Quanon
-
Posts
482 -
Joined
-
Last visited
-
Days Won
32
Content Type
Profiles
Forums
Blogs
Forum & Tracker Requests
Downloads
Gallery
Store
Events
Everything posted by Quanon
-
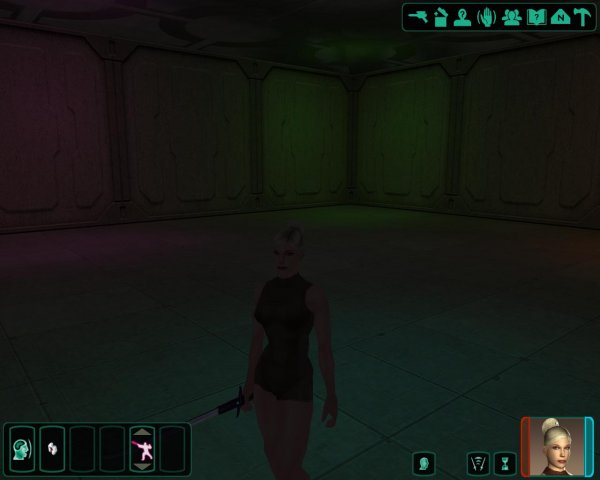
Kept working on Bastila some more. Minor tweaks to the face. Main focus was getting the hair to look good this time. Spend more time to make sure the hair flows a bit a better. The test before the direction of the hair didn't work good on the model. Also spend time to get the hair color ok looking. I'll release a pack. So far I've got a good 'dark' brown. 'Light' ( stronger contrast) brown and a blonde Bastila. Which looks really weird; but that's just because I'm used to seeing her as a brunette Preview of 'light' brown and blondy (which just needs better fitting make up):
-
Thanks for that! I'll try it out Bastila is now in full redux status. I redid most of the skin. It needs some fixes around the mouth. Things get more stretched then I thought. It looks a bit funny now I haven't changed the hue/ color of the skin it self. It's how the photo model looked like, rendered in Kotor engine. So it's a bit more tanned then I think Bastila would be. I only applied a soft layer of the old Bastila skin on top. I'll play around a bit more. Then get back to do the hair. It's moving along a lot quicker, since I've already did this once before. Less searching on how or what I should do. Tried your GLOverride, SuperSzym, but it didn't help. I keep having the same issue, bit of a shame. But; it doesn't bother me to much. Kept tweaking Bastila. Getting closer to what I want. If I can, I'll release a multi color hair pack. Should be fun, if anyone wanted to play with a blond or redhead Bastila
-
Yes, that's because of the alpha channel. My PC doesn't handle the graphics correctly. I have the same issue with the grass on Dantooine. It clips through the models. It should just be transparent and work OK on other PCs. Plus I can easly provide a skin without the alpha channel.
-
After seeing Dark Hope's excellent update on my Canderous skin; I felt that I just did a very sub-par job on the hair. Dark Hope also has a nice looking contrast on the skin of the characters; while my versions have a softer look to that part. I must admit that the higher contrast does 'pop' better in the game. I always get fooled by the looks of things in Photoshop. And I haven't really nailed down how to get a same effect in Photoshop. Ahum, but the skin thing is besides the point... I'm now experimenting on getting better looking hair on the characters. First test was done on Bastila and I like it so far. Coloring might be worked on; contrast thingies; but it looks better.
-
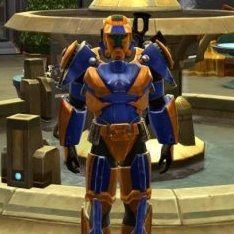
File Name: Quanons Mission Color Pack File Submitter: Quanon File Submitted: 26 Jun 2017 File Category: Skins K1R Compatible: Yes Quanons Mission Color Pack Hello, everyone, Here follows a small mod, well more a variation on a mod I did earlier. A reskin for Mission Vao. Though this time I altered her skin color. You can pick any of 5 I made. Red, Green, Yellow, Purple and White/ Cream. Have a look at the screenshots and the row of portrait shots. Those will show you just how colorful I made it. As before, nothing changed much to her vanilla look, besides the color. To install, copy all the TGA files, each color has it's own folder, to your Override. That's it! The mod is installed. Enjoy! Click here to download this file
-

Version 1.0
453 downloads
Quanons Mission Color Pack Hello, everyone, Here follows a small mod, well more a variation on a mod I did earlier. A reskin for Mission Vao. Though this time I altered her skin color. You can pick any of 5 I made. Red, Green, Yellow, Purple and White/ Cream. Have a look at the screenshots and the row of portrait shots. Those will show you just how colorful I made it. As before, nothing changed much to her vanilla look, besides the color. To install, copy all the TGA files, each color has it's own folder, to your Override. That's it! The mod is installed. Enjoy! -
Lightmap blues...
-
No worries, I will release them. I just want to do a few extra colors Meanwhile, I've been testing KotorMax and MDLedit. An updated version of NWmax and MDLops, which was the tool I used for about everything 3D related. I now have used the tool for a first serious attempt at getting a new area in the game. The experience has been great. Things work pretty good from the go. I only had to correct a few bothersome meshes; still have a few left. Looks like the rescaling I did on some of my machines got lost on the exporting or compiling. Walk-mesh creating has been a blast as well. I don't think I ever got a good result from the very first test. Camera gets blocked of as well; which used to be an annoying affair to get corrected. Often meaning things got broken beyond repair sometimes. I do still have some issues, with my Light maps. It looks like UVs got destroyed. I might have done to many 3D meshes in one go for the tools to handle. So I cheated a bit. I just turned all of my light maps in a neutral grey. Which at least made my area visible for inspection. This is an updated model for my Scrapyard mod. It's the landing bay. So far only the Ebon Hawk and Barracuda, use their proper Light maps; all the other stuff has the "cheating" lightmap applied MIND, this is sort of an alpha or beta build. I'm very aware of the faults!
-
 A hairy old man!
 -
More chest hair!
-
Jolee Reskin is out the door! At last!
-
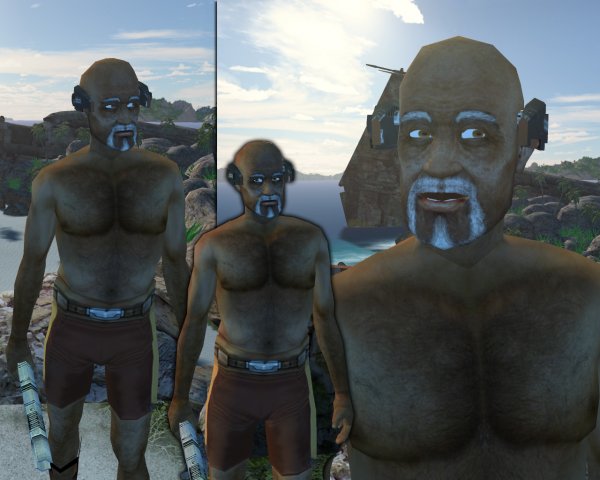
Quanons Jolee Reskin View File Quanons Jolee Reskin. It has taken me some time to get the last of my reskins out of the door. But it's here! Jolee, the old Jedi hermit, crazy wisecracking cook, had been done for some time. So have a peek at the screenshots, as I've given him the same treatment as my other reskins. A nice size boost; which allowed me to put in a more texture to his skin and clothes. I've kept his classic vanilla look, so no changes to his design. Just more crisp and sharp looking details all over. Jolee comes with 3 differant icons. I've put those in a folder. When installing just rename the icon properly. You only need to remove the '02' or '03' suffix. For the other files, just copy them to the Override and done! By demand a more hairy chest version has been added! Submitter Quanon Submitted 06/24/2017 Category Skins K1R Compatible
-

Version 1.1
2,521 downloads
Quanons Jolee Reskin. It has taken me some time to get the last of my reskins out of the door. But it's here! Jolee, the old Jedi hermit, crazy wisecracking cook, had been done for some time. So have a peek at the screenshots, as I've given him the same treatment as my other reskins. A nice size boost; which allowed me to put in a more texture to his skin and clothes. I've kept his classic vanilla look, so no changes to his design. Just more crisp and sharp looking details all over. Jolee comes with 3 differant icons. I've put those in a folder. When installing just rename the icon properly. You only need to remove the '02' or '03' suffix. For the other files, just copy them to the Override and done! By demand a more hairy chest version has been added! -
Back @ home. Looks like it's hot just across Europe

-
Its hot!
-
Hello, folks, just to let you all know that tomorrow I leave for about 12days to Spain. Vacation time for the Q! This also means I won't be able to anything moddingwise. I'll have a peek at the forums now and then

-
So if folks are wondering on how I do this portrait rendering, here follows a quick and dirty run down: The place to start is a tutorial I made some time back, as part of a lightmap tutorial. This part deals about setting up the render engine and lighting: http://www.mediafire.com/file/kw7btvf80epzcyp/Lights%26Render.pdf I'll now list a few extra tweaks I found that improved the look of the portraits, since the above mentioned tutorial deals more with lighting an area instead of a character. A first note/change: When reading the tutorial, pause at the step where you switch 'on" Global Illumination (Step 2 on the screenshot) ;-) There is a small box called Multiplier, it has a value of 1,0. You can enter 5,0 in there. Below that is Maximum Photons per sample; this is set to 500. Jack it up to 40.000. Keep following the instructions about how to setup the lights and other bits. Nothing changes there. Next use MDLops to compile your model to ASCII. Use NWmax to import. To setup a good shot of the character: 1. First, make a big box that surrounds the model. 2. Turn the box into an Editable Poly (for example, the right-click menu has "Convert To..."->"Editable Poly"). 3. Chamfer the ceiling and floor edges in the back. 4. Delete the front and sides of the box. 5. Change the selection to "Select by Element" and click on the box. 6. Then use the Flip button. Now all of the faces face inwards. 7. With all the faces still selected, scroll down to smoothing options. Click on autosmooth. Deselect the faces. Now you can open the Material editor (M-key). Change any slot from the Standard material to Arch&Design. In the options of this material, there is a drop down list. Pick 'Pearl Finish'. Apply this material to the chamfer 'box' background. Add in some lights (3 to 4 lights works best). 3 to 4 spotlights work best; only one of them casts shadows. Depending on the model, Shadowmap ( soft-edged shadows) or RayTraced Shadows ( hard crisp edges) work best for your render. Example screenshots for the spotlights: This is how my scene looks like: View of the material thingy I talked about: Getting the shot: 1. Select any viewport, just click on it. 2. Hit the P-key to change it to an Perspective 3D view. Move around the view until you get the view/shot/look of the character you want. 3. Hit Ctrl+C to create a camera, followed by Shift+F. This will set the Safe Frame. The view port now has the same size and dimensions as what your rendered image will be. If that is set at 800x600, the view will now look like that. If it is set at 1024x1024, the viewport will now be square. You can further tweak the camera, even move it around in the other viewports. You'll see the changes in the 3D viewport instantly. To get the same camera setup I used (to get a look that closely resembles the game portraits), set the camera like this: Lens: 43 - 44 ( a value in between) FOV: 45.00 These are the only options you will need to tweak a little sometimes. It depends on the pose and look of the character. Notice that in the example screenshots of my scenes, the camera is really close to the character. Example screenshots: Remember, just like the meshes, you can move the camera object and it's target with the move and rotate tool. Like this you can really capture the perfect shot. For the skins of the character I just use the Standard material (all of the character textures will be in at least one slot in the Material Editor, though a different one than the one we used earlier). I drop the skin into the Diffuse slot, as well as the Spec Color, Spec level, Glossiness, and Bump slots. Then I can play around with the specular values and the glossiness. For human skin I mostly go for Spec 55 and Gloss 35. For the Bump slot, I scale back to 15 or 5. After all of this, you can render a shot using the Render menu. Notes: You can play around with the values, it just depends on what you want. Just experiment, do lots of little test renders. Best at 512x512 for example. Quick to do and you get a good idea on how the end result looks like.
-

Blog #54 - Possible Expansion to K1 Portrait Pack?
Quanon commented on Sith Holocron's blog entry in Sith Holocron's Blog
So if folks are wondering on how I do this portrait rendering, here follows a quick and dirty run down: Place to start, is a tutorial I made some time back, it was part of a lightmap tutorial. But this part deals about setting up the render engine and lighting: http://www.mediafire.com/file/kw7btvf80epzcyp/Lights%26Render.pdf I'll now list a few extra tweaks, I found that improved the look of the portraits. Since the above mentioned tutorial deals more with lighting an area instead of a character. A first note/ change, when reading the tutorial, the step where you switch 'on" Global Illumination. Step 2 on the screenshot ;-) There is a small box called Multiplier, it has a value of 1,0. You can enter 5,0 in there. Below that is Maximum Photons per sample; this is set to 500. Jack it up to 40.000. Keep following the instructions about how to setup the lights and other bits. Nothing changes there. Next use MDLops to compile your model to ASCII. Use NWmax to import. Now to get a good shot of the character, first, make a big box that surrounds the model. Turn the box into a Edit Poly. Then Chamfer the back ceiling and floor edges. Then delete front and sides. Select by Element, click on the box. Then use the Flip button. So that all faces, now, face inwards. With all the faces still select, scroll down to smooting options. Click on autosmooth. Deselect the faces. Open the Material editor ( M-key). Change any slot, from the Standard material to Arch&Design. In the options of this material, there is a drop down list. Pick 'Pearl Finish'. Apply this material to the chamfer 'box' background. Add in some lights. Three to 4 lights works best. This is how my scene looks like: View of the material thingy I talked about: Select any viewport, just click on it. Hit P-key to change it to an Perspective 3D view. Move around the view. Untill you get the shot of the character you want. Then hit Ctrl+C to create a camera. Next hit Shift+F. This will set the Safe Frame. The view port now has the same size and dimensions as what your rendered image will be. If that is set at 800x600pix, the view will now look like that. If it is set at 1024x1024 the viewport will now be square. You can further tweak the camera, even move it around in the other viewports. You'll see the changes in the 3D viewport instantly. For the skins of the character I just use the Standard material. I drop the skin into the Diffuse slot. But also into the Spec Color, Spec level; Glosiness and Bump slots. I then play around with the specular values and the glosiness. For human skin I mostly go for Spec 55 and gloss 35. Bump I scale back to 15 or 5. You can play around with the values, it just depends on what you want. Just experiment, do lots of little test renders. Best @ 512x512 for example. Quick to do and you get a good idea on how the end result looks like. This is just a very quick run down of things. I might create a more noob friendly tutorial later on. -
So, I finally have something to show for this mod. Besides my areas I made years ago. I planned on creating some extra placeables to decorate and pimp older modules and the new ones. Though, it took me some time to get it all going. Thanks to Bead-V for checking my work, as I wouldn't be able to show this tiny victory! A new display, it smaller then I thought, but it's animated. I'm messing about with Genetica 4.0. It helps me to create animated things. Though it's node based, so I need further dig myself in. I'm very visual, so I really like doing things in Photoshop. But I guess combining these two might give me really nice results. The shot below is just a place holder texture. It was a very experiment in Genetica. Had some more texturing fun. I have now a wobbly dancing Juma Juice
-
 Doing some tests again; a freshly new little box area with lightmap. First time ever I didn't have to go and mess with the UVs again to get them fixed Fun times!
 -
Looks like getting new placeables into the game is harder then I thought?
- Show previous comments 2 more
-
I just have this very simple "plane" model, which acts as a screen.
I've edited the .Git file and 2DA file. Made an UTP file + model.
Once the area 301NAR, the landingpad area, loads, it either crashes or it loads but my placeable is nowhere to be found.
I've used Fairstrides Tool, to get some good coords for my placeable, it should be visible but it's not.
And I've no idea about the crashes... It's pretty randome, depending from whi...
-

-
-
Well, for my own reskins I made for the K1 party: I only used the old game texture for the color. (Just gave it a minor blurr; mostly use a black/ white copy to boost shadows and highlights, with a layer set on Overlay or Soft Light. Tweak Opacity or adjust it via Adjustment layers. Working none-destructive ;-) ) And as a guide for the layout or where certain folds; belt buckles.. etc, details are. I then used various other photos of "textures" from fabrics, like burlap, cotton, leather...etc and a few Photoshop filters combinations, plus playing around with layer options, to get some effects. Then endlessly tweaking contrasts/ brightness... vibrance... or Levels to get a result YOU like. For the human skin, well, the internet is full of bare human skin, I don't think I need to point out where to look The thing you need to look for when you are searching for your materials is the size of the pictures. Preferable 2000pix and up. Like that you can just use a part of the texture or re-scale it to your own liking. The bigger it is the more you can play around with it. A good scource: https://www.textures.com/ Free to use, no need to pay, but you can only download about 15 textures a day and not always the premium quality. But they have a huge selection some really great stuff to be found. Sadly Mayang textures is gone; was another good site. Still just using google sometimes gives you what you need. But as DP pointed out, the UVs for most models have really bad parts; so these can be really annoying as they can wreck details.
-
Taking a minor break from the portrait rendering today. As I didn't have much time to do some modding; I decided to do some color tests for Mission. As I mentioned those when I started this whole reskin the party business Just a very basic test for how strong the color should be for her skin. Eyes and eyebrows need extra work, plus each color might need some tweaks on contrast/ highlights. Clothing will remain the same for now. So far I've got a green, red and white/ ivory version in the cooker. Mind this is just for pure fun. I've got lots of things in the running, this is just something for whenever I feel like it


 I'll see to it, that he gets a proper update on that department