DarthParametric
-
Posts
4,886 -
Joined
-
Last visited
-
Days Won
556
Content Type
Profiles
Forums
Blogs
Forum & Tracker Requests
Downloads
Gallery
Store
Events
Everything posted by DarthParametric
-
K1 Endgame Cutscene Improvements
DarthParametric replied to DarthParametric's topic in Work In Progress
The positioning needs to be adjusted to better fit the camera angles, and the sprites at the back are probably a bit too dense, but this arrangement seems to give a pretty acceptable level of performance. Dropped maybe ~10fps in the final shot, which is consistently the worst performing section. I used lite models for the Sith officers. I could possibly play around more with that, see if I can bulk out the numbers whilst camouflaging the low poly stuff as much as possible. It's also lacking any sort of Sith/Dark Jedi, so some of those need to be sprinkled in. -
Dodonna in action. Seems like she has some claw hands going on though, might need to play around with that (or even just try and swap out the gloves for a native KOTOR mesh - damn fingers are hell).
-
K1 Endgame Cutscene Improvements
DarthParametric replied to DarthParametric's topic in Work In Progress
It seems like it runs pretty terribly even in its vanilla state though, as I said above. I wonder what it is about it. It shouldn't be too taxing, theoretically. Most of the level geometry is a single room model running about 40K polys, but there's nothing particularly outrageous. The heaviest individual meshes are the Rakata statue parts, weighing in around 800 polys each. Edit: So I did a test to see what happens in the best case scenario. Editing the room model with all the references that spawn in the stunt models and deleting them all, I still get a 5fps drop in the final shot as it pans over the now non-existent crowd. Swapping out about half of the sprites for static meshes with shadows disabled gave around a 25-30fps drop. I think you could probably cull a bunch of those anyway. There's something like 140 sprites, but you can't even see a good chunk of them because of the camera angles. Sprites would be fine up the back where you can't really tell the difference anyway. Then closer to the front could be a thinner crowd of actual meshes. The droids could probably be thinned out by 50%. They are packed in pretty tight. -
Testing out the Dodonna model sidetracked me to a new tangent - fixing those god-awful stunt models in the endgame cutscenes. First up is the Dark Side version, replacing the droids: Interestingly, my framerate in this scene is pretty terrible even in the vanilla version. I have a GTX 1080Ti so I'm not exactly hurting for raw GPU horsepower, but it drops to sub-40 fps in certain places. The replacement version of the droids can see it dip below 30 with shadows enabled (it's about 5fps better with their shadows disabled). Next up is the cardboard cutout people. Bioware didn't use a flipbook (animated texture) for those. Instead they have a bunch of planes with static textures in slightly different poses, and they animate the alpha values of the meshes to blend between them. It seems an odd choice, but perhaps that was a more efficient use of memory or GPU for the Xbox. The DS versions are particularly terrible, as they just sort of wobble side-to-side. At least in the LS version they are clapping, which looks a lot better.
-
Help with issue with (re)Texture
DarthParametric replied to Salk's topic in General Kotor/TSL Modding
Yeah I think you need to fix your alpha mask. Edit: I'm not sure if this will be an improvement or not Alternative2_LDA_leaf02.7z -
Help with issue with (re)Texture
DarthParametric replied to Salk's topic in General Kotor/TSL Modding
Try this and see if it is an improvement: Alternative_LDA_leaf02.7z Although at least part of your problem is that your alpha mask isn't solid. It has grey values, so you are going to have semi-transparent edges, probably not a great idea for leaves. -
Help with issue with (re)Texture
DarthParametric replied to Salk's topic in General Kotor/TSL Modding
That screenshot is too tiny to make anything out (at least for an old blind man like me). You'd be better served posting the actual texture. -
[REQUEST] K1 Light Side save for award ceremony
DarthParametric replied to DarthParametric's topic in Game Saves
OK yeah that works, cheers. -
[REQUEST] K1 Light Side save for award ceremony
DarthParametric replied to DarthParametric's topic in Game Saves
Ah, yeah. When does that happen? After the Malak fight? Edit: Just checked, there is indeed the Dodonna/Vandar death sequence straight after you defeat Malak. Thanks for the reminder. Although regardless, I still want the LS ceremony sequence so I can check the animations work ok. -
I need a save to test out an Admiral Dodonna model edit. My recollection is that you only see her regular appearance in the award sequence at the end of the game for LS characters, so a save right before this would be appreciated. I have DS saves to test the hologram appearance (which is a separate model) during the pre-Star Forge sequence.
-
Making assumptions based on filenames is often going to lead you down the wrong path. For example, the gardens in the Residential 082 East/West modules (203TEL/204TEL) use DAN_Grss for the ground texture. Extracting the level models is the only practical way to know for sure what textures are being used. That said, TEL_fl02 does appear to be used in the TSF room in Entertainment Module 081 (202TEL), so if an edited copy in the Override is not showing up then something else is going on.
-
List the specific file names of the textures you are editing and the module you are trying to change them in.
-
Help with issue with (re)Texture
DarthParametric replied to Salk's topic in General Kotor/TSL Modding
What's your TXI semantic? I imagine the original would have used blending punchthrough Edit: Looking at the original TPC it appears not. No TXI data at all. Also, make sure your diffuse background extends beyond the borders of your alpha mask, in order to prevent bleed causing the outline you describe. -
As I said above: Like the full-on Clone Trooper stuff? While I like the look of some of it, it has never really struck me as lore-appropriate for the period. Edit: I've converted the female version, at least for TSL: You can see the occlusion conundrum in the last two videoes. In the current hierarchy configuration, the arms properly occlude the legs when crossed in front of the body. Yet as a result they are also visible through the legs when behind the body. If you change the hierarchy to fix the second animation, then the legs are visible through the arms in the first animation.
-
A tip for anyone using Max and exporting a lot of models via KOTORMax and starting to experience slowdown in the process. Open a Listener window (F11) and type/paste in:
gc()
This is the inbuilt "garbage collection". It's supposed to run automatically, but I think it is probably broken on modern systems with oodles of RAM. Note that this will flush the undo buffer, so probably don't do it while in the middle of editing a file.
-
I think I have most of the hologram issues sorted out now, at least within the limits of what is practical with the engine: I've also added a ceremonial sash, similar to what is painted on the original K1 Saul uniform, but this one is an actual 3D mesh (swiped from the TOR Imperial Officer model): I'll do a female version for Admiral Dodonna in K1, although her hologram version might be a pain. K1 did holograms differently to TSL. I was thinking I can also do a plain version with no shoulder bars and changed up rank insignia for the captain, nav officer, etc. Edit: Added the Cede and captain versions: Although I've since gone back and also removed that black block on the collar. Still haven't swapped the boots yet though. Now on to converting the female model.
-
Trying out a new Republic officer uniform: Although of course that introduces a bunch of new problems with holograms: I'll have to lop off the arms at the shoulders and have them as separate meshes. Not sure what to do about the neckline. Either the neck shows through the collar, or the collar shows through the neck, depending on hierarchy order. I'm also not a fan of the boots. I think I'll swap them out for something more suitable.
-
Freedon Nadd's Tomb Statue WIP
DarthParametric replied to VarsityPuppet's topic in General Kotor/TSL Modding
No need now. I was thinking about possible ways to get at the texture, but @ndix UR swooped in with those magic tools. That shouldn't be tricky from a mechanical perspective. It's a pretty simple animation. If you are planning to make something from scratch you could always just model it around something existing so you can swipe its animations. -
There'd be no point using an Edit Normals modifier currently. KOTORMax makes no use of Max's normal data. It only takes the smoothing groups.
-
Freedon Nadd's Tomb Statue WIP
DarthParametric replied to VarsityPuppet's topic in General Kotor/TSL Modding
Do you have a save in that room you can share? -
Freedon Nadd's Tomb Statue WIP
DarthParametric replied to VarsityPuppet's topic in General Kotor/TSL Modding
Here you go: fx_ritual01.7z -
Freedon Nadd's Tomb Statue WIP
DarthParametric replied to VarsityPuppet's topic in General Kotor/TSL Modding
What's the source? I can see "sith_ritual" which uses the "SithRitualEffect" placeable. It uses Fx_Lightning and fx_Smoke. Interestingly, fx_Smoke is a flipbook but has no TXI data. FX_Lightning_and_Smoke_Textures.7z -
Using an Edit Normals modifier at the top of the stack will let you unify normals along seams without affecting the skin. As I have discussed with bead-v before, this was the behaviour of the Dragon Age Origins Max I/O script.
-
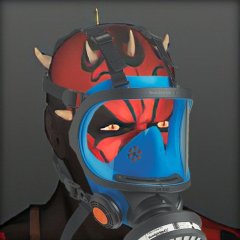
Yeah the plan was to replace the vanilla mask. Like the Eradicator mask I'll have to make a new backface for it, as in TOR it's always used with the full head covering. Don't get your hopes up. Anything with capes or other flappy bits is probably too much trouble to deal with. I think they are meant to be, yeah. In TOR it is called "Restored Triumvirate" armour. But it's more like a K1 Sith Trooper body with a TSL Commando-style helmet. I was thinking of doing a variant using the vanilla K1 helmet. Could probably do one with the vanilla TSL helmet as well. From here:
-
I figured I'd post some pics as I mess around with various TOR stuff, figuring out what works and what doesn't. I posted these in a status update the other day: And here's the latest experiment: But those bloody envmaps, ugh. So terrible. They ruin everything. Edit: Although @Darth_Sapiens' CM_baremetal replacement is a lot nicer: Edit 2: Sapien's CM_SpecMap is arguably better again. Shiny, but not an overpowering mirrored chrome: