DarthParametric
-
Posts
4,885 -
Joined
-
Last visited
-
Days Won
556
Content Type
Profiles
Forums
Blogs
Forum & Tracker Requests
Downloads
Gallery
Store
Events
Everything posted by DarthParametric
-
What mod was that? I don't recall ever hearing about black, but I know in the Aspyr version of TSL there's a shader bug that causes sabers to turn grey. This one has Luke's hero, V2, and shared stunt sabers. I doubt you are ever going to get a more comprehensive collection.
-
Freedon Nadd's Tomb Statue WIP
DarthParametric replied to VarsityPuppet's topic in General Kotor/TSL Modding
I see he has the requisite pole dancers, as any good Sith lord should. Your envmap turned out pretty good, judging by that shot. Although seeing it with camera movement is always the real test. What did you use? -
OK @Kainzorus Prime, here are the fruits of my latest labour: It actually turned out a lot better than I was expecting. There are probably a few areas that could use some weight tweaks, but otherwise it worked pretty well straight out of the box. I just need to tweak the neck area of the body texture to try and get a better blend at the join.
-
legends [Finished] [K1] Selven "Legends"
DarthParametric replied to ebmar's topic in Work In Progress
Congrats on the release. Now go actually play - and finish - the game.- 77 replies
-
- 2
-

-

-
- work in progress
- 2.0
- (and 3 more)
-
Released:
- 29 replies
-
- 1
-

-
- mod request
- swtor
- (and 1 more)
-
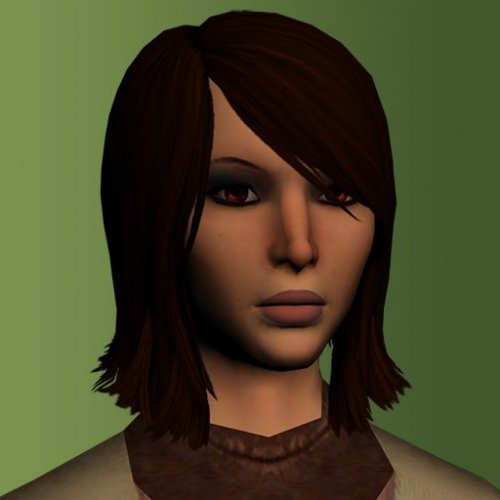
View File TOR Ports: Jaesa Willsaam Female Player Head for K1 This mod adds the head model of Sith Warrior companion Jaesa Willsaam from The Old Republic MMO as a selectable player head for female characters. N.B. Some screenshots feature @ndix UR's KOTOR High Resolution Menus A few notes: While aligned as closely as possible, the neckline probably won't match perfectly. Expect some visible gaps on body models that don't hide the join. The TOR head models use separate textures for the face, eyes, and hair. In order to allow for DS transitions, these had to be merged together (and the UVs adjusted to match). The eyes are the big loser in this. They went from having their own dedicated 256x256 texture to being shrunk down to a corner where they could be squeezed in. An additional consequence of the texture merge is no normal maps, due to the hair requiring alpha masking. TOR heavily relies on tint mapping textures for variation - skin tone, hair colour, eye colour, etc. Unfortunately, while the tint colours are available in the material files, the specifics of their shaders are currently unknown to me, so the best I can do is experiment with various blend modes to approximate the look. It may require some further experimentation and kludging. Not even having specularity, much less the advanced (by comparison) graphical features of TOR, expect textures to look pretty flat by comparison to the originals. KOTOR has a maximum bone limit per mesh of 16. This creates a problem for TOR meshes, as adding the eyelids to the face bone array pushes that to 18. I had to drop 2 bones to make it work. I chose the two nose corner bones, as they seemed the least important. I don't know what effect this may have on various facial animations though. The hair mesh is currently using skin weights and is fairly rigid. Possibly I may add a danglymesh version in a future update. The underside of the hair at the back of the neck is fairly bare. I may add some additional hair elements in a future update. Dark Side transitions are included, but they are relatively mild. I'm not a big fan of the zombie look. Acknowledgements: Original models and textures ported from The Old Republic MMO Thanks to @bead-v for KOTORMax and MDLEdit Thanks to @ndix UR for TGA2TPC Thanks to zaramot on the Xentax forums for the TOR GR2 Max import script Submitter DarthParametric Submitted 07/09/2018 Category Mods K1R Compatible Yes
-
- 1
-
-
Revan and Meetra heads ported from SWTOR
DarthParametric replied to Canderis's topic in Mod Requests
Added my own touchups: Could still use a little bit of touchup around the beard. Oh, and the UV map. Revan_Head_d_v3.7z TOR_Revan_Head_UV_Map.7z -
Revan and Meetra heads ported from SWTOR
DarthParametric replied to Canderis's topic in Mod Requests
-
Revan and Meetra heads ported from SWTOR
DarthParametric replied to Canderis's topic in Mod Requests
It's a good start, but it still needs work IMO: I might get around to it playing with it at some point, but it's low on the priority list. -
Revan and Meetra heads ported from SWTOR
DarthParametric replied to Canderis's topic in Mod Requests
A non-scarred/wounded version, yes. -
Version 1.0.0
3,808 downloads
This mod adds the head model of Sith Warrior companion Jaesa Willsaam from The Old Republic MMO as a selectable player head for female characters. N.B. Some screenshots feature @ndix UR's KOTOR High Resolution Menus A few notes: While aligned as closely as possible, the neckline probably won't match perfectly. Expect some visible gaps on body models that don't hide the join. The TOR head models use separate textures for the face, eyes, and hair. In order to allow for DS transitions, these had to be merged together (and the UVs adjusted to match). The eyes are the big loser in this. They went from having their own dedicated 256x256 texture to being shrunk down to a corner where they could be squeezed in. An additional consequence of the texture merge is no normal maps, due to the hair requiring alpha masking. TOR heavily relies on tint mapping textures for variation - skin tone, hair colour, eye colour, etc. Unfortunately, while the tint colours are available in the material files, the specifics of their shaders are currently unknown to me, so the best I can do is experiment with various blend modes to approximate the look. It may require some further experimentation and kludging. Not even having specularity, much less the advanced (by comparison) graphical features of TOR, expect textures to look pretty flat by comparison to the originals. KOTOR has a maximum bone limit per mesh of 16. This creates a problem for TOR meshes, as adding the eyelids to the face bone array pushes that to 18. I had to drop 2 bones to make it work. I chose the two nose corner bones, as they seemed the least important. I don't know what effect this may have on various facial animations though. The hair mesh is currently using skin weights and is fairly rigid. Possibly I may add a danglymesh version in a future update. The underside of the hair at the back of the neck is fairly bare. I may add some additional hair elements in a future update. Dark Side transitions are included, but they are relatively mild. I'm not a big fan of the zombie look. Acknowledgements: Original models and textures ported from The Old Republic MMO Thanks to @bead-v for KOTORMax and MDLEdit Thanks to @ndix UR for TGA2TPC Thanks to zaramot on the Xentax forums for the TOR GR2 Max import script -
Revan and Meetra heads ported from SWTOR
DarthParametric replied to Canderis's topic in Mod Requests
No, not at the moment. There's no point without a suitable texture. -
Revan and Meetra heads ported from SWTOR
DarthParametric replied to Canderis's topic in Mod Requests
Unless you have a head matching the UV layout, no. -
Revan and Meetra heads ported from SWTOR
DarthParametric replied to Canderis's topic in Mod Requests
The left cheek has mirrored UVs in order to maximise pixel density, which is why that corner is cut off. head_human_caucasian_revan_m_d.7z -
Revan and Meetra heads ported from SWTOR
DarthParametric replied to Canderis's topic in Mod Requests
If you are volunteering to hand paint out the scars/wounds from the texture, then sure. -
View File TOR Ports: Jaesa Willsaam Female Player Head for TSL This mod adds the head model of Sith Warrior companion Jaesa Willsaam from The Old Republic MMO as a selectable player head for female characters. A few notes: While aligned as closely as possible, the neckline probably won't match perfectly. Expect some visible gaps on body models that don't hide the join. The TOR head models use separate textures for the face, eyes, and hair. In order to allow for DS transitions, these had to be merged together (and the UVs adjusted to match). The eyes are the big loser in this. They went from having their own dedicated 256x256 texture to being shrunk down to a corner where they could be squeezed in. An additional consequence of the texture merge is no normal maps, due to the hair requiring alpha masking. TOR heavily relies on tint mapping textures for variation - skin tone, hair colour, eye colour, etc. Unfortunately, while the tint colours are available in the material files, the specifics of their shaders are currently unknown to me, so the best I can do is experiment with various blend modes to approximate the look. It may require some further experimentation and kludging. Not even having specularity, much less the advanced (by comparison) graphical features of TOR, expect textures to look pretty flat by comparison to the originals. KOTOR has a maximum bone limit per mesh of 16. This creates a problem for TOR meshes, as adding the eyelids to the face bone array pushes that to 18. I had to drop 2 bones to make it work. I chose the two nose corner bones, as they seemed the least important. I don't know what effect this may have on various facial animations though. The hair mesh is currently using skin weights and is fairly rigid. Possibly I may add a danglymesh version in a future update. The underside of the hair at the back of the neck is fairly bare. I may add some additional hair elements in a future update. Dark Side transitions are included, but they are relatively mild. I'm not a big fan of the zombie look. Installation: If you are using TSLRCM or the hybrid TSLRCM + M4-78 from the Steam Workshop, make sure to choose its Workshop folder as the installation location, not the main game folder. Acknowledgements: Original models and textures ported from The Old Republic MMO Thanks to @bead-v for KOTORMax and MDLEdit Thanks to @ndix UR for TGA2TPC Thanks to zaramot on the Xentax forums for the TOR GR2 Max import script Submitter DarthParametric Submitted 07/09/2018 Category Mods TSLRCM Compatible Yes
-
OK, fixed. Redownload from the link posted above. Weirdly I got some odd bug with the danglymesh hair looking like the diffuse/ambient wasn't set at 1.0, even though they were. Had to go back and decompile the earlier version.
-

Version 1.0.0
3,274 downloads
This mod adds the head model of Sith Warrior companion Jaesa Willsaam from The Old Republic MMO as a selectable player head for female characters. A few notes: While aligned as closely as possible, the neckline probably won't match perfectly. Expect some visible gaps on body models that don't hide the join. The TOR head models use separate textures for the face, eyes, and hair. In order to allow for DS transitions, these had to be merged together (and the UVs adjusted to match). The eyes are the big loser in this. They went from having their own dedicated 256x256 texture to being shrunk down to a corner where they could be squeezed in. An additional consequence of the texture merge is no normal maps, due to the hair requiring alpha masking. TOR heavily relies on tint mapping textures for variation - skin tone, hair colour, eye colour, etc. Unfortunately, while the tint colours are available in the material files, the specifics of their shaders are currently unknown to me, so the best I can do is experiment with various blend modes to approximate the look. It may require some further experimentation and kludging. Not even having specularity, much less the advanced (by comparison) graphical features of TOR, expect textures to look pretty flat by comparison to the originals. KOTOR has a maximum bone limit per mesh of 16. This creates a problem for TOR meshes, as adding the eyelids to the face bone array pushes that to 18. I had to drop 2 bones to make it work. I chose the two nose corner bones, as they seemed the least important. I don't know what effect this may have on various facial animations though. The hair mesh is currently using skin weights and is fairly rigid. Possibly I may add a danglymesh version in a future update. The underside of the hair at the back of the neck is fairly bare. I may add some additional hair elements in a future update. Dark Side transitions are included, but they are relatively mild. I'm not a big fan of the zombie look. Installation: If you are using TSLRCM or the hybrid TSLRCM + M4-78 from the Steam Workshop, make sure to choose its Workshop folder as the installation location, not the main game folder. Acknowledgements: Original models and textures ported from The Old Republic MMO Thanks to @bead-v for KOTORMax and MDLEdit Thanks to @ndix UR for TGA2TPC Thanks to zaramot on the Xentax forums for the TOR GR2 Max import script -
Ah, I never would have thought of that. I split the lips out as a separate smoothing group, but the mouthbox was presumably still sharing the same group as the rest of the face. I'll compile a fixed version of the model and test it out.
-
I'll play around with it, but it probably requires input from @bead-v and @ndix UR on what might be done.
-
I've tried recompiling it with both MDLEdit and MDLOps, but I'm getting some shading issues at the mouth corners not present in the original model. I've tried it with the original smoothing groups and creating new ones but the issue persists. The other thing I realised is that it's still not drag and drop for 3rd party texture mods anyway, due to the differences between portrait names and DS transitions in K1. You'll need to remove the leading 0 from the portrait filenames, and adjust both DS transition and portrait names to account for K1's DS transitions going D1, D2, D3, D. You can test out this version while I try and resolve the model issues - https://www.darthparametric.com/files/kotor/k1/[K1]_TSLs_PFHC05_Ported_To_K1.7z
-
I was talking purely about using 3rd party reskins. The head model needs to be recompiled for K1. You need to decide whether you want it to replace K1's PFHC05 or have a new designation.
-
Trying out something new:

Still need to fill in the back after I chopped off all the head and neck parts of the original, plus add a shadowcaster mesh and fiddle with envmaps (ugh).
-
TOR Ports: Kira Carsen Female Player Head for K1
DarthParametric commented on DarthParametric's file in Mods

-
The textures from that other mod would be compatible in layout, but would not be a case of simply dropping in the Override folder - at least assuming you wanted to leave the existing K1 heads intact. K1 already has a PFHC05, so unless you plan to replace that, you'd have to rename the TSL PFHC05 into something else, then rename the textures accordingly. Of course if you just want to outright replace K1's PFHC05 then that makes things simpler. Any TSL PFHC05 texture mod would be a straight drop-in override just like they would be in TSL.