

Modding Tools
59 files
-
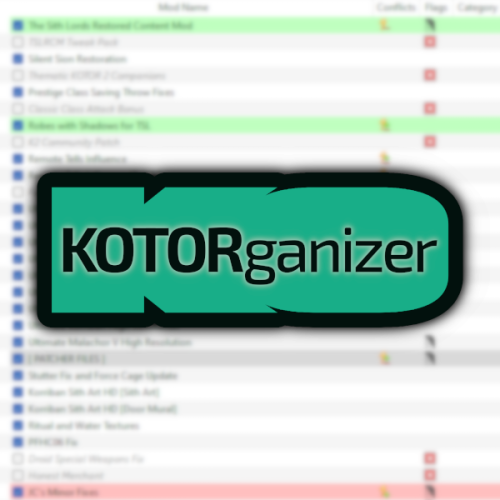
KOTORganizer MO2 Plugin
By J
## Quick Setup 1. Download the Latest Archive version of **Mod Organizer 2 Beta 2.5.3** from the MO2 Discord and extract it somewhere with plenty of free space. 2. Download the **KOTORganizer plugin** and extract it into your MO2 folder. 3. Launch MO2 and complete the first-time setup: * Choose **KOTOR** or **KOTOR 2** as the game. * Choose **portable instance**. * Login to your nexus account, in the settings. 4. Open the **Sync** tab on the right side of MO2. 5. Click **Refresh** to pull the latest mod build instructions. 6. Click **Download All** and wait for the downloads to finish. * Some downloads will open in your browser and require you to click the download button manually. 7. Once all downloads are finished, click **Refresh** again to validate the files. * If any files are missing or mismatched, download them again. 8. When all files are validated, click **Sync** to install the mod list. * This may take some time. * The process is complete when the patcher window shows the final error and warning count. 9. Click **Run** to start the game. NOTE: The following are not included and will need to be patched/installed manually: - Widescreen Patches for KOTOR - 4GB patches for both games - 3C-FD Patcher for KOTOR2 - Upscaled Movies for KOTOR and KOTOR2 KOTORganizer MO2 Plugin
KOTORganizer extends Mod Organizer 2 for both STAR WARS Knights of the Old Republic and STAR WARS Knights of the Old Republic II: The Sith Lords.
Why Mod Organizer 2?
Mod Organizer 2 already provides a stable foundation for mod management across many games. Extending it for Star Wars: Knights of the Old Republic and Star Wars: Knights of the Old Republic II: The Sith Lords gives KOTOR modding access to MO2’s biggest strength: the virtual file system.
With MO2, the game sees modded files as if they are in the game directory, while the real game folder stays untouched. This keeps the base install closer to vanilla, makes mods easier to enable or disable, and gives better visibility into how files overlap or conflict.
MO2 does have a learning curve, but for advanced KOTOR/KOTOR2 builds, the extra structure is worth it.
Who Is This For?
This plugin is mainly intended for larger KOTOR/KOTOR2 mod builds, repeatable installs, and users who want better insight into file conflicts.
An auto downloader and installer is included to easily deply the Mod Builds from https://kotor.neocities.org/
If you only install a few simple loose-file mods, this may be more tool than you need. If you are building a large mod list with many TSLPatcher mods, texture overrides, and compatibility concerns, MO2 provides a much cleaner workflow.
Installing
Mod Organizer 2.5.3 Beta is required. The current unreleased beta builds include features that KOTOR support depends on.
A beta build can be acquired from the Mod Organizer 2 Discord in the dev-build channel. Development has been more active recently, so an official release should be available soon.
Once you download and extract MO2, download and extract KOTORganizer to the MO2 directory. Launch ModOrganizer.exe and you can verify the plugin is loaded by opening the Info tab on the right.
The sync tab can download and install the mod builds from https://kotor.neocities.org/
Texture Management
KOTOR uses several texture-related file types, including .tpc, .tga, .dds, and .txi. MO2 normally only detects exact filename conflicts, but KOTOR has additional texture priority rules that can cause problems even when the extensions differ.
The texture management tab helps bridge that gap. It detects conflicts across supported texture formats and highlights them by severity. The highest-severity conflicts are cases that may cause hard crashes in-game. Lower-severity warnings include cases where a .tpc takes priority over a .tga or .dds unexpectedly.
An Auto Fix button is included to resolve supported texture conflicts based on the current MO2 mod priority order.
TSLPatcher Management
Many KOTOR mods use TSLPatcher-style installers instead of simple loose-file installs. The patcher tab lists enabled mods that contain a tslpatchdata folder and can consolidate their patched output into a single MO2-managed mod.
Double-clicking a patcher mod shows more detail, including:
the changes.ini parsed human-readable install actions detected conflicting patch actions the latest install log A test tab is also available for simulating or testing a single mod install before running the full patcher process.
When the patcher process is run, enabled patcher-style mods are processed in priority order and consolidated into a [PATCHER FILES] mod in MO2’s left panel.
Automatic Mod Deployment
The sync tab is designed to help download, validate, and install mod builds that follow the instructions from the KOTOR Mod Builds site.
The Refresh button pulls the latest instruction set and checks for missing files. Download All starts downloading missing mods in sequence.
Nexus Mods downloads require logging in with a Nexus account inside MO2. Deadly Stream mods can be downloaded automatically when supported. Mods from other sources open in an Edge browser window, where the user only needs to click the download button. The browser window closes automatically after the download completes.
Downloads can still fail. Servers can be slow, unavailable, or inconsistent, and some files may need to be retried manually.
Once all files are validated through Refresh, the Sync button becomes available. Sync extracts the downloaded files, runs the multi-patcher, and applies supported texture conflict fixes. When the patcher summary appears with the number of errors and warnings, the process is complete.
Manual Mod Installing
KOTOR mods are often packed inconsistently. The plugin includes a KOTOR-specific mod data checker that recognizes common archive layouts and can fix many of them automatically.
This is especially useful for loose-file mods and patcher-style archives that would otherwise require manual cleanup before MO2 can install them correctly.
Steam Workshop Warning
If the game is installed through Steam and Workshop content is detected, the plugin warns the user.
The intended workflow is MO2-managed content, not a mixed MO2 plus Steam Workshop setup. Mixing both can make conflicts harder to understand and can lead to unexpected file priority issues.
Save Support
The plugin integrates the game’s saves folder into MO2. Save entries can show timestamps, basic metadata, and screenshot previews.
Profile-specific saves can also be enabled through MO2 settings.
Limitations
This plugin is meant to reduce repetitive setup work, improve conflict visibility, and make large KOTOR/KOTOR2 builds easier to manage. It does not remove the need to read mod instructions.
Mods with unusual installers, custom compatibility patches, manual edit requirements, or unsupported archive layouts may still require manual review.
117 downloads
- modorganizer
- mo2
- (and 1 more)
(0 reviews)0 comments
Updated
-

KotorBlender for Blender 3.6 and 4.2
By seedhartha
Blender addon for working with KotOR assets.
Features:
Import & export MDL models, including animations and walkmeshes Import & export LYT files Import & export PTH files Lightmap texture baking Area minimap rendering For installation and usage guides, see README in the GitHub repository.
4,012 downloads
-

translate Kotor AutoTranslate Tool
By th3w1zard1
Translate an entire mod or KOTOR install to 80 languages using Google Translate!
This is a very powerful tool that can modify TLK strings and CExoLocStrings in GFFs in bulk quickly. Simply follow the prompts, point it to the GFF/TLK/Kotor directory/whatever and have it automatically translated to the language of your choice!
This tool can also create those bitmap 'font packs' that users have been using to play the game in non-released languages (Many thanks to Drazgar and DarthParametric for providing the insight into the TXI files). This means the in game text will show the correct characters when playing the game.
How to use:
Simply run the executable. It'll ask you many things. There are 3 actions you can do with this:
Set all dialog unskippable sets all dialog found in dlgs, at the chosen path, to unskippable. Includes every node. Not recommended lol
Translate Will translate All CExoLocStrings (localized strings) and TLK entries at the path to the language(s) of your choice
Create Fonts Will create fonts of the chosen languages to your current directory in a folder named after the language. Just drag and drop these files to your Override folder once it completes.
If you point PATH1 to a KOTOR install, it will ONLY patch the Override folder, the Modules folder, the rims folder (if exists), and the dialog.tlk file. This was a design choice to improve how long the patcher takes to finish. This includes any subfolders within the aforementioned folder names.
The patched files will be in the same directory as the original files with the appended language suffixed to the end of the file. For example, 'dialog_de.tlk'. You will need to rename them as their original filenames to activate them.
Supported filetypes/formats:
TalkTable files (TLK) Any GFF file (DLG, UTC, etc) TGA/TXI (non-translateable obviously) Any capsule (ERF, MOD, etc)
DBCS languages such as Japanese/Korean/Chinese are not currently supported.
This program is in beta. Please report any bugs you encounter.
Source code:
https://github.com/NickHugi/PyKotor/tree/master/Tools/BatchPatcher
Credit:
@Cortisol for creating the PyKotor library
@DarthParametric for extensive testing and feature recommendations.
@Drazgar for providing a ton of knowledge in regard to the TXI/TGA font packs
The project would not be possible without these awesome modders.
K1-translated dialog files:
941 downloads
-

SaberMaker for KotOR and TSL
By lachjames
This is a simple Python utility that lets you create new lightsaber textures for KotOR and TSL. Note that (especially in KotOR) creating a new lightsaber colour requires more steps than this - a future project will make this a one-click process for users, but for now I'm releasing this as a standalone tool for mod developers.
Installation
You should have Python 3 installed. There are no other dependencies. Just download and unzip the zip archive from this page, and you should be good to go!
I'll be releasing a Windows .exe version at some point. If you're not comfortable using the Python script, either wait for that or ask me (or one of the many helpful people on DeadlyStream) to make your lightsaber textures for you.
Usage
Run the script editor.py using Python, with a command like
"python editor.py".
This will open up the editor. You can choose the glow and core colours for the saber texture, and then save it using one of the bottom two buttons. The texture will then be saved in the current directory.
Bugs
There might be some bugs, but it's a pretty simple script and it seems to work fine.
FAQ
The lightsaber looks dark in-game!
For a bright lightsaber, you should select a colour with both Saturation and Brightness parameters set to 100% (in the second tab in the colour picker). Then you can use the Hue slider to choose a colour.
Can I use this for my mod?
Sure, feel free to use the textures for your own mods! I'd appreciate it if you credit this tool for helping create the lightsaber textures.
Can I redistribute this program in its entirety (with or without attribution)?
Please don't redistribute this program elsewhere on the internet. I will keep it here, so you can point people to it.
How do I take this texture and put it straight in the game (not as part of a mod)?
I'm working (along with others on DeadlyStream) to make an "end-user version" of this tool, as part of a larger modding project. Stay tuned!
The lightsaber core looks weird!
You should probably leave the "Core" colour to its default value (pure white) to get lightsabers that look like the ones from the base game. But if you want to experiment, the option to change the core colour is there!
224 downloads
-
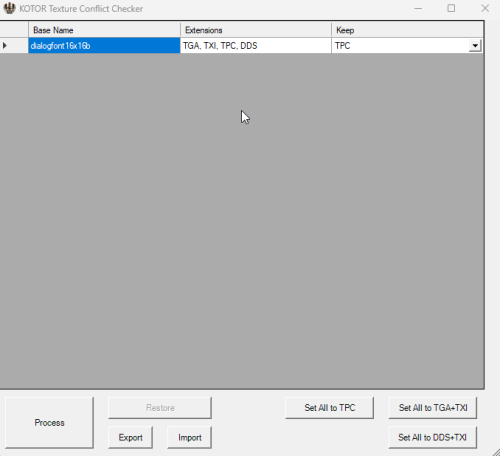
Texture Conflict Checker
By J
Texture conflict checker for K1 and K2. Place in your game directory and open it. It will list all conflicting textures, in the override folder, and allow you to choose which version to keep. Unwanted textures are moved to a texture_duplicates folder and can be restored through the tool.
Source: https://github.com/J0-o/kotormods/tree/main/Texture Conflict Checker
104 downloads
(1 review)0 comments
Updated
-
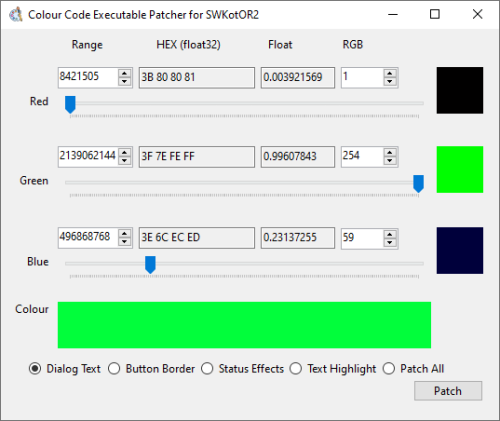
Colour Code Executable Patcher for SWKotOR2
By Thor110
Relish in the fact that you can now make the dialog text and highlight text colours whatever you want them to be!
With just the press of a button this tool will update the hard coded values within the executable for you!
Limitations imposed upon the Aspyr version of the game are that the Red value for the dialog text must lie between 8 & 31.
But there is no issue when updating the legacy versions of the game, provided you use the editable executable as I don't support editing the executable that comes with LegacyPC Steam or the Disc version of the game as they are slightly different, but the editable executable is essentially identical.
I made this tool to automate updating the hard coded colour codes contained in the executable for SWKotOR2.
Requires .NET 8.0!
Just put it in the game folder, next to the swkotor2.exe file and it will detect which version of the game you have when you click patch.
It detects what version of the game you have by checking for certain files, check the source code if you want to know more.
I advise against patching all the colours at once, but I provided an option just in-case anyone wanted to do this.
I also suggest looking at my written documentation, some values such as text highlight effect one another and the various different versions of the game are all slightly different, it's also possible that I have things slightly wrong here and there, feel free to let me know if you find out more.
More information on patching the values manually can be found in my tutorials here : https://deadlystream.com/topic/6886-tutorial-kotor-modding-tutorial-series/
In Tutorial : "24 - [ADVANCED] - Hard Coded GUI Elements"
For Steam LegacyPC users and users of the original Disc version of the game, please use the editable executable which can be found here : https://deadlystream.com/files/file/1321-kotor-2-editable-executable/
I released a new version on GitHub, functionally it is practically identical, I just removed the "Patch All" option and made a slight improvement to the way it detects the version of the game, there's no real need for me to update the version here as it is just an improvement to the code for the program.
Source code for the tool can be found here : https://github.com/Thor110/HexColourSlider
Thor110
57 downloads
(0 reviews)0 comments
Updated
-

Holocron Toolset
By Cortisol
This modding toolset is a work in progress and I carry no responsibility to any damage done to your game files or lost work that may occur. Some antiviruses will flag a false positive and prevent you from opening the application. If this happens you will need to configure your antivirus to allow the program to run.
Holocron Toolset is a collection of modding tools packaged in a single application aimed at streamlining modding development for KotOR/TSL, drawing inspiration from Kotor Tool and the NWN Aurora Toolset. There are editors available for nearly every file type used by the game. Also included with it is a 3D module editor and a "Map Builder" which the user can use to create new maps by rearranging existing models already used in the game.
Discord for suggestions + bug reports: https://discord.com/invite/3ME278a9tQ
If you are running Windows 7 or 8 and get a missing DLL error when opening the program you will need to download the Visual C++ Redist from Microsoft.
Toolset source
3,353 downloads
-

KotOR SaveGame Editor
By Fair Strides
KotOR Savegame Editor is a Perl/Tk application used in the editing of
Star Wars: Knights of the Old Republic savegame files.
The following fields are currently editable:
- Savegame name
- Player name
- NPC Name
- Appearance (player and party)
- Portrait (player and party)
- Attributes
- Skill Ranks
- Equipment (player and party)***
- Feats (add/remove)**
- Powers (add/remove)**
- Cheats Used flag
- Hit Points (current and max*)
- Force Points (current and max*)
- Experience Points (player and party)
- Good/Evil rating
- Credits
- Time played
- Class (see notes below)**
- Levels
- Current Party
- NPCs
- Global Booleans
- Global Numerics
- Gender
- Min1HP
- Inventory**
- Influence (TSL only)
- Chemicals (TSL only)
- Components (TSL only)
- Quests
*=Note: Max Hit Points and Max Force Points, while editable appear to be calculated
at the time the savegame is loaded. Therefore while these fields are editable, the
game will change the values back to what it calculates as correct. It is therefore
better to change your Wis/Cha and Con to affect your MFP and MHP.
** Not supported on Xbox Saves, will cause "Damaged Savegame" message.
*** See special section for detailed instructions
-----------------
Credits
-----------------
tk102 for originally creating the KSE.
Pazuzu156 for reporting the issue with the Cloud saves, as well as helping fix it and setting up a mirror for and creating the auto-updater.
Chev Chelios for much discussion of how Steam worked, as well as creating the INI-Generation tool, KPF.
-----------------
Before Using KSE
-----------------
---------------
Intro to KSE
---------------
-------------
Using KSE
-------------
---------------------------------------------
Override Folder: Subdirectories NOT supported
---------------------------------------------
-----------------------------
Notes About Feats and Powers
-----------------------------
-------------------------
Reminder: No Safety Net!
-------------------------
-----------------------------------------------
Notes regarding Class-changing/Adding/Removing
-----------------------------------------------
--------------------------------
Notes regarding changing levels
--------------------------------
-------------------------------
Notes about changing equipment
-------------------------------
===============
Known Bugs
===============
No saves found (You have Steam KotOR 2 and use cloud saves)
-----------------------------------------------------------
Go to your KotOR 2 folder and make a folder called "saves".
Inventory Hiccup
------------------
If an item is added to your inventory and it has the same Tag as another item, KSE
will generate an error.
Getting Stuck During Vision Sequence (KotOR1)
----------------------------------------------
Symptom: After leaving the Endar Spire or Leaving Taris, you run into a sequence
where you should be seeing a "dream" cutscene but instead you're locked up in a
room with a "CutStart" object that doesn't do anything.
Cause: You have NOT placed the modified .dlg files into your override directory
and you have changed your character to a Jedi/Minion/Droid class or you have
changed your Gender to something other than Male or Female.
Fix: Download the KSE Fixed Cutscene Files (available from http://www.pcgamemods.com/8800 )
and place the .dlg files into your Override folder.
==============================================
After changing appearance to look like (an NPC), the real NPC has no head!
---------------------------------------------------------------
Symptom: You change appearance to look like one of your party NPCs and all is well
until you attempt to enter a new area with that NPC. Then the NPC loses its head!
Cause: SW:KotOR doesn't like two unique characters appearing together.
Fix: From T7Nowhere's post on Holowan Labs--
===============================================================
Equipment Section
------------------
Due to an unknown bug, the Equipment branch might become unusable.
The only fix is to restart KSE.
==================
Please report bugs to zxcvbnm6012@yahoo.com
11/7/13 - In addition, please report bugs to tristongoucher@gmail.com Thank you. - Fair Strides.
297,437 downloads
-
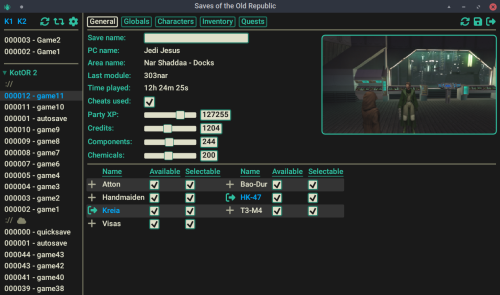
SotOR Save Editor
By StarfishXeno
SotOR: Saves of the Old Republic
A new save editor for KotOR 1 and 2
Warning
SotOR is a pathway to many abilities some consider to be unnatural, and generally lacks sanity checks, potentially allowing you to break the save. Also there are bugs, probably.
It creates a zip with the previous version of the save in it's directory, but you may still want to back it up manually.
May or may not work with saves from non-English versions of the game. Use at your own risk.
Differences from KSE
Aims to provide the same features and more. Currently WIP. Runs natively on Windows, Linux and in the browser (experimental, using wasm). Mac version should work, but pre-built releases won't be available here. Uses a built-in game database, allowing it to work wihout the game installed. Still capable of loading provided game files for your modding needs. Provided releases assume KotOR 1 Community patch and KotOR2 TSLRCM. Support for the updated steam version of TSL, including workshop. Does NOT support xbox and switch saves. See "Contributing" section. Contributing
If you encounter a bug or have a suggestion, please open an issue on github.
I would like to add support for the console versions, but I don't own any of them. If you're willing to provide save files and help with testing, please open an issue.
Thanks
Thanks to KSE , NWN Wiki, KotOR.js and xoreos projects for providing references on where and how to get the required game data.
824 downloads
- saves
- save editor
- (and 1 more)
(0 reviews)0 comments
Updated
-

mod installer HoloPatcher
By Cortisol
HoloPatcher is replacement for the old TSLPatcher tool. HoloPatcher offers an alternative that makes installing mods faster and is backwards compatible with any previous mods using TSLPatcher.
For more inforrmation see:
Installing mods with HoloPatcher Information for mod developers HoloPatcher is open sourc and can be found on GitHub.
18,617 downloads
-

gui Lightweight GUI Patcher
By th3w1zard1
A very simple CLI-based tool that'll take a folder of GUIs made for one resolution and patch them to work for another resolution. Please report any bugs.
Simply input the path to the GUI file (or folder of GUI files) and the output location, your desired resolution, and let it work.
GUI Resizer CLI Tool
Overview
This is a simple command-line interface (CLI) tool designed to adjust and scale GUI (Graphical User Interface) files based on different screen resolutions. The tool reads `.gui` files from the popular game Star Wars: Knights of the Old Republic and adjusts the layout to fit various resolutions and aspect ratios. It supports multiple resolutions and can handle batch processing of files.
Features
Multi-Resolution Support: The tool can adjust GUI files to fit several resolutions across different aspect ratios, such as 16:9, 16:10, 4:3, 5:4, 21:9, 3:2, and 1:1. Batch Processing: You can process multiple GUI files at once, making it easy to adjust a whole directory of files. Logging: Outputs logs to track the processing of files, including which resolutions were processed and where the output files are saved. Cross-Platform: Works on Windows, Linux, and macOS with Python 3.8+. Usage
Basic Command
To run the tool, use the following command:
python3 gui_resizer.py --input <input-path> --output <output-path> --resolution <resolution> Parameters
--input: The path to the `.gui` file(s) you want to process. You can specify a single file or a directory containing multiple `.gui` files.
--output: The directory where the processed files will be saved.
--resolution: The target resolution(s). Use the format `WIDTHxHEIGHT` (e.g., `1920x1080`). You can also specify `ALL` to process all common resolutions.
Example
To convert all `.gui` files in the directory `input_files/` to fit a 1920x1080 resolution and save them to the `output_files/` directory, run:
python3 gui_resizer.py --input input_files/ --output output_files/ --resolution 1920x1080 Logging
If logging is enabled, a log file named `output.log` will be created in the specified output directory. This file will contain details of the processing operations performed.
How It Works
1. Input Handling: The tool takes in `.gui` files or directories containing these files and reads them using the `pykotor` library.
2. Resolution Scaling: The tool scales the GUI elements based on the specified target resolution(s). It calculates scale factors based on the original dimensions of the GUI and applies these factors to resize elements accordingly.
3. Output Generation: The processed GUI files are then saved to the specified output directory, organized by resolution.
Credit:
Cortisol for PyKotor (90% of the code)
DarthParametric for testing and brainstorming the idea
128 downloads
(1 review)0 comments
Updated
-

KotOR II Switch modding framework
By DrSnuggly
For full details, usage instructions, and bug reports — please use the GitHub project associated with this file.
This project is a group of tools to make modding the Nintendo Switch version of Star Wars: Knights of the Old Republic II (aka. KotOR II) easier, less confusing, and less cumbersome.
With these tools, we can now finally enjoy mods like The Sith Lords: Restored Content Mod (and others) on Nintendo Switch!
These scripts are by no means necessary, but they will help prevent common issues that can occur, especially when dealing with Aspyr's odd file structure in their port, the port's built-in .tpc override files, and the localized folder structure on the Nintendo Switch.
Based on and inspired by jacqylfrost's work! Appreciate your insight as I worked through this.
NOTE: these modding tools will ONLY work for modded Nintendo Switches.
478 downloads
- tslrcm mod
- modding
- (and 3 more)
(0 reviews)0 comments
Updated
-

script compiler knsscomp
By Cortisol
The knsscomp application is intended to be a cross-platform alternative to the various versions of nwnnsscomp that support compiling scripts for KotOR.
If you are using Windows, I would recommend sticking with nwnnsscomp as that is the far more tested and stable solution for compiling script files. That is unless you wish to aid in the development, then continually using knsscomp will help find out bugs and make it stabler program overall.
If you do encounter an issue with a compiled (such as the script not working the way intended in-game) and you have access to nwnnsscomp, then it is recommended to see if it works correctly if compiled with that program instead. If you believe the issue is with knsscomp itself, send the script file to Cortisol on Deadlystream or Discord and he will investigate.
This compiler has the include scripts and nwscript data embedded within the program and so it is not necessary to bundle them in the app folder. You can, however, include nwscript with the knsscomp as a way of the program automatically determining what game version.
The optimize flag currently does nothing and is there as a placeholder for future versions to use.
82 downloads
-

KOTOR TOOL
THIS PROGRAM IS MADE BY FRED TETRA I TAKE NO CREDIT FOR THIS PROGRAM,
i also have some of the map files from the site if any one has more pm or email me, ill upload them here.
here is the original readme for this program.
Kotor Tool v1.0.2210.16738 (2006-1-19 12:38)
About this program...
I originally wrote this tool so I could experiment with 2DA files and scripts.
Through feature suggestions, it has grown quite a bit into what many tell me
is a pretty handy utility.
Thanks to all of those who have taken the time to make those suggestions and put
up with the occasional bug that creeps in at 2:00 in the morning!
-----------------------------------------------------------------------------------------------
Requirements...
I should (and will!) mention in the readme file that you need to have
the Microsoft .NET Framework 1.1 installed.
You can get it at:
http://download.microsoft.com/download/a/a/c/aac39226-8825-44ce-90e3-bf8203e74006/dotnetfx.exe
-----------------------------------------------------------------------------------------------
Contact info...
fredtetra@hotmail.com
-----------------------------------------------------------------------------------------------
Quick start instructions...
Unzip the kotor_tool.exe, ImageTools.dll files and the Maps folder to a directory.
The first time you run the program, it will attempt to
detect where you have installed KotOR and configure
some of the directory paths it needs to work. It will
then bring up the path management screen so you can verify them.
To work with BIF files:
Expand the BIFs item on the tree view.
You can:
- Select any *.bif file from the tree view, then click
Extact to extract every file in it to a directory
- Select any file in a bif, then click Extact to extract
it to a directory
- Select any file in a bif, then click Hex View to see
it in Hex/ANSI/Unicode
- Double-click on any 2da file to bring up the editor for it.
You can then edit the values and write the file to a directory.
(Most likely the override folder in yout KotOR folder)
Clicking on the column header in the editor grid will sort it
based on the values in that column. Repeated clicking will
change the sort direction.
- You can also open the 2da v2.b file editor from the File menu
for editing. NOTE: You do not have to open the chitin.key file first.
- 2DA editing features:
* Add line to end, delete any line, right click
to insert new line. Be careful with those last two!
* You can renumber the row labels from the right-click menu
* Undo all changes
* Reset sort to "as opened" mode (press F5 or use menu
* Import and export your 2da files in XML format
- Double click on any nss/vis/txi file to bring up the editor for it.
You can then edit the text and write the file to a directory.
- To extract a .mdl (Model) file, double click on it; the model will be
extracted and converted, along with any required TGA-format textures.
NOTE: You must have CChargin's Extract0-5 program installed in the
same directory as Kotor Tool.
To work with RIM files:
Expand the RIMs item on the tree view.
- Select any *.rim file from the tree view, then click
Extact to extract every file in it to a directory
- Select any file in a rim, then click Extact to extract
it to a directory
- Double-click on almost any file in a rim to launch the GFFEditor,
assuming you have installed it in the kotor_tool directory
- Control-Double-click on almost any file in a rim to launch text editor
with a syntax-colored version of the GFF file's contents
- Shift-Double-click on almost any file in a rim to launch text editor
with a plain-text version of the GFF file's contents.
To work with ERF files:
Expand the ERFs item on the tree view.
- Select any file in a rim, then click Extact to extract
it to a directory
- Double-click on almost any file in a rim to launch the editor for it.
- TPC files now can be viewed with the built-in image viewer. You can also
save the files in TGA format from the viewer.
- If you like using the keyboard to navigate the treeview, you can use the
spacebar to open the Image Viewer with a TPC file selected.
- If the Image Viewer is open, moving up and down the list of TPC files
with the arrow keys will show each image in turn. Note: some files cannot
yet be viewed.
- To view tpc files in an external app, hold down the Shift key while
double-clicking. You need tpc2tga and an image viewer. (see below)
- Some tpc files have a format that is not yet understood. Attempting
to view one of these files may either show a strange image or
crash the program.
Notes:
* You can specify whether or not you want to automatically convert extracted .tpc files to TGA format
from the Tools | Options... menu. This is only used with the external tpc2tga program.
* If you also want to be able to view the .tpc files using an external program
you must install a TGA file viewer and specify the path to it in the Path Manager.
You can download a free TGA viewer at http://www.creabit.com/viewer/
* You can specify whether or not you want the BIF tree built at
program startup or not from the Tools | Options... menu.
If you leave the checkbox unchecked, the BIF portion of the
tree view will only be built when you attempt to expand it.
Want to unlock all of the movies and music in KotOR II:TSL?
In your swkotor2.ini, set the following:
[Game Options]
UnlockedPlanetSongs=1023
[Movies Shown]
Movie10=0
Movie 9=0
Movie 8=0
Movie 7=31
Movie 6=255
Movie 5=255
Movie 4=255
Movie 3=255
Movie 2=255
Movie 1=255
Movie 0=255
57,935 downloads
-

KotOR Scripting Tool - 2021
By Blue
About Kotor Scripting Tool
Kotor Scripting Tool is my attempt at a scripting interface for nwnnsscomp.exe.
I originally designed this tool to aid me in my scripting efforts back in the day. My desire was to create a scripting tool with some of the creature comforts that today's coders have come to expect. The core features that were important for me were the ability to have NWScript function name Auto Completion and Syntax Highlighting. If anyone is interested in helping to extend its functionality be sure to check out the link to the GItHub repo below.
Anyways that's enough rambling for now!
Happy Modding!
Features include:
Compile .nss Scripts
Syntax highlighting
AutoComplete Suggestions (Beta)
Tabbed Text Editor
Advanced Find & Replace
Browsable nwscript function list
Browsable nwscript constants list
Zip Archive
Download and extract the zip file. Once extracted navigate to the directory and run Kotor Scripting Tool.exe
This program was compiled in C# with version 4.0 of the .NET Framework if you do not already have it downloaded you will need to download it [here].
The source code has been released on my GitHub account https://github.com/KobaltBlu/KotOR-Scripting-Tool.
3,582 downloads
-

reone toolkit
By seedhartha
toolkit is a GUI application that can be used to preview, extract, edit and create KotOR and TSL resources. Part of reone engine project.
## Features
Extract BIF, RIM and ERF archives Create RIM, ERF or MOD archive from directory Preview and export almost every resource type, including 3D models, images and audio files Export TPC as TGA / TXI Export encoded WAV as regular WAV / MP3 Visually edit 2DA, GFF, TLK, LIP, SSF, NCS and plaintext files Decompile NCS to NSS-like pseudocode Compose LIP files from text and audio files https://github.com/seedhartha/reone/wiki/Tooling
772 downloads
- gui-application
- media-preview
- (and 2 more)
(2 reviews)0 comments
Updated
-

K-GFF
By TK102
From the original thread on Lucasforums:
K-GFF (GFF Editing Utility) v1.3.0 (Jan 8, 2008)
Yet another GFF Editor...
This one features some extra support for KotOR/TSL namely in the form of VECTOR and ORIENTATION fields. These field types, as you may recall, were not present when GFFEditor.exe was published on Bioware's web site. Consequently certain GFF files (eg.: .git, .ifo) would become corrupted by editing. K-GFF supports these fields, hence you will no longer need to use CamEdit if you edit a module's .git file. Support for StrRef fields (Field Type: 18) has also been added for Jade Empire modding as of v1.1.9.
Another enhnacement over GFFEditor is the support for multiple CEXOLOCSTRING substring editing. It is now feasible for instance to publish a .dlg file with localized strings that is readable in all languages.
Other little features include: rudimentary support for BINARY fields (you can import and export these fields to files to perform hex editing), Cut/Copy/Paste of nodes, optional TLK file integration so you can translate StringRefs if you choose.
4,756 downloads
-

2DA Editor Alpha
Just a little 2DA Editor I've been working on for a few months. Has a few neat features that the Kotor Tool one doesn't have like:
- copying/pasting cells
- search/filter
- backup format in case of catastrophic file write failure
Credit to @JCarter426 for an awesome logo 👍
4,765 downloads
-

DLG Editor
By Fair Strides
DLGEditor is a GUI based dialog viewer and editor for Star Wars: Knights of the
Old Republic and Star Wars: Knights of the Old Republic II: The Sith Lords.
The editor is divided into two panes. The upper pane contains the treeview
portrayal of the dialog with NPCs speaking in red (Entries) and PC replying in
blue (Replies). Upon highlighting the nodes of the tree, detail widgets appear
in the lower pane containing node-specific information which can be edited.
5,187 downloads
-

KOTOR Dialog Editor
By lachjames
This is a visual dialog editor for KOTOR and TSL. It's currently in alpha, so if you're planning to use it for your mods just be aware that there might be (i.e. will be) bugs.
COMPATIBILITY
I am unaware of any compatibility issues with the DLGs created by this editor, but that doesn't mean there aren't any because this is an early alpha release. Please let me know if you experience any issues.
INSTALLATION STEPS
1. Download the ZIP file, and unzip it into a folder (it doesn't create one on its own - I hate it when zips do that ).
2. Copy your "dialog.tlk" into the folder alongside the file "app.exe" - I included the "dialog.tlk" file for KOTOR (as "kotor.tlk"), and for TSL (as "tsl.tlk"), but if you're using any mods which edit "dialog.tlk" for the game you're working on (e.g. using TSLRCM), you'll need to replace it with your own copy. You can find the "dialog.tlk" file in the same folder as the base executable for your KOTOR/TSL installation. If it's for KOTOR 1, rename the copy of "dialog.tlk" you put into your app folder to "kotor.tlk". If it's for TSL, rename your "dialog.tlk" to "tsl.tlk". Don't change the name of dialog.tlk inside your actual KOTOR/TSL installation, as that will break the game. Only change the name of the version you copied into the KotOR Dialog Editor install directory (alongside "app.exe").
34 Run "app.exe"
UNINSTALLATION
Delete all the downloaded files.
USAGE INSTRUCTIONS
General Usage
- Create a new dialog file (for KOTOR 1) by pressing the "New" button, or open an existing DLG file using "Open"
- Save dialog files using the "Save" button (there's no auto-save, nor does ctrl-s work - I'll make it work eventually)
- Once you open a dialog file, you'll see some panels:
- The top-left panel contains the "actions" list, which is a set of actions you can currently take.
- The bottom-left panel contains "link" information when you select a response which is linked to the current response.
- The top-middle panel contains NPC dialog (entries)
- The bottom-middle panel contains player dialog (replies)
- The right panel contains metadata for the selected response (strref, text, script, etc.)
Some Important Terminology
To understand what the actions do, you'll need to know the following terminology (some of which I made up, so please read this even if you're a pro):
- Response: A line of dialog, spoken either by an NPC or the player (I sometimes call this a "node" too)
- Entry: A line of NPC dialog
- Reply: A line of player dialog
- Start: A possible entry point for the dialog (always points to an entry, never a reply)
- Link: Responses are linked to one another through "links"
- Metadata: The general dialog data (things like the script that should run when the dialog ends, etc,.)
- Selected response: The response which is highlighted in orange - this is preserved when navigating (until you select something else)
- Current response: The response you last navigated into.
- Copied response: The response you last selected "Copy Selected Node" on.
Actions:
The panel in the top-left corner contains a list of actions you can perform to edit your dialog. I'll try to describe the actions as well as I can here, but honestly the best way to learn the software is just to try it out:
- Back To Start: Go back to the start of the dialog you're currently in
- New Response: Create a new response (either an entry or a reply, depending on context)
- Unlink Response: Removes the link between the selected response and the current response
- Copy Selected: Sets the selected response as the copied response
- Paste Into Start: If you have an entry as your copied response, and have selected a start response, it makes the start response point to the copied response
- Paste As Link (Link): Adds a link from the current response to the copied response
- Move Selected Up/Down: Moves the selected response up or down (respectively) by one level in the dialog evaluation order (for player dialog, this changes the order of the dialog lines they can choose from; for NPCs, the first line in the evaluation order whose "Active" script is either blank or returns TRUE is selected as the NPC's line)
- Step Back/Forward: Move back/forwards in your dialog history (so you can easily go in/out of replies without restarting the dialog)
FAQ
I did x and it crashed/broke my DLG/set my PC on fire
Yeah, this is alpha software and I need some people to test it out. Please let me know what broke the software so I can fix it.
I'm clicking responses but nothing's happening
You need to select responses for both the player (the bottom screen) and the NPCs they're talking to (the top screen). If this info doesn't fix your problem, let me know so I can look into it.
I can navigate through the dialog, but how do I edit things?
You left click on dialog lines to navigate through them, or right click on them to "select" them. Once a line is selected, you can edit it in the window to the right, edit the link between it and the current dialog node on the bottom-left panel, or copy it to another node by navigating to that node and pressing "Paste Into Current (Link)".
The navigation seems to work, but I can't see the actual dialog text
Make sure you have the correct "dialog.tlk" file in the same folder as "app.exe". If this doesn't solve the problem, please let me know so I can look into it.
Cool app. Ugly, though...
Yeah, I'm working on it, and I'm open to suggestions for making the UI cleaner/better/easier to use.
DLGEdit's faster to use/better in some other way
This isn't meant to be a replacement for DLGEdit - DLGEdit's power comes from the ease at which you can change an existing DLG into exactly what you want. Although this tool can do that too, it's designed for easily/naturally building DLGs from scratch rather than doing minor edits in existing DLGs, while having to actually run the dialog in KOTOR/TSL as little as possible (to avoid the time it takes to load the games and get to the conversation).
FUTURE FEATURES
- Flow chart view
- Animation selection
- More testing, bug fixes, etc.
KNOWN ISSUES
- If you create a link from node A to node B, and node A already has a link to node B, the dialog editor doesn't know which one you want to select when you right click and does weird things (e.g. always selecting the bottom-most copy, even when you right click on another copy). Will fix this asap.
INCLUSION IN OTHER MODS
Anyone who wants to use this in their mod is free to do so, with appropriate attribution.
CREDITS
This mod is created by me (lachjames). Thanks to Thor110 for helping me test it out.
Thanks to the Xoreos team for allowing us to include xoreos-tools with this mod. We use the gff2xml and xml2gff tools from xoreos-tools to read and write the DLG files. Xoreos-tools is licensed under the terms of the GNU General Public License v3; more information can be found here.
1,109 downloads
(0 reviews)0 comments
Updated
-

K2Console - A Console For KOTOR 2
By lachjames
DESCRIPTION
This is a little tool that mimics the visible console from K1, in TSL. It's written in Python (I've attached the source code below).
IMPORTANT NOTES
- The tool does not work in fullscreen mode (for now). I'd like to fix this in the future, but for now it only works in windowed mode.
- The tool doesn't connect to TSL at all - it's completely separate. This means that (for example) if you open the console in TSL with tilde, and then alt-tab out of TSL and press tilde again, K2Console will detect this but TSL itself won't (meaning K2Console and TSL will be out of sync).
- If you get out of sync and/or want to start the program again, you can type "xxxxx" (five x's in a row) into the console while it's open, which will close the program. Then just run the file "k2console.exe" and it'll start up again. No need to restart TSL (but make sure the TSL console is closed when you start K2Console, or you'll still be out of sync).
- This program works by reading your keyboard inputs and storing them to memory, which is also one way a keylogger might work - so your anti-virus might identify it as such. This code does not connect to the internet at all (you can verify this for yourself if you like). I haven't included the source with the program package to avoid cluttering your TSL installation, but I included it as a separate download below.
INSTALLATION
Unzip all three files into the same folder as swkotor2.exe (i.e. C:\SteamLibrary\steamapps\common\Knights of the Old Republic II\, or wherever your TSL installation is located).
UNINSTALLATION
Delete the three files "k2console.exe", "console.bat", and "steam_console.bat".
INITIALIZATION
If you use Steam: Instead of starting your game through Steam, you can start it by running the file "steam_console.bat", located in your TSL install folder.
Otherwise: Start the game by running "console.bat", again located in your TSL install folder.
USAGE
- Whenever you press ` to open the console in TSL, the mimic console should pop up too. I tried my best to exactly match the behavior of the TSL console (e.g. when it keeps text vs clears it), but if you find any discrepancies please let me know so I can fix them.
- If I did my job, you shouldn't really be able to tell that the console's not built into TSL, so just use it as normal (with the ability to see what you wrote!)
- To close the program (not TSL, just the console), type "xxxxx" (5 x's in a row) into the open console (this won't work if the console's not visible). Alternatively, you can close the command line that opens when you run the .bat file.
INCLUSION IN OTHER MODS
I'm not sure why you'd want to include this in other mods, but if you want to, you're welcome to do so with appropriate attribution.
CREDITS
Thanks to Thor110 for the idea for this tool, and for helping out with testing and ideas (as well as taking the screenshot for me).
k2console.py
720 downloads
-

SithCodec
By JCarter426
Introduction
The audio files of Star Wars: Knights of the Old Republic and Star Wars: Knights of the Old Republic II – The Sith Lords (KOTOR) contain extra headers of what seem to be superfluous data that obfuscate access to the original audio outside of the video games. Most audio software will refuse to open the files, or interpret the extra bytes as audio data, leading to glitches. It has also been observed anecdotally that files lacking an appropriate header may fail to playback in certain releases of the games.
SithCodec is an application that can automatically detect and remove an extraneous header from a KOTOR audio file, or alternatively prepend a KOTOR header to a standard audio file and allow for the introduction of new audio content to these games.
Running SithCodec
SithCodec requires Windows (32-bit or 64-bit). Make sure to extract SithCodec to a folder where you have read & write permission. The code is not signed (because code signing costs an extortionate amount of money) so your firewall may warn you about running an unrecognized application. Commands
Commands in SithCodec are executed by combining keywords into certain command sequences that the application recognizes. Input may be passed as command-line arguments when SithCodec is launched, or entered manually through a command- line interface if the application is launched without any command-line arguments.
Keywords may be entered in short form (dash followed by a single letter) or long form (double dash followed by a full word).
SithCodec keywords are not case sensitive, but—depending on your operating system—other data that you input may be, such as the names of files.
Help Screen
Entering -h or --help will display the help screen, showing a list of all keywords and their function.
-d, --decode decode audio -e, --encode encode audio -f, --format set output audio format -m, --music streammusic format -s, --sfx streamsounds format -v, --vo streamwaves/streamvoice format -a, --all all files -l, --list list files & formats -i, --in input path -o, --out output path -h, --help display this menu -c, --commands display list of commands -x, --examples display example commands -q, --quit exit application Commands Screen
Entering -c or --commands will display a screen with the list of all valid commands.
-d -i=[input path] -d -i=[input path] -o=[output path] -d -a -d -a -i=[input path] -d -a -o=[output path] -d -a -i=[input path] -o=[output path] -e -f -[format] -i=[input path] -e -f -[format] -i=[input path] -o=[output path] -e -a -f -[format] -e -a -f -[format] -i=[input path] -e -a -f -[format] -o=[output path] -e -a -f -[format] -i=[input path] -o=[output path] -l -l -i=[input path] -l -o=[output path] -l -i=[input path] -o=[output path] Examples Screen
Entering -x or --examples will display some example commands.
Encode all files in SFX format from the input path, to the output path:
-e --all -f --sfx- -i=in_folder -o=out_folder Decode a file, outputting to a new file:
-d -i=oldfile.old -o=newfile.new Decode a file without specifying output, possibly overwriting the original:
-d -i=file.wav List all files & formats in a given directory, printing to the console:
-l -i=my_folder List all files & formats in the current directory, printing to a file:
-l -o=file.txt Batch Files
SithCodec comes with batch files that are set up with commands for some common operations.
decode.bat
This file will decode all files located in a folder called "in" (no matter what their format) and save the new files in a folder called "decoded".
encode_music.bat
This file will encode all files located in a folder called "in" and save the new files in a folder called "music".
encode_sfx.bat
This file will encode all files located in a folder called "in" and save the new files in a folder called "sfx".
encode_vo.bat
This file will encode all files located in a folder called "in" and save the new files in a folder called "vo".
Copyright
SithCodec is free software: you can redistribute it and/or modify it under the terms of the GNU General Public License as published by the Free Software Foundation, either version 3 of the License, or (at your option) any later version.
SithCodec is distributed in the hope that it will be useful, but WITHOUT ANY WARRANTY; without even the implied warranty of MERCHANTABILITY or FITNESS FOR A PARTICULAR PURPOSE. See the GNU General Public License for more details.
You should have received a copy of the GNU General Public License along with SithCodec. If not, see https://www.gnu.org/licenses/.
All trademarks (including logos and icons) are used for identification purposes only and are the property of their respective owners.
Star Wars and related items are trademarks and/or copyrights of Lucasfilm Ltd. SithCodec is not affiliated with or endorsed by Lucasfilm Ltd., their subsidiaries, associates, or employees, or any Star Wars license holder.
Donations
If you enjoy my mods and would like to show your support in a monetary manner, you may do so via PayPal with this donation link.
For various legal and ethical reasons, this is entirely optional and is not a requirement to downloading or using any of my mods. I also do not create specific mods for hire.
I make mods as a hobby and will most likely do so regardless of any donations or lack thereof, but modding does take up a lot of my time and every bit helps.
1,234 downloads
(8 reviews)0 comments
Updated
-

JdNoa's AniCam (Beta 3)
By JumpStationZ
Part of the...
AniCam
Author: JdNoa - [contact info in read-me]
Notes on dlg fields compiled from observations by Tupac Amaru, Dashus, and JdNoa.
Tupac Amaru did most of the testing for this. Thanks!
Thanks also to tk102 for updating DlgEditor for us & Darth333 for passing it along quickly. It made testing *much* less painful.
Thanks to several people for their notes/code about the mdl format: Torlack for notes on binary mdl and for NWNMdlComp, sorcerer for notes on ascii mdl, and cchargin for MDLOps.
---------------
Version
---------------
Beta 3 - Dec 1 2005
History: beta 3 should fix the bug where cubic interpolation treats angles as numbers and so interpolates the wrong way across the 360 degree mark.
---------------
Description.
---------------
AniCam is an internal tool used by TSLRP (The Sith Lords Restoration Project). It is being released to the public "as is". There is no warranty, implicit or explicit, of any kind.
AniCam is an animated camera editor for KotOR 2.
Animated cameras are just models in a specific format. AniCam lets you open & edit existing camera models or create your own. You can then use the animated camera model in a .dlg.
---------------
Installation
---------------
Requirements:
JRE 1.5 or newer. (Developed with 1.5.0.04).
AniCam will not run with JRE 1.4.
Simply extract this zip to your preferred install location and run the jar file, AniCam.jar.
---------------
Uninstallation
---------------
Delete the files that came in the .zip, plus the configuration file anicam.conf (if it was created).
---------------
1. How to use AniCam:
---------------
--- 1a. Basics:
Fill in your desired camera name and the length in seconds of the camera shot.
Add entries for your camera. An entry needs the time in seconds, position as x,y,z, and orientation as h,p,r. (heading, pitch, roll).
To add an entry, select "insert row" from the Edit menu or type ctrl-i.
Orientation is done in degrees. Straight ahead is (0,90,0). Left is (90,90,0). Right is (-90,90,0). And so on.
If you're getting position from WhereAmI, keep in mind that the Z location given is lower than what you see (I think it's the location of your feet). You probably want to add 3 or 4 to get a shot at eye level.
When you have all of your entries, select save from the file menu. The files cameraname.mdl and cameraname.mdx (which is an empty file) will be created. These can go in your override folder.
To use the new model, set the camera model field in a dialog, then in the dialog entry/entries that will have the camera shot, set the CameraID to -1, use CameraAngle 4, and set CameraAnimation to a useful number (probably 1200 or 1000: see part 2 for details).
An example:
Entry Time x y z h p r
1 0.0 -70 20 3.5 0 90 0
2 3.5 -70 30 3.5 70 90 0
3 4.5 -70 31.5 3.5 50 45 0
4 6.5 -72 31.5 3.0 30 0 0
with animation length 7.5.
This will (1) start looking straight ahead,
(1)->(2) move along the y axis and rotate left,
(2)->(3) rotate right and down while moving a little more along the y axis,
(3)->(4) rotate right and point straight down while moving a little along the x axis,
then (4) hold position for 1 second.
-- 1b. Interpolation:
If interpolation is selected, then when you save, extra intermediate entries will be generated to smooth out changes in position and orientation. So, if your entries have the camera going straight forward, and then moving left, instead of an abrupt transition from forward to left, the camera will move in a curve.
If interpolation is not selected, what you entered is what you get. Sudden changes in direction will be abrupt.
-- 1c. Importing:
You can import from a binary model, an ascii model, or xml.
For both binary and ascii models, I'm only looking for the data found in the standard animated camera models. This means that there is a single node, called camerahook, with animations called CUT###W (where ### is a number, usually 001), which has positions and orientations. The import routines can't handle anything else - no mesh nodes, no emitters, etc.
(Note that, if you're looking at the original camera models, importing 003EBOcam.mdl will fail because they misspelled "camerahook" - the camera won't work in-game, either.)
The XML import is *very* limited and has pretty much no error checking. It was set up to import data from Excel. If you enter your time, position, and orientation in Excel - like on the main screen for AniCam, but without the "entry" field - and then save as XML, you should be able to import into AniCam.
---------------
2. Indices, Multiple Animations, and your Dialog
---------------
-- 2a. Multiple Animations and their Indices
One camera model can have multiple animations. As a .dlg file can only have one associated camera model, this lets you do multiple animated camera shots in one dialog. (An example: kreiatch.dlg in 301NAR uses 2 of the 3 animations from 301narcam).
Each animation has a name of the form CUT###W, where ### is a 3-digit number. The number should be 001 or greater. If there is only one animation, usually the single animation is called CUT001W. This is not required (101percam uses CUT002W).
When you add an animation to your camera model, the ### is what you're putting in the "New Index" box - so if you enter 5 and click New Animation, you'll get a new animation called CUT005W.
-- 2b. Some general notes on using animated shots
1. Once you start an animated camera shot running, it *keeps* running, in real-time, even if you've switched to static shots. If you do 'start animation'->static shot->'continue animation', the second animated shot will probably be at a different position/orientation if the user clicked to skip one of the earlier nodes in your dialog, or if they had to choose a response.
2. Only one animation will run at a time. If you 'start animation' with CUT001W, then 'start animation' with CUT002W, then 'start animation' CUT001W again, the final call will start back at the beginning of CUT001W's camera shot... it won't pick up where it left off the first time. And if you do 'start animation' CUT001W -> 'start animation' cut002W -> 'continue animation' cut001W, the 'continue animation' will continue with cut002w, not cut001w. Once you start a given animation running, it's the only one you can use until you start another one.
-- 2c. Your .dlg file:
Useful fields are Camera Model in your dlg header, and CameraID, CameraAngle, CameraAnimation, Delay, and WaitFlags in your entries.
-- 2c.1 Camera Model
In the dialog header ("General Properties" in DLGEditor), set the Camera Model to your new camera's name.
-- 2c.2 CameraID and CameraAngle
Every node that is animated uses CameraID -1 and CameraAngle 4.
(Although all the Obsidian .dlg's use CameraAngle 4, other CameraAngle values will also work.)
-- 2c.3 CameraAnimation
You also need a CameraAnimation field in each entry using an animated camera shot.
CameraAnimation is where you specify which animation to use if you have multiple animations.
'start animation' is 1200, 1201, etc.
To start CUT001W running, use CameraAnimation 1200. To start CUT002W, CameraAnimation 1201. And so on.
'continue animation' is 1000. Or 1001, 1002, but...
...in the official .dlg's, at the very least, 1000, 1001, 1002, and 1401 are used - but testing doesn't show any difference in using them. If you start with 1200, then call 1001, it's not going to jump to the other animation. If anybody sees a difference between these, please let me know!
-- 2c.3a Start/Continue and the end of the animation
Your animated shot is 20 seconds long, but you gave the user a choice of responses in between animated shots, and they took 30 seconds to pick a line. What do animated .dlg entries do after the end of the animation?
If the entry is set to 'continue animation', it will hold the last position/orientation from the animation.
If the entry is set to 'start animation', it will re-start the animation. You could probably do some looping with this.
If you reach a 'start animation' entry and the current animation hasn't finished, the behaviour depends on which animation you specify. If it's the same one that's already running, it won't restart - it'll continue, acting like a 'continue animation' entry.
-- 2c.4 WaitFlags
If you set WaitFlags to 1 and use 'start animation', the entire camera shot (or the remaining portion) will be used in one entry. This won't work if you use 'continue animation'.
If you leave WaitFlags at 0, the camera shot will run for as long as the entry does, so you can either have VO or set the Delay field.
(WaitFlags = 3 is used in kreiatch.dlg, but I've seen no difference between WaitFlags=3 and WaitFlags=0 in my testing).
Setting WaitFlags doesn't block the user from skipping the entry.
-- 2c.5 Delay
If WaitFlags is not 1, the animated shot in your entry will last as long as the VO lasts, or for the length of your Delay field if it's set. If there's no VO, like the long animated shot of the ruined Dantooine enclave, then you'll want to set Delay to specify how long your camera shot lasts. Delay is set in seconds. Note that if you set Delay=0, it seems to override your VO length, so it may skip lines. If you're not using Delay it should be -1, not 0.
-- 2c.6 CamVidEffect doesn't work
CamVidEffect will *not* be applied to animated camera shots, but you can use a script to turn video effects on and off. Check out the first two nodes in intro.dlg in 001EBO: they call a_video_effect to turn T3M4's freelook on and off. (Notice that the developers tried to use CamVidEffect!) The a_video_effect script simply calls EnableVideoEffect(VIDEO_EFFECT_FREELOOK_T3M4) or DisableVideoEffect(). Don't forget to disable your video effect, or it will stay on forever.
---------------
3. Some examples from the original files:
---------------
These are a few places where camera models are used in different ways:
kreia_kr.dlg in 701KOR has a camera shot that spans several entries. Under "{Intro to 701KOR...", it starts at "{Animated camera begins}" and ends at "{Angry at end...".
kreiatch.dlg in 301NAR has an animated camera that plays intermittently. It has animated angles followed by static angles followed by animated angles. It also uses two different animations, CUT001W and CUT003W.
enc_ruin.dlg in 605DAN consists of one long animated shot.
51 downloads
(0 reviews)0 comments
Submitted
-

Quanon's Modeling Tutorial (Part 3)
By Quanon
Part of the...
From Sith Holocron: Only Part 3 of this tutorial was found at JumpStationZ. Hopefully, there's enough in here to be helpful to somebody.124 downloads
(1 review)0 comments
Updated
-

JRL Merger by Stoffe
By jc2
Author: Stoffe
(Original lucasforums post)
I've put together a small utility that saves some time while combining the global.jrl files of different mods that use this file but don't come with a mod installer.
It will currently take two global.jrl (Quest Journal) files and merge together any changes to existing Category fields in them, along with any new Category fields that have been added in either file. It will not handle any fields having been deleted from the standard global.jrl file, but I can't see any reason why anyone would want to do that.
It will also check the resulting merged file and warn you if multiple Categories have the same tag (which could happen if both mods use similar tags for new journal entries).
You can get it here if you want it. Be warned that this is a test/beta version for now, it worked fine with a number of different modded global.jrl files I tested it with, but there may still be problems I haven't been able to spot yet. If you run into any problems using it please let me know so I can attempt to fix them.
It will need an unaltered copy of global.jrl in addition to the two modded files that should be merged, to be used to compare against. This file can be extracted from the dialogs.bif file with KotorTool.
501 downloads
- global.jrl
- kotor
- (and 3 more)
(0 reviews)0 comments
Submitted
-
File Reviews
-

Kätzchen 7
Juhani always belonged to the Kotor 1 companions who got the rather short end of the stick. So while this mod may not fix all my issues with her character, I do appreciate the effort to make her feel more complete.
Edited by Kätzchen -
Kätzchen 7
I never understood why there were no Iriaz on Dantooine, despite everyone on Dantooine always talking about there being both Iriaz and Kathhounds on Dantooine. Must have mod for anyone (like me) who wishes for this inconsistency to be fixed.
-
As someone who wholeheartedly believes that Peragus is a slog, this mod is a lifesaver and i have enjoyed it.
Good work
-
Kätzchen 7
I've been looking forever for a mod that finally acknowledges the fact that Juhani is, indeed, a romance option for a female lightsided Revan. And when I heared about there being a mod that allows you to select who Revan ended up with in the first game, I was really excited to try this mod out, thinking it would be exactly what I was looking for at last. Unfortunately, the Mod in it's current form isn't what I was looking for. Yes, it does indeed make sure that Juhani is finally acknowledged as an option for a female Revan, instead of me being stuck with the games assumption that my female Revan ended up with Carth. And while I am a bit iffy about the voice acting, the fact that the author managed to incorporate both a Hidden message from Juhani and a cameo appearance from basically nothing, is rather impressive.
However, what the Mode also does, is take various romance mods for Kotor 1, Mods that remove gender locks for Carth and Bastila and /or enable poly-romances with them to be precise, and turn their "additions" into selectable options too. Which I would be fine with, if these were coming in the form of selectable components that people can choose to either install or skip. But sadly, they are part of the main install, with the only optional component being the aforementioned cameo Juhani appearance. Thus sadly leaving me stuck with a playthrough were K2 acts as if Revan charging up both Carths and Bastilas loading ramps simutaneously was an actual genuin option in an unmodded vanilla Kotor 1 game.
Edited by Kätzchen -
Kätzchen 7
A simple but much needed fix for a more immersive Kotor 2, that has become a main stay in all my playthroughs ever since I first installed it
Edited by Kätzchen -

th3w1zard1 49
Why does deadlystream let creators review their own apps?
3/5 gets the job done. v2 should be 4/5 if not 5/5
-
Kätzchen 7
My one and only gripe with this mod is that it isn't part of TSLRCM. It is such a minor yet really crucial restoration in my book and it really surprises me that the TSLRCM team hasn't incorporated into TSLRCM in another patch by now
-
 1
1
-
-
Legend for this fr.
-
I don't have any other UI mods and this isn't working.
-
Saul0097 11
Hello 👋 n-drew, I'm investigating a bug and I'm trying to fix it myself. I have tslrcm, community patch, 3C-FD fog fix patcher as well as your bug fix collection and restored content plus. I have no other mods related to audio. I'm having a issue where the work bench "upgrade" sound isn't playing... I've narrowed it down to one of the aforementioned mods being the cause. Just wondering of you or anyone else can recreate the bug or know how to fix it.
Thank you
- Saul
Edited by Saul0097 -
Kätzchen 7
Much better than the Remote Tells Influence Mod in my book. If only for the fact that the Ebon Hawk computer doesn't make that REALLY ANNOYING SOUND while I'm checking in on said influence
Edited by Kätzchen-
 1
1
-
-
muahwii 0
i love this mod
Edited by muahwii -
Saul0097 11
Nice mod!
-
1
-
-

Jeff1742 1
Excellent mod, does what it says om the tin
-
90SK 183
This is an incredible innovation for Knights Of The Old Republic and The Sith Lords modding. It handles everything I throw at it and deserved status as the next KOTOR Tool.
-


-
File Comments
-
By JasonRyder · Posted
I was trying to use it with the "Revan's Hoodless, Maskless Flowing Robes" mod. -

By StupidSmeagol · Posted
So I have a problem with the mod Last time when I installed it it worked fine, but this time I get multiple errors about temporary files not found, or some files not compiling properly, and I don't really know what to do here If somebody could help me, it would be greatly appreciated Here is the error report if it's any help installlog.txt -
 Right... well, I gave her a Green Lightsaber. Because given that those crystals were part of her father's gift to the Jedi, I doubt she'd get rid of them willingly.
 -
 First of all: Just wanted to let you know that these images didn't load for me, for some reason. But that being said: Yes, I had thought about the fact it's probably canonically green while working on this mod. But I decided to break with that and give her a purple crystal for two reasons: 1: Purple was not previously used by a companion upon recruiting them: Bastila has yellow, Juhani has blue, Jolee has green. Might as well make Vima a little unique. 2: It's kinda an insi
 -
 I had this same problem after applying the widescreen patches after installing this mod due to a missing widescreen-patched blaster icon. My fix was to manually put a proper icon file named iw_blstrpstl_099.tpc for Carth's blaster into the swotor\Override folder, since this restoration mod's .uti file uses the 99 variant instead of the usual 1-6. There may be a better way to do this, but I installed the "Pretty Good! Icons for KOTOR" mod, linked below, for the hi-res icons after applying the wid
-