DarthParametric
-
Posts
4,897 -
Joined
-
Last visited
-
Days Won
556
Content Type
Profiles
Forums
Blogs
Forum & Tracker Requests
Downloads
Gallery
Store
Events
Everything posted by DarthParametric
-
Seems a bit too pinkish to me compared to the buildings in the foreground. Might need to be desaturated a bit, and/or shifted more towards the blue side of things. It is probably accurate for the time of day, so you can blame Bioware for the lighting in the rest of the level.
-
Now its time for Feats of Strength.
-
You should know enough by now to know how this works. The pre-patched row ID is 509, which is one greater than the last vanilla row ID. Although that is completely irrelevant, as the UTC is patched during install to whatever new row ID is added to appearance.2da. The equipped outfit is clothing variant 9. I would guess VP was using a texture mod (his own or someone else's) in the video.
-
Run it by @Tyvokka I guess.
-
Kotor 1 Companion Heads and Outfits from Swtor
DarthParametric replied to Maxwell1453's topic in Mod Requests
Those are my models using mildly tweaked versions of my textures. -
Emitter changes with MDLEdit
DarthParametric replied to Malkior's topic in General Kotor/TSL Modding
DeNCS is what you want. If it can't decompile it then it can't be decompiled. In that case the best you can do is to convert tit to PCode and try and decipher what it is doing, but that's really only something for advanced scripters to bother with. -
You don't need to be the author, you just need to have permission. If they signed off on it then that should be fine. Did they provide an updated EULA/terms of use to go along with it?
-
Most of TOR's Jedi robes are complete ass. The only thing of merit is the armoured robes, and if I ever get around to that it will be a hybrid using the TSL Knight/Master robe outer, with just the chest and legs from TOR. But that's way down the priority list. New girl added to the team, Rodian female: I tried an envmap on the eyes the time around, but the result was kind of meh. Need to experiment with some different cube maps (this one was Darth_Sapiens' CM_SpecMap).
-
Kotor 1 Companion Heads and Outfits from Swtor
DarthParametric replied to Maxwell1453's topic in Mod Requests
Wash your mouth out. That was modelled from scratch. -
Dark Jedi Wear Robes (for JC's Cloaked Jedi Robes Mod)
DarthParametric commented on DarthParametric's file in Mods
 You can still use the Prequel Robes mod if you want. You just need to make sure you use the supermodels from JC's mod in order for the Dark Jedi robes to work properly. I'll update the description to make that clearer.
 -
I don't plan on replacing all the humans. I'll still keep at least one in every group.
-
Yet another Kotor Tool problem
DarthParametric replied to N-DReW25's topic in General Kotor/TSL Modding
Program Files is a semi-protected directory. Windows, especially newer ones, gets very picky about permissions in it. And on Windows 10 you don't actually have a real admin account, so it's even worse. The Desktop is probably little better if it is in its default location. Do you not have a different drive? If you must install it on C drive, do so under a non-system directory (e.g. create C:\Games\KTool). -
I'm not really limited by it, I just see it as a cheap cop-out most of the time.
-
Yet another Kotor Tool problem
DarthParametric replied to N-DReW25's topic in General Kotor/TSL Modding
Where do you have it installed? What's the full path? If it's in Program Files, start by moving it out of there to a different drive. The same for the game (i.e. basically never install anything in Program Files). -
Not as yet. Currently I am just testing them out in-game, and this is a convenient location. But all these ones at least do currently have a specific male line about guarding the ship. I'm not sure if there is a female version available. Ones elsewhere can be given generic gender-appropriate voice sets, but anyone that actually says lines will presumably need to remain the same sex. Edit: Although I suppose for species like Rodian or Bith it would make sense for them to use alien VO, so that is one way of getting around it. Just as long as it is not another Twi'lek speaking Huttese.
-
Added a Nautolan female:
-
5760x1080 HUD Fix for Kotor 1 (Solution)
DarthParametric replied to spicelord21's topic in General Kotor/TSL Modding
It was for his own private use. He never released it. -
5760x1080 HUD Fix for Kotor 1 (Solution)
DarthParametric replied to spicelord21's topic in General Kotor/TSL Modding
He wrote a program to generate the required offsets for each resolution automatically. He hasn't been around for a while so you are either going to have to use one of the existing ones, or manually calculate the required values for your resolution yourself. -
5760x1080 HUD Fix for Kotor 1 (Solution)
DarthParametric replied to spicelord21's topic in General Kotor/TSL Modding
Like I said, there is nothing. -
5760x1080 HUD Fix for Kotor 1 (Solution)
DarthParametric replied to spicelord21's topic in General Kotor/TSL Modding
There's no existing support for an edited GUI fitting that resolution. The closest that @ndix UR's High Resolution Menus covers is 5120x2160 and 5120x2880. If you are trying to patch the base resolution in the EXE, you'll want to use UniWS. Just select KOTOR from the drop down menu, pick a resolution to patch, and enter your custom resolution into the provided fields. -
They don't need to be high level either. They just need to be able to get to the Jedi Temple on Coruscant.
-
You only need to send the scanner to your Republic alt. They can find the part which is Bind to Legacy and then mail it to your Imperial character, or put it in Legacy Storage.
-
MOD:Dark Jedi Wear Robes (for JC's Cloaked Jedi Robes Mod)
DarthParametric replied to DarthParametric's topic in Mod Releases
Yes, the supermodels are the only strictly mandatory requirement. -
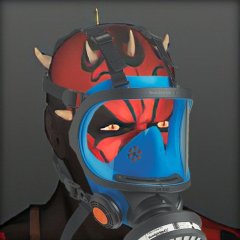
Now that Dark Jedi Wear Robes is released, it's time to beef up their adversaries with a companion mod. The ranks of the Jedi are a little thin on variety. In my latest playthrough, their Star Forge boarding party apparently comprised 90% Mullet Men. So I plan to spice that up a bit with some new alien Jedi appearances. The first batch are done - Rodian, Kel Dor, and Nautolan males: Like the Dark Jedi mod, this will make use of the ported TSL Knight robe models from @JCarter426's Cloaked Jedi Robes mod. I'm not sure what the full roster will look like just yet, but I've previously messed around with both Rodian and Nautolan female heads, so those are on the list. Beyond that I am undecided.
-
View File Dark Jedi Wear Robes (for JC's Cloaked Jedi Robes Mod) This mod changes the Dark Jedi appearance (male and female) from a skin tight jumpsuit to the TSL Knight robes (ported to K1 by JCarter). The hood and head of the original models have been retained, with the hood being worked into the torso mesh to make it a more natural looking extension of the cloak. Two extra masked head variants have also been added, ported from the TSL Dark Jedi/Assassins. The Dark Jedi you encounter throughout the game have had their appearances diversified between these three versions, along with swapping a few genders here and there. Additionally, the three Dark Jedi masters on the Star Forge have been given unique appearances. This mod takes advantage of the port of TSL’s robes added by @JCarter426’s mod “JC's Fashion Line I: Cloaked Jedi Robes for K1”. As such, that mod is a prerequisite. You must at the very least install the supermodels from JC's mod (S_FemaleXX/S_MaleXX), as this mod will not function correctly without those. Compatibility: As mentioned, the mod relies on JC's robes mod. As such, any other mod that alters the supermodels will not be compatible unless based on his supermodels. The mod changes the base vanilla appearances of the four male and one female Dark Jedi. It will not be compatible with any mods that alter those. The mod makes extensive module changes. Make sure that any mods that brute force MOD file installs, like NPC Overhaul or K1R, are installed first. Acknowledgements: Thanks to @JCarter426 for making the modder's resource used to make these robes available, for helping out with script edits for the Star Forge Deck 2/3 modules to diversify the random spawns, and tracking down the obscure spawn origin of one particular group Thanks to @Fair Strides for the edited version of TSLPatcher capable of handling duplicate filenames Thanks to @bead-v for KOTORMax and MDLEdit Thanks to @ndix UR for TGA2TPC Thanks to @Darth_Sapiens for the Cubemap Pack modder's resource Masks for two of the Masters on the Star Forge ported from The Old Republic MMO Thanks to zaramot on the Xentax forums for the TOR GR2 Max import script Thanks to @akimbo73 for pointing out the TSLPatcher issue with the SF Deck 3 module Submitter DarthParametric Submitted 12/18/2018 Category Mods K1R Compatible Yes