

Modding Tools
61 files
-

MDLOps
By Fair Strides
-----------------------------------------------------------------
-->--
-----------------------------------------------------------------
-------------------------
-->--
-------------------------
-----------------
-->--
-----------------
This script is released under the GPL, see the included
GPL.txt.
----------------
-->--
----------------
MUCH MUCH MUCH thanks to Torlack for his NWN MDL info!
Without his info this script could not exist!
Thanks to my testers:
T7nowhere
Svosh
Seprithro
ChAiNz.2da
Thanks to all at Holowan Laboratories for your input
and support
file browser dialog added by tk102
AABB, animations, lights and emitters, and speed-up by JDNoa
Calculations of vertex and face normals by VP and Fair Strides
1.0 version by ndix UR, thanks to bead-v for inspiring many of the added
features, figuring out a number of critical format algorithms, and sharing
the journey
-----------------------
-->--
-----------------------
This is a Perl script for converting
Star Wars Knights of the Old Republic (kotor 1 for short)
AND Star Wars Knights of the Old Republic, The Sith Lords (kotor 2 for short)
binary models to ascii and back again.
Binary models are converted to an ascii format compatible
with NeverWinter Nights.
It can also do some other operations on models,
like renaming textures and replacing meshes.
------------------
-->--
------------------
-Automatic detection of binary model version
-Automatic detection of model type
-node types supported:
-trimesh
-danglymesh
-lightsaber
-skin
-emitter
-light
-reference
-dummy
-model properties supported:
-diffuse
-ambient
-shadow
-render
-alpha
-self illumination
-many, many more
-supports compile/decompile pwk/dwk/wok walkmesh files
along with their associated models
-when reading in a binary model a text file is created
that lists all the textures the model uses.
-replacer function lets you replace 1 tri-mesh in a binary
model with another tri-mesh from an ascii model
-renamer function lets you rename textures in a binary
model
read the tutorials "KotOR_Tutorial.txt" and "Quick_tutorial.txt"
for an explanation of how to get your models into kotor
----------------------------
-->--
----------------------------
-------------------
-->--
-------------------
-------------------------------------------
-->--
-------------------------------------------
--------------------------------------
-->--
--------------------------------------
----------------------------------
-->--
----------------------------------
This script may only be hosted from sites that do not claim
ownership of files they host. In other words, any site that
claims "All files submitted to this site become property of
the site owner" can not host this script.
You are free to host this script from your website as long
as the distribution contains only the files listed below.
You are free to submit this script to any public download
site as long as the distribution contains all the files
listed below.
GPL.txt
icon.bmp
KotOR Tutorial.txt
mdlops.exe
mdlops.pl
MDLOpsM.pm
Quick_tutorial.txt
readme_mdlops_1-0.txt
replacer_tutorial.txt
I also ask that if you do host or submit this script to a
site send me an e-mail to let me know. My e-mail address
is at the top of this file.
3,977 downloads
(5 reviews)0 comments
Updated
-

TSL Patcher, TLKEd, and Accessories
By Fair Strides
Inside this download, you will find several VERY useful tools. Almost all of these were made by stoffe originally and the only alteration I made was to make sure TSL Patcher did NOT check for the presence of the dialog.tlk file to verify the path you're installing the mod to. This was done to allow installing mods to the Workshop folders.
Of note in this package are three files:
1. ReadMe, really.pdf - A read-me file that really should be read if you want to understand how to do something with the TSL Patcher.
2. nwnnsscomp.exe - A modified script compiler that TSL Patcher uses to substitute tokens (such as .2da row pieces) in source scripts (.nss files) and then compile the scripts.
3. nwscript.nss - As far as I'm aware, the nwscript.nss file from KotOR 2, required by nwnnsscomp.exe to compile scripts.
Below are the original release thread descriptions for stoffe's work and I honestly don't think I could put it better than she already did years ago.
TLK Ed:
TSL Patcher (along with ChangeEdit):
A few quick "how to" examples:
Insert new branches into DLG files.
( http://web.archive.org/web/20150911133933/http://www.lucasforums.com/showpost.php?p=2135535&postcount=177 )
Install a New Player Appearance mod.
( http://web.archive.org/web/20150929073207/http://www.lucasforums.com/showpost.php?p=2168405&postcount=201 )
Troubleshooting:
Q: I get a RichEdit line insertion error when trying to install mods. What's wrong?
A: It seems a few people have odd versions of the RichEdit DLL files installed in their system that doesn't play nice with the colored text box component TSLPatcher uses. To work around this you could try to replace the RichEd DLL files with versions that should work. Extract the two DLL files from this archive and put them in your Windows\Windows32 folder. Move existing files with those names to a safe location first so you can restore them if this causes other problems! Do not overwrite them!
Alternatively, if you don't want to mess with your DLL files, you could force TSLPatcher to use a plain text box for status messages rather than the colored/formatted one. To do this, use Notepad to open the changes.ini file found inside the tslpatchdata folder that came with the mod you wish to install. Under the [settings] section, change the value of the key PlaintextLog from 0 to 1. Q: I'm not seeing any Install Mod button, and the text field in the TSLPatcher window seems to extend behind the window boundraries.
A: This odd problem some people experience seems to be tied to what screen resolution and pixel density is being used in your monitor settings, but I have been unable to replicate it or figure out exactly what's going on. As a workaround you can "click" on the Install button by using it's quick keyboard command. Pressing the [ALT] keys on your keyboard should start the installation process. Q: When trying to install a mod it complains that it's not a valid installation location. What's wrong?
A: Make sure you are selecting the folder the game is installed in, not the override folder, when the TSLPatcher asks you where to install the mod. Q: When trying to install a mod it complains that access was denied to the dialog.tlk file.
A: Make sure that your dialog.tlk file is not write protected. This file is found in the same folder as the swkotor.exe binary. To check if it's write protected and undo it, right-click on the file, pick Properties in the context menu and uncheck the write protected checkbox.
Original update history (ordered newest change first):
12,262 downloads
- TSLPatcher
- Patcher
- (and 3 more)
-

tpcview
By ndix UR
View and export Odyssey Engine proprietary texture formats.
A lightweight, somewhat quick viewer for textures in TPC format, or the proprietary header DDS format used in Aurora and its descendants.
Also provides a capability to export to TGA, which is useful when you find images that won't convert via any other tool.
The viewer aspect is a bit of an afterthought, as for the longest time this was just where I tested my TPC=>TGA conversion code. However, over time, I found myself wanting a simple viewer that could preview a lot of images at once, so this happened.
The application is cross-platform, available for macOS and Windows.
The app is written in javascript, built on Electron using three.js.
============================================================
How do I set it up?
Windows: Download the '-installer' file, unzip the 7z package, run tgaview Setup <version>.exe
Mac: unzip the package, move tpcview.app to /Applications, run it
* This is not a signed application, so you have to do whatever is required to run non-MAS applications on your MacOS version.
The application provides file associations for TPC & DDS files. Hopefully the DDS association will not override any you may already have for non-proprietary DDS files.
============================================================
How do I use it?
Viewing
Drag files in. They should show up. The files you drag in fill the window in a list that generally resembles the file input order. They all show at once, so there's a moderate memory requirement around loading many files at once. For example, loading the 5210 TPC files from TSL takes 2.25G memory on my machine, your mileage will vary.
Mouse over images to get info about them in the window's title bar. Click images to toggle scaling the image to fit the window and viewing the information about them in the info panel at the bottom of the window.
Double click the background of the window to clear all loaded images.
Exporting
Use modifier keys while dragging in order to get Export as TGA functionality. A description of the export activity you are requesting shows up in the info panel at the bottom while you are dragging. Export will occur while the file is being loaded. You cannot export already open images without dragging them in again.
Files are exported into same directory as original TPC files being dragged, THEY WILL OVERWRITE EXISTING TGA FILES WITHOUT WARNING.
When a TPC file is exported to TGA, a TXI file will also be generated if the original TPC file contained such information.
When adding alpha blending value to TXI output, only non-1.0 values will be added (as 1.0 is considered default).
============================================================
Features
View TPC format 32bpp, 24bpp, and 8bpp compressed and uncompressed images View Aurora proprietary DDS format 32bpp and 24bpp compressed images Export to TGA Export TXI files containing the texture extension information from TPC files Export all detail levels (mipmaps) present in original image file (can help debugging image compressors) Add an alpha blending value from the TPC header into exported TXI file outputs, i.e. '# alphablending 0.67' File association for TPC and DDS formats with provided file type icons2,740 downloads
-

KOTOR Font Tool (NWN Font Maker)
I take no credit/responsibility for this tool. you will need to generate and rename files for a complete font-set.
link to original nwn page
originally made by Richard O'Doherty-Gregg
Original Readme:
I felt that uploading this here is appropriate, seeing as the original nwvault is down (where this file was originally uploaded)
1,212 downloads
(1 review)0 comments
Updated
-

KOTOR TOOL
THIS PROGRAM IS MADE BY FRED TETRA I TAKE NO CREDIT FOR THIS PROGRAM,
i also have some of the map files from the site if any one has more pm or email me, ill upload them here.
here is the original readme for this program.
Kotor Tool v1.0.2210.16738 (2006-1-19 12:38)
About this program...
I originally wrote this tool so I could experiment with 2DA files and scripts.
Through feature suggestions, it has grown quite a bit into what many tell me
is a pretty handy utility.
Thanks to all of those who have taken the time to make those suggestions and put
up with the occasional bug that creeps in at 2:00 in the morning!
-----------------------------------------------------------------------------------------------
Requirements...
I should (and will!) mention in the readme file that you need to have
the Microsoft .NET Framework 1.1 installed.
You can get it at:
http://download.microsoft.com/download/a/a/c/aac39226-8825-44ce-90e3-bf8203e74006/dotnetfx.exe
-----------------------------------------------------------------------------------------------
Contact info...
fredtetra@hotmail.com
-----------------------------------------------------------------------------------------------
Quick start instructions...
Unzip the kotor_tool.exe, ImageTools.dll files and the Maps folder to a directory.
The first time you run the program, it will attempt to
detect where you have installed KotOR and configure
some of the directory paths it needs to work. It will
then bring up the path management screen so you can verify them.
To work with BIF files:
Expand the BIFs item on the tree view.
You can:
- Select any *.bif file from the tree view, then click
Extact to extract every file in it to a directory
- Select any file in a bif, then click Extact to extract
it to a directory
- Select any file in a bif, then click Hex View to see
it in Hex/ANSI/Unicode
- Double-click on any 2da file to bring up the editor for it.
You can then edit the values and write the file to a directory.
(Most likely the override folder in yout KotOR folder)
Clicking on the column header in the editor grid will sort it
based on the values in that column. Repeated clicking will
change the sort direction.
- You can also open the 2da v2.b file editor from the File menu
for editing. NOTE: You do not have to open the chitin.key file first.
- 2DA editing features:
* Add line to end, delete any line, right click
to insert new line. Be careful with those last two!
* You can renumber the row labels from the right-click menu
* Undo all changes
* Reset sort to "as opened" mode (press F5 or use menu
* Import and export your 2da files in XML format
- Double click on any nss/vis/txi file to bring up the editor for it.
You can then edit the text and write the file to a directory.
- To extract a .mdl (Model) file, double click on it; the model will be
extracted and converted, along with any required TGA-format textures.
NOTE: You must have CChargin's Extract0-5 program installed in the
same directory as Kotor Tool.
To work with RIM files:
Expand the RIMs item on the tree view.
- Select any *.rim file from the tree view, then click
Extact to extract every file in it to a directory
- Select any file in a rim, then click Extact to extract
it to a directory
- Double-click on almost any file in a rim to launch the GFFEditor,
assuming you have installed it in the kotor_tool directory
- Control-Double-click on almost any file in a rim to launch text editor
with a syntax-colored version of the GFF file's contents
- Shift-Double-click on almost any file in a rim to launch text editor
with a plain-text version of the GFF file's contents.
To work with ERF files:
Expand the ERFs item on the tree view.
- Select any file in a rim, then click Extact to extract
it to a directory
- Double-click on almost any file in a rim to launch the editor for it.
- TPC files now can be viewed with the built-in image viewer. You can also
save the files in TGA format from the viewer.
- If you like using the keyboard to navigate the treeview, you can use the
spacebar to open the Image Viewer with a TPC file selected.
- If the Image Viewer is open, moving up and down the list of TPC files
with the arrow keys will show each image in turn. Note: some files cannot
yet be viewed.
- To view tpc files in an external app, hold down the Shift key while
double-clicking. You need tpc2tga and an image viewer. (see below)
- Some tpc files have a format that is not yet understood. Attempting
to view one of these files may either show a strange image or
crash the program.
Notes:
* You can specify whether or not you want to automatically convert extracted .tpc files to TGA format
from the Tools | Options... menu. This is only used with the external tpc2tga program.
* If you also want to be able to view the .tpc files using an external program
you must install a TGA file viewer and specify the path to it in the Path Manager.
You can download a free TGA viewer at http://www.creabit.com/viewer/
* You can specify whether or not you want the BIF tree built at
program startup or not from the Tools | Options... menu.
If you leave the checkbox unchecked, the BIF portion of the
tree view will only be built when you attempt to expand it.
Want to unlock all of the movies and music in KotOR II:TSL?
In your swkotor2.ini, set the following:
[Game Options]
UnlockedPlanetSongs=1023
[Movies Shown]
Movie10=0
Movie 9=0
Movie 8=0
Movie 7=31
Movie 6=255
Movie 5=255
Movie 4=255
Movie 3=255
Movie 2=255
Movie 1=255
Movie 0=255
58,290 downloads
-

Bioware TGA to DDS Converter
This is the orignal tool made by bioware to create a kotor-compatible dds, please see the .doc for instructions. (it wasn't mentioned there but the TGA must be square, and a power of 2 (256x256,512x512,1024x1024,2048x2048 etc.) in resolution)
NOTE: this tool is one way only, tga>dds it doesn't do the reverse. FORUM DISCUSSION HERE
1,144 downloads
(4 reviews)0 comments
Updated
-

KotorBlender for Blender 3.6 and 4.2
By seedhartha
Blender addon for working with KotOR assets.
Features:
Import & export MDL models, including animations and walkmeshes Import & export LYT files Import & export PTH files Lightmap texture baking Area minimap rendering For installation and usage guides, see README in the GitHub repository.
4,096 downloads
-

RGB-BGR Converter
By Fair Strides
This conversion tool is simply a converter between the standard hexadecimal RGB colour format and the decimal BGR color format.
This BGR format is used in the Fog settings and the Tweak Colour field used in the UTD structs in a .git file (though, the tweak colour might be useable in all of the Type structs...).
860 downloads
(1 review)0 comments
Updated
-
![More information about "[K1/TSL] Modder's Resource - Holocrons"](https://deadlystream.com/downloads/screens/monthly_07_2015/thumb-961be34f37aa6eb3b2a91f632394fc93-k1s7.jpg)
[K1/TSL] Modder's Resource - Holocrons
By InSidious
This pack contains two major elements. First, images for use as icon files,
depicting one (blue) Jedi holocron and one Sith holocron.
Second, it contains two placeable files and accompanying textures, for one
(blue) Jedi holocron and one Sith holocron, on pedestals.
There are versions of these models for KotOR I and KotOR II.
N.B.: This is not a mod. Placing these files in your Override folder
on their own will have no effect on your game whatsoever.
Permissions
You may use and modify these files however you wish in any mod that you wish, with
three conditions:
First, you must credit me in the Readme file or other mod descriptions
(i.e., TSLPatcher info.rtf, or the file description online) as the original author
of these files.
Second, you must include a copy of this readme file with any mod released containing
any or all of these resources.
Third, that you may not reupload these files, unaltered and on their own, to
any website without my expressed, written permission. This does not mean you
need my permission to include them in a mod, or to upload modified versions,
I just don't want this modder's resource mirrored all over the web
without my knowledge.
Known Bugs/Issues
- The Sith holocron pedestal has some UV map issues.
Attempts to fix this only broke the holocron model itself.
Credits and Thanks
- Thanks to Quanon, VarsityPuppet, and Marius Fett for their help with the models;
- thanks also to Zhaboka, Sith Holocron, newbiemodder, Fallen Guardian, Warlord664, Quanon, Marius Fett, Canderis, DarthAnsem, SithSpecter, Slstoev, CptPriceless, kyrie, and Fair Strides 2 for their feedback and comments on the mod these were made for as it progressed;
- to Fred Tetra for the truly awesome KotOR tool and his nwnsscomp conversion;
- to Holowan Labs for remaining by far the best place to work on KotOR mods on the internet;
- and to Obsidian, Bioware, and LucasArts, for making both KotOR games.
269 downloads
(2 reviews)0 comments
Submitted
-

gui Lightweight GUI Patcher
By th3w1zard1
A very simple CLI-based tool that'll take a folder of GUIs made for one resolution and patch them to work for another resolution. Please report any bugs.
Simply input the path to the GUI file (or folder of GUI files) and the output location, your desired resolution, and let it work.
GUI Resizer CLI Tool
Overview
This is a simple command-line interface (CLI) tool designed to adjust and scale GUI (Graphical User Interface) files based on different screen resolutions. The tool reads `.gui` files from the popular game Star Wars: Knights of the Old Republic and adjusts the layout to fit various resolutions and aspect ratios. It supports multiple resolutions and can handle batch processing of files.
Features
Multi-Resolution Support: The tool can adjust GUI files to fit several resolutions across different aspect ratios, such as 16:9, 16:10, 4:3, 5:4, 21:9, 3:2, and 1:1. Batch Processing: You can process multiple GUI files at once, making it easy to adjust a whole directory of files. Logging: Outputs logs to track the processing of files, including which resolutions were processed and where the output files are saved. Cross-Platform: Works on Windows, Linux, and macOS with Python 3.8+. Usage
Basic Command
To run the tool, use the following command:
python3 gui_resizer.py --input <input-path> --output <output-path> --resolution <resolution> Parameters
--input: The path to the `.gui` file(s) you want to process. You can specify a single file or a directory containing multiple `.gui` files.
--output: The directory where the processed files will be saved.
--resolution: The target resolution(s). Use the format `WIDTHxHEIGHT` (e.g., `1920x1080`). You can also specify `ALL` to process all common resolutions.
Example
To convert all `.gui` files in the directory `input_files/` to fit a 1920x1080 resolution and save them to the `output_files/` directory, run:
python3 gui_resizer.py --input input_files/ --output output_files/ --resolution 1920x1080 Logging
If logging is enabled, a log file named `output.log` will be created in the specified output directory. This file will contain details of the processing operations performed.
How It Works
1. Input Handling: The tool takes in `.gui` files or directories containing these files and reads them using the `pykotor` library.
2. Resolution Scaling: The tool scales the GUI elements based on the specified target resolution(s). It calculates scale factors based on the original dimensions of the GUI and applies these factors to resize elements accordingly.
3. Output Generation: The processed GUI files are then saved to the specified output directory, organized by resolution.
Credit:
Cortisol for PyKotor (90% of the code)
DarthParametric for testing and brainstorming the idea
131 downloads
(1 review)0 comments
Updated
-

KotOR Stuff
By ApanLoon
KotOR Stuff provides several tiny command-line tools that each perform a small task. With scripting, these tools could be used to simplify batch processing or support other tools that perform more complex tasks.
Currently three tools are included:
bif - Extract assets from KeyTable/BIF repositories erf - Extract assets from ERF/MOD/SAV and HAK repositories tpc - Convert TPC files to PNG or PNG files to TPC. Use command line options to select which side of a cubemap, what frame of a cycle animation or which mip map to convert. Can also list TXI attributes if any are present.
404 downloads
(2 reviews)0 comments
Updated
-

Knights of the Old Republic Character Generator
By Animal
A program to generate a character at random to play with in Kotor 1 and Kotor 2
Also available in Browser https://animal31.itch.io/kotorgenerator
1,986 downloads
(3 reviews)0 comments
Updated
-

Odyssey++
By JCarter426
Overview
Odyssey++ is a set of user-defined languages for Notepad++. Based on Fancy Colors – NWScript support in text editors, Odyssey++ has been updated for the Odyssey Engine games Star Wars: Knights of the Old Republic and Star Wars: Knights of the Old Republic II – The Sith Lords. It seeks to replicate the basic features you’d expect from an integrated development environment, such as syntax highlighting and autocompletion, to make scripting for these games more convenient. When you write scripts using Odyssey++, the program will color-code everything you type and make suggestions based on terms specific to the NWScript language.
Features
Syntax Highlighting – Words are color-coded based on their role in the NWScript language. Data types, operators, functions, constants, labels, strings, and comments are assigned different colors. This makes it clearer how the parts of your code interact, making it clearer what your code is actually doing, and also helps you make sure you typed things correctly. Code Folding – Text contained within { braces } can be folded and unfolded again. This lets you hide clutter when reading your code and helps keep track of whether you’ve closed everything you’ve opened. { Autocompletion – As you type, you’ll get suggestions for functions, constants, and other terms in the NWScript language. If you choose one of these suggestions by hitting TAB or ENTER, the program will finish typing it for you. This will save you a few precious keystrokes and ensure you don’t misspell things. Parameter Hints – When you type a NWScript function, a window will pop up showing all of the function’s parameters, their default values, and a description of the function from the developer comments in nwscript.nss. File Association – Whenever you open or save a .nss file, Notepad++ will switch to one of Odyssey++’s user-defined languages. Games Supported
Star Wars: Knights of the Old Republic
Star Wars: Knights of the Old Republic II – The Sith Lords
399 downloads
(1 review)0 comments
Updated
-
 (4 reviews)
0 comments
Updated
-

MDLedit
By bead-v
MDLedit is a (de)compiler for KOTOR and KOTOR2 model files.
Which version should I download?
There are two packages on the download page. They differ in whether the program uses Visual Styles or not. The difference is purely visual, they are completely equivalent in terms of functionality. The version in the mdledit_v0.0.0xp.zip package will work on Windows XP or newer as well as on MacOS through Wine, but it will look like crap. The version in the mdledit_v0.0.0.zip package will look better, but will only work on Windows Vista and up.
How do I set it up?
Open the .zip archive, extract the .exe and run it. If you want MDLedit to keep track of your option between sessions, create a blank mdledit.ini file in the same folder as your .exe.
How do I use it?
The program comes with a help documentation window accessible from the About menu, read that to learn how to use it. If something is not mentioned there please let me know in the relevant thread (link to be added) and I will explain the functionality and add the explanation to the help window for the next version.
MDLedit was designed to be used with KOTORmax and the new version of KotORBlender by ndix UR. Using the ascii model files that it produces with NWmax will cause data to be ignored in the best case and a crash in the worst.
The program crashed/froze/reported a weird error!
Describe your issue in the relevant thread and I will look into it. Attaching a .zip archive with the files that MDLedit was processing when the problem appeared is also very welcome.
Thanks
A big thank you goes out to ndix UR, without whom MDLedit would have maybe half the functionality it has now.
I would also like to thank the testers, who also made a lot of great suggestions that made MDLedit that much better:
– DarthParametric
– JCarter426
– Quanon
– VarsityPuppet
– FairStrides
The program was built on the knowledge about the MDL format, which is the result of the work of many modders, including CChargin, Magnusll, JdNoa, ndix UR, DarthSapiens, VarsityPuppet, FairStrides, and others! Thank you for your efforts!
Lastly I'd like to thank the KOTOR modding community, which makes taking the time to make such a tool worth it.
2,708 downloads
(10 reviews)0 comments
Updated
-

KOTORmax
By bead-v
KOTORmax is a plugin for 3ds Max and Gmax that allows importing and exporting of ascii model files for KOTOR and KOTOR2. KOTORmax is directly extended from NWmax by Joco.
How do I set it up?
Open the .zip archive, the instructions are in the readme file.
How do I use it?
Check for tutorials in the Tutorials Section. A lot of the basic functionality is exactly the same as with NWmax, so most of the tutorials should help you with using KOTORmax. As for the new functionality, it is now up to the community to create new tutorials for it.
KOTORmax was designed to be used with MDLedit and the new version of MDLOps by ndix UR. Using the ascii model files that it produces with an older version of MDLOps will cause data to be ignored in the best case and a crash in the worst.
What's different from NWmax?
– Support for all known properties of the Odyssey MDL Format. All NWN functionality that is irrelevant for the KOTOR games removed.
– Ambient texture (lightmap) import/export. Experimentally also vertex colors as well as texture0 and texture1 UV coordinate import/export.
– Support for bezier animation controllers.
– Lightsaber mesh object.
– New Anim Editor, Key Ops, Constraint Editor, Visibility Editor, Roomlink Editor and improved Anim Mapper.
– LYT and VIS file Import and Export.
– Game smoothing preview.
– Sanity check now adapated to KOTOR models.
... and much more!
Max crashed/froze/reported a weird error!
Describe your issue in the relevant thread (link to be added) and I will look into it. Please explain in detail exactly what you were doing when the error occurred. Also include any relevant files in your post.
Thanks
A big thank you goes out to ndix UR, without whom KOTORmax wouldn't even exist. A big thanks also to Joco for allowing me to build on NWmax and release it as KOTORmax.
I would also like to thank the testers, both for their patience when I was dealing with very persistent bugs and for all the suggestions that helped make KOTORmax what it is now:
– DarthParametric
– JCarter426
– Quanon
– VarsityPuppet
Lastly I'd like to thank the KOTOR modding community, which makes taking the time to make such a tool worth it.
1,507 downloads
(5 reviews)0 comments
Submitted
-

tga2tpc
By ndix UR
tga2tpc
Author: ndix UR
Release: Sep 2020
Version: 4.0.0
Convert TGA images to TPC format for use in KotOR and TSL.
TPC files contain the information from a TXI file (so the TXI file is no longer needed when a TPC file is used), and can be uncompressed or compressed with either DXT1 or DXT5.
Advanced features like animation and cubemap layering are initiated by the presence of specific TXI directives like cube 1 and proceduretype cycle.
For some reason, the game really wants normal maps to be in TPC format. This will let you create and use full 32-bit color normal maps without having to make them into simple height maps by using indexed color.
The tool is free, open source, and cross-platform. Code is available at https://github.com/ndixUR/tga2tpc
The app is written in javascript, built on Electron using three.js, jquery, bootstrap. It includes a ported version of the AMD/GPUOpen Compressonator image compression library.
============================================================
How do I set it up?
Windows: unzip the package, run tga2tpc.exe
Mac: unzip the package, move tga2tpc.app to /Applications, run it
* This is not a signed application, so you have to do whatever is required to run non-MAS applications on your MacOS version.
============================================================
How do I use it?
Drag files in and hit start. There shouldn't be much more to it than that. Using power-of-2 sized textures is always required for optimal quality, TXI information is optional, and the settings are pretty much self-explanatory. The nature of TPC alpha blending is not necessarily intuitive so you may need to seek information to use it properly.
Compressor settings:
Super Fast - the lowest quality setting, uses the pre-4.0.0 image compressor that includes the 'compression failure' error for long conversion queues Fast - Bare bones setting Normal - Runs two profiles and selects the best result, adaptive color weighting Slow - Deeper refinement of the color palette for each 4x4 pixel block Ultra - 3D refinement of the color palette for each 4x4 pixel block How Automatic encoding mode selects encoding for each texture in the queue:
24bpp TGA = DXT1 32bpp TGA = DXT5 8bpp TGA = 8bpp uncompressed isbumpmap1 or compresstexture 0 in TXI data = 24 or 32bpp uncompressed ============================================================
Features
Create cubemaps Create animated textures Automatic compression selection based on trends from the vanilla game High quality DXT1/5 compression engine using custom ported version of AMD/GPUOpen Compressonator Multi-core image compression on systems with 4 or more cores Horizontal/Vertical flip, for those pesky wrongly oriented TGA files Bicubic downsampling for mipmaps (precomputed lower detail versions of the texture, part of the TPC format) Control texture alpha blending setting (part of TPC format), can be loaded from TXI file comments of the form: "# alphablending 0.67"
Known Issues
Cannot create uncompressed animated textures. Super Fast compressor has a memory leak issue, leading to errors for long conversion queues Using 4:1 and wider size ratios for individual frames of animated textures seem to crash the game. 2:1 is fine, 1:4 is fine, etc. Only for converting from TGA to TPC. For TPC to TGA, use Kotor Tool, xoreos-tools, tpcview, etc. Progress bar doesn't update as often as you might want. The package size is large. This is the cost of easy cross-platform GUI support. All electron applications are large like this. You are likely to have problems trying to read TGAs from folders containing markup entities/encoded characters (like ') ============================================================
Thanks
DarthParametric for inciting the creation of this tool, and doing the testing.
DrMcCoy and all the contributors to xoreos, whose TPC decoding implementation provided the basis for the TPC library herein.
bead-v for moral support.
2,561 downloads
(4 reviews)0 comments
Updated
-

CSLU Toolkit (No Online Licensing)
By Jenko
Previous versions of the CSLU Toolkit could not be installed without an active licensing server. This was unavailable for almost two years. This program has been modified by myself and the original authors to allow for an installation without CSLU's servers being active.
This program is required to create .phn files used for new .lip files.
Instructions
------------
1. Copy "CSLU Toolkit" folder to the following destination: "C:\Program Files (x86)\"
2. Open command prompt as administrator!
3. Change directory to "C:\Program Files (x86)\CSLU Toolkit" (command is: "CD C:\Program Files (x86)\CSLU Toolkit")
4. Run setup.bat (command is "setup.bat")
357 downloads
(1 review)0 comments
Updated
-
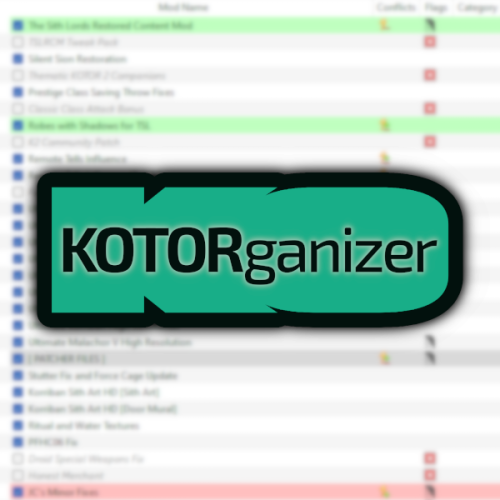
KOTORganizer MO2 Plugin
By J
## Quick Setup 1. Download the Latest Archive version of **Mod Organizer 2 Beta 2.5.3** from the MO2 Discord and extract it somewhere with plenty of free space. 2. Download the **KOTORganizer plugin** and extract it into your MO2 folder. 3. Launch MO2 and complete the first-time setup: * Choose **KOTOR** or **KOTOR 2** as the game. * Choose **portable instance**. * Login to your nexus account, in the settings. 4. Open the **Sync** tab on the right side of MO2. 5. Click **Refresh** to pull the latest mod build instructions. 6. Click **Download All** and wait for the downloads to finish. * Some downloads will open in your browser and require you to click the download button manually. 7. Once all downloads are finished, click **Refresh** again to validate the files. * If any files are missing or mismatched, download them again. 8. When all files are validated, click **Sync** to install the mod list. * This may take some time. * The process is complete when the patcher window shows the final error and warning count. 9. Click **Run** to start the game. NOTE: The following are not included and will need to be patched/installed manually: - Widescreen Patches for KOTOR - 4GB patches for both games - 3C-FD Patcher for KOTOR2 - Upscaled Movies for KOTOR and KOTOR2 KOTORganizer MO2 Plugin
KOTORganizer extends Mod Organizer 2 for both STAR WARS Knights of the Old Republic and STAR WARS Knights of the Old Republic II: The Sith Lords.
Why Mod Organizer 2?
Mod Organizer 2 already provides a stable foundation for mod management across many games. Extending it for Star Wars: Knights of the Old Republic and Star Wars: Knights of the Old Republic II: The Sith Lords gives KOTOR modding access to MO2’s biggest strength: the virtual file system.
With MO2, the game sees modded files as if they are in the game directory, while the real game folder stays untouched. This keeps the base install closer to vanilla, makes mods easier to enable or disable, and gives better visibility into how files overlap or conflict.
MO2 does have a learning curve, but for advanced KOTOR/KOTOR2 builds, the extra structure is worth it.
Who Is This For?
This plugin is mainly intended for larger KOTOR/KOTOR2 mod builds, repeatable installs, and users who want better insight into file conflicts.
An auto downloader and installer is included to easily deply the Mod Builds from https://kotor.neocities.org/
If you only install a few simple loose-file mods, this may be more tool than you need. If you are building a large mod list with many TSLPatcher mods, texture overrides, and compatibility concerns, MO2 provides a much cleaner workflow.
Installing
Mod Organizer 2.5.3 Beta is required. The current unreleased beta builds include features that KOTOR support depends on.
A beta build can be acquired from the Mod Organizer 2 Discord in the dev-build channel. Development has been more active recently, so an official release should be available soon.
Once you download and extract MO2, download and extract KOTORganizer to the MO2 directory. Launch ModOrganizer.exe and you can verify the plugin is loaded by opening the Info tab on the right.
The sync tab can download and install the mod builds from https://kotor.neocities.org/
Texture Management
KOTOR uses several texture-related file types, including .tpc, .tga, .dds, and .txi. MO2 normally only detects exact filename conflicts, but KOTOR has additional texture priority rules that can cause problems even when the extensions differ.
The texture management tab helps bridge that gap. It detects conflicts across supported texture formats and highlights them by severity. The highest-severity conflicts are cases that may cause hard crashes in-game. Lower-severity warnings include cases where a .tpc takes priority over a .tga or .dds unexpectedly.
An Auto Fix button is included to resolve supported texture conflicts based on the current MO2 mod priority order.
TSLPatcher Management
Many KOTOR mods use TSLPatcher-style installers instead of simple loose-file installs. The patcher tab lists enabled mods that contain a tslpatchdata folder and can consolidate their patched output into a single MO2-managed mod.
Double-clicking a patcher mod shows more detail, including:
the changes.ini parsed human-readable install actions detected conflicting patch actions the latest install log A test tab is also available for simulating or testing a single mod install before running the full patcher process.
When the patcher process is run, enabled patcher-style mods are processed in priority order and consolidated into a [PATCHER FILES] mod in MO2’s left panel.
Automatic Mod Deployment
The sync tab is designed to help download, validate, and install mod builds that follow the instructions from the KOTOR Mod Builds site.
The Refresh button pulls the latest instruction set and checks for missing files. Download All starts downloading missing mods in sequence.
Nexus Mods downloads require logging in with a Nexus account inside MO2. Deadly Stream mods can be downloaded automatically when supported. Mods from other sources open in an Edge browser window, where the user only needs to click the download button. The browser window closes automatically after the download completes.
Downloads can still fail. Servers can be slow, unavailable, or inconsistent, and some files may need to be retried manually.
Once all files are validated through Refresh, the Sync button becomes available. Sync extracts the downloaded files, runs the multi-patcher, and applies supported texture conflict fixes. When the patcher summary appears with the number of errors and warnings, the process is complete.
Manual Mod Installing
KOTOR mods are often packed inconsistently. The plugin includes a KOTOR-specific mod data checker that recognizes common archive layouts and can fix many of them automatically.
This is especially useful for loose-file mods and patcher-style archives that would otherwise require manual cleanup before MO2 can install them correctly.
Steam Workshop Warning
If the game is installed through Steam and Workshop content is detected, the plugin warns the user.
The intended workflow is MO2-managed content, not a mixed MO2 plus Steam Workshop setup. Mixing both can make conflicts harder to understand and can lead to unexpected file priority issues.
Save Support
The plugin integrates the game’s saves folder into MO2. Save entries can show timestamps, basic metadata, and screenshot previews.
Profile-specific saves can also be enabled through MO2 settings.
Limitations
This plugin is meant to reduce repetitive setup work, improve conflict visibility, and make large KOTOR/KOTOR2 builds easier to manage. It does not remove the need to read mod instructions.
Mods with unusual installers, custom compatibility patches, manual edit requirements, or unsupported archive layouts may still require manual review.
166 downloads
- modorganizer
- mo2
- (and 1 more)
(1 review)0 comments
Updated
-

KotOR PathFinder
By ChevChelios
-- SW: KotOR PathFinder - Readme
-Buttons
Export To KSE.ini : Create/Update a KSE 3.3.6 compliant *.ini file containing the games install path.
Export To Registry : Export KotOR2 Steam path to registry.
Undo Export : Undo changes made by "Export To Registry"/-2reg.
+Steam+/+Disc+ : Change install type priority for "Export To KSE.ini" button, by default it's Steam.
-CMDLine Switches
"-2ini" : Export K1/K2 Paths to KSE.ini *
"-2reg" : Export K2 Steam Install into registry to look like a disc install, for older kse versions. *
"-undoreg" : Undo the registry changes made by -2reg or "Export To Registry" button. *
"-pdisc" : Give Disc Installs priority for -2ini ( Steam installs have priority by default).
"-logfile" : Enable logging to file.
*(Using this switch no GUI is displayed, once all requested tasks are done the app will close)
-- Thanks @
LucasArts
Bioware
Obsidian
Aspyr
Fair Strides
# Changelog
- 0.5.0.0
First public release.
686 downloads
(1 review)0 comments
Submitted
-

SithCodec
By JCarter426
Introduction
The audio files of Star Wars: Knights of the Old Republic and Star Wars: Knights of the Old Republic II – The Sith Lords (KOTOR) contain extra headers of what seem to be superfluous data that obfuscate access to the original audio outside of the video games. Most audio software will refuse to open the files, or interpret the extra bytes as audio data, leading to glitches. It has also been observed anecdotally that files lacking an appropriate header may fail to playback in certain releases of the games.
SithCodec is an application that can automatically detect and remove an extraneous header from a KOTOR audio file, or alternatively prepend a KOTOR header to a standard audio file and allow for the introduction of new audio content to these games.
Running SithCodec
SithCodec requires Windows (32-bit or 64-bit). Make sure to extract SithCodec to a folder where you have read & write permission. The code is not signed (because code signing costs an extortionate amount of money) so your firewall may warn you about running an unrecognized application. Commands
Commands in SithCodec are executed by combining keywords into certain command sequences that the application recognizes. Input may be passed as command-line arguments when SithCodec is launched, or entered manually through a command- line interface if the application is launched without any command-line arguments.
Keywords may be entered in short form (dash followed by a single letter) or long form (double dash followed by a full word).
SithCodec keywords are not case sensitive, but—depending on your operating system—other data that you input may be, such as the names of files.
Help Screen
Entering -h or --help will display the help screen, showing a list of all keywords and their function.
-d, --decode decode audio -e, --encode encode audio -f, --format set output audio format -m, --music streammusic format -s, --sfx streamsounds format -v, --vo streamwaves/streamvoice format -a, --all all files -l, --list list files & formats -i, --in input path -o, --out output path -h, --help display this menu -c, --commands display list of commands -x, --examples display example commands -q, --quit exit application Commands Screen
Entering -c or --commands will display a screen with the list of all valid commands.
-d -i=[input path] -d -i=[input path] -o=[output path] -d -a -d -a -i=[input path] -d -a -o=[output path] -d -a -i=[input path] -o=[output path] -e -f -[format] -i=[input path] -e -f -[format] -i=[input path] -o=[output path] -e -a -f -[format] -e -a -f -[format] -i=[input path] -e -a -f -[format] -o=[output path] -e -a -f -[format] -i=[input path] -o=[output path] -l -l -i=[input path] -l -o=[output path] -l -i=[input path] -o=[output path] Examples Screen
Entering -x or --examples will display some example commands.
Encode all files in SFX format from the input path, to the output path:
-e --all -f --sfx- -i=in_folder -o=out_folder Decode a file, outputting to a new file:
-d -i=oldfile.old -o=newfile.new Decode a file without specifying output, possibly overwriting the original:
-d -i=file.wav List all files & formats in a given directory, printing to the console:
-l -i=my_folder List all files & formats in the current directory, printing to a file:
-l -o=file.txt Batch Files
SithCodec comes with batch files that are set up with commands for some common operations.
decode.bat
This file will decode all files located in a folder called "in" (no matter what their format) and save the new files in a folder called "decoded".
encode_music.bat
This file will encode all files located in a folder called "in" and save the new files in a folder called "music".
encode_sfx.bat
This file will encode all files located in a folder called "in" and save the new files in a folder called "sfx".
encode_vo.bat
This file will encode all files located in a folder called "in" and save the new files in a folder called "vo".
Copyright
SithCodec is free software: you can redistribute it and/or modify it under the terms of the GNU General Public License as published by the Free Software Foundation, either version 3 of the License, or (at your option) any later version.
SithCodec is distributed in the hope that it will be useful, but WITHOUT ANY WARRANTY; without even the implied warranty of MERCHANTABILITY or FITNESS FOR A PARTICULAR PURPOSE. See the GNU General Public License for more details.
You should have received a copy of the GNU General Public License along with SithCodec. If not, see https://www.gnu.org/licenses/.
All trademarks (including logos and icons) are used for identification purposes only and are the property of their respective owners.
Star Wars and related items are trademarks and/or copyrights of Lucasfilm Ltd. SithCodec is not affiliated with or endorsed by Lucasfilm Ltd., their subsidiaries, associates, or employees, or any Star Wars license holder.
Donations
If you enjoy my mods and would like to show your support in a monetary manner, you may do so via PayPal with this donation link.
For various legal and ethical reasons, this is entirely optional and is not a requirement to downloading or using any of my mods. I also do not create specific mods for hire.
I make mods as a hobby and will most likely do so regardless of any donations or lack thereof, but modding does take up a lot of my time and every bit helps.
1,264 downloads
(8 reviews)0 comments
Updated
-

Adding Geometry Tutorial
By miro42
This isn't really a tool, but it's not a mod, media, or skin either. With a lot of finagling and a nice hex editor, you can add geometry to heads for KOTOR and TSL characters. At least back in my day (my last mod was either in 2011 or 2013), this was a constant thorn in the side of models, so hopefully this tutorial is irrelevant by now. If that's the case, then I've uploaded it hear for historical significance.
Hope all is well.
Ben
204 downloads
(1 review)0 comments
Submitted
-

KAurora
By Sithspecter
Created by MagnusII, and uploaded with permission.
Welcome to the KAuroraEditor. This tool will allow you to perform some operations on the resource files used by the Kotor games.
Please do not disassemble, reverse engineer, copy, distribute etc. the program. The source code will be released with a later version along with the necessary license.
---------------------------------------------------------------------
Disclaimer
WARNING: this program comes with no warranty whatsoever. Use it at your own risk.
This is an Alpha. It will have several bugs and problems. It has been preliminary tested on a few walkmeshes and models from Kotor I. I've used Gmax 1.2 and NWMax 0.7 to work with the exported ascii walkmeshes. Notice that the NWMax 0.7 AABB tree building algorithm is bugged and can enter into an infinite loop; I had to comment out the code to be able to work on some of the more complex walkmeshes. The program does not need the AABB data from NWMax anyway; it rebuilds its own AABB tree.
---------------------------------------------------------------------
Installation
You must have Microsoft .NET Framework 2.0 installed.
You must have DirectX 9.0 SDK Update April 2005 or later installed. The redist will be enough.
Note that if you have installed the latest DirectX update without having already installed the .NET Framework, some of the necessary libraries may be missing. If that is the case, install the Framework and then install a newer update. If you're already at the latest level, install the whole SDK.
Once you have the prerequisites, just run the executable. Nothing else is required.
---------------------------------------------------------------------
Using the program
At present, the program has three main functions: it will allow you to extract most of the resources packed in the game files, to export and import the walkmesh (.WOK) files, and to load,render, and import the model (.MDL) files with the option of rendering the textures and the lightmaps.
When you run the program, a window with a tree structure will appear, having the two main nodes "Kotor I" and "Kotor II".
You can add the games' resources to the main nodes by simply selecting one of them, and then clicking on one of the menu items under "File". A window will appear; just select the appropriate file or directory and the relative tree will be built under the chosen node.
To export a resource, simply double-click on its node and another window will appear. Click on the "Save As..." button to export the resource.
---------------------------------------------------------------------
Walkmeshes
The Walkmesh menu lets you load and save a Kotor walkmesh file, and it also gives the possibility of visually editing the room adjacency values.
To load a walkmesh from a node, you must first select a node with the appropriate resource (i.e. a .WOK file). Once it is selected, simply click on the "Load From Selected Node" menu item and the walkmesh will be loaded in memory. You can also load a walkmesh from an ascii or binary file, without the need to build the tree first. Also, if you load a model file with a walkmesh in it, the walkmesh will be autoloaded.
Once a walkmesh is loaded in memory, you can export it either in ascii or binary format by selecting the appropriate menu items. You can also clear the memory; the export items will be disabled.
The "Render" option will open a DirectX window with a top-view rendering of the walkmesh, along with a drawing of the first perimetric line in the walkmesh. Edges hilighted in red are those with a room adjacency value different from "-1"; this means they are those edges which, once crossed, will bring you into another room. The room to which they lead is expressed as a zero-based index of the room list which you can find into the .ARE file of the area to which the walkmesh belongs.
Some walkmesh files have several perimeters in them. If that is the case, hitting the up and down arrow keys will let you cycle through all the perimetric lines belonging to the walkmesh.
Once you can see the perimeter you want, you can double-click on the edges [best results by trying to hit the edge center]; a window will appear, detailing the edge number along with its current adjacency value. You can change the value by choosing "Apply"; if the value is anything else than "-1", the edge will be hilighted in red.
The "Refactor" option is mostly needed when you need to export a binary .WOK of a room having a displacement in the .lyt file, and you didn't load the walkmesh directly from the .WOK. Simply enter the coordinates you find in the .lyt file and hit refactor; the walkmesh will be translated to its new position.
The initial coordinates you find when you open the refactor window represent the position of the walkmesh node.
You don't need to refactor if:
A) you loaded the walkmesh directly from the .WOK file, or from a file exported using the .WOK as the original source (the walkmesh is already expressed in absolute coordinates in the .WOK)
you loaded a .mdl file, it had a walkmesh in it, and the position of the model in its .lyt file is (0, 0, 0). The walkmesh gets auto-translated to its absolute position based on the rest of the model nodes
You *DO* need to refactor if:
A) you loaded a .mdl file which had a walkmesh in it, and the model is translated according to the .lyt file.
---------------------------------------------------------------------
Models
At the moment, many of the model export and import functions are incomplete. The ascii export is disabled. They will be added in a future release.
The binary export and ascii import are currently limited to models containing nodes of type: dummy, trimesh, walkmesh, and light. Lights will be imported in binaries without crashing the game, but I'm not sure they work properly. Only the first walkmesh in a model will be used for .WOK generation; second and subsequent ones will be ignored (and you shouldn't have them in the first place, anyway, as the game only uses 1 walkmesh/room).
Select either Kotor I or II model format before loading the node.
To load a model from a node, simply select the node in the tree. To load it from a binary file, you must have the respective .mdx in the same directory. Export is pretty obvious. Just one thing: if you reuse an existing file, the game overwrites the existing one WITHOUT DELETING IT first. So if the new file is shorter than the old one, your new file will have spurious extra bytes at the end. Bottom line: either change the name, or delete the old one before re-exporting.
Select wether you want to visualize textures, lightmaps, or both before rendering the model. REMEMBER TO LOAD THE ERF FILES IN THE TEXTUREPACK DIRECTORY if you want to render textures, and the chitin.key if you want lightmaps; otherwise the program won't be able to find them.
You can somewhat navigate the model with the arrow keys and the "u" and "d" keys. This will move the camera in fixed increments. It is not possible to rotate the camera at the moment. If nothing is shown on the screen, try to hit "u" a few times to rise the camera higher and get an increased field of view. The program tries to center the initial camera placement, but sometimes this works suboptimally and the model is off center.
Right now only trimesh type nodes are rendered. This means no animations, no skinmeshes, no danglymeshes, no sabers, no lights, no emitters and no references. Sorry. On the plus side, area models do look cool in the rendering window.
---------------------------------------------------------------------
Layouts
Load a .lyt file from a node. You can now render all the rooms in the lyt at once. Selecting which one to render will be added in a future release (will be useful f.e. to keep the skybox from being included, since skyboxes are huge compared to everything else and they mess up the image proportions).
---------------------------------------------------------------------
So, how do I export, modify, and import a walkmesh anyway?
A simple procedure:
- load the chitin.key file. All the walkmesh resources are in "models.bif"
- select the one you want to change and load it. Take a note of which edges are red, and which values they have
- export to ascii
- load the ascii model using GMax with NWMax
- modify it as needed, then export it back into ascii format
- load the modified ascii with the editor. You'll see that no edge is hilighted anymore, as the adjacency info has been lost
- use the render window to select the edges you took note of in the second step, and give them their old values back
- export to binary, *using the same name as the original resource*, and put it into the override directory
---------------------------------------------------------------------
What if I'm creating an area from scratch and I need a walkmesh?
- create the area in GMax, including the walkmesh. Try to keep the walkmesh object as child of the root node (this is the default, so you shouldn't have problems on this)
- export everything to an ascii file using NWMax scripts
- import the ascii in the editor
- choose refactor, insert the .lyt displacement coordinates, hit the button
- manually insert edges adjacency if you need them (I trust you know which edges lead to which rooms in the area you just made....)
- export to a binary .WOK file as above
---------------------------------------------------------------------
I want to create an area!
Do everything as above, and also binary export the model to produce the mdl and mdx files. Note that if your area is new (i.e. you're not "overwriting" an existing area and recycling its other files) you will also need at a minimum:
- the .lyt file (just look at another one, figuring it out is pretty easy)
- the .vis file (as above)
- you'll need to build a .MOD file containing the .ARE, .GIT and .IFO and put it INTO THE MODULES directory (NOT the override one....). Of course the values in these files should be changed to reflect your new area (e.g. the room struct should contain a list of your new models...)
- put the value "16777215" in the sun diffuse and sun ambient fields in the .ARE file. This will give you a nice white sun. Otherwise, without lights and lightmaps, you'll find yourself in the "absolute pitch black night which doesn't render textures"
- when you apply a texture to the mesh, use only UV mapping types which do not change the number of verts (i.e. planar). If the number of tverts is different from the number of verts (you can check it pretty easily by looking at the ascii file exported from NWMax), your texture will be messed up. This is because having tverts verts needs additional processing which will be added in a future release
738 downloads
(1 review)0 comments
Updated
-

SaberMaker for KotOR and TSL
By lachjames
This is a simple Python utility that lets you create new lightsaber textures for KotOR and TSL. Note that (especially in KotOR) creating a new lightsaber colour requires more steps than this - a future project will make this a one-click process for users, but for now I'm releasing this as a standalone tool for mod developers.
Installation
You should have Python 3 installed. There are no other dependencies. Just download and unzip the zip archive from this page, and you should be good to go!
I'll be releasing a Windows .exe version at some point. If you're not comfortable using the Python script, either wait for that or ask me (or one of the many helpful people on DeadlyStream) to make your lightsaber textures for you.
Usage
Run the script editor.py using Python, with a command like
"python editor.py".
This will open up the editor. You can choose the glow and core colours for the saber texture, and then save it using one of the bottom two buttons. The texture will then be saved in the current directory.
Bugs
There might be some bugs, but it's a pretty simple script and it seems to work fine.
FAQ
The lightsaber looks dark in-game!
For a bright lightsaber, you should select a colour with both Saturation and Brightness parameters set to 100% (in the second tab in the colour picker). Then you can use the Hue slider to choose a colour.
Can I use this for my mod?
Sure, feel free to use the textures for your own mods! I'd appreciate it if you credit this tool for helping create the lightsaber textures.
Can I redistribute this program in its entirety (with or without attribution)?
Please don't redistribute this program elsewhere on the internet. I will keep it here, so you can point people to it.
How do I take this texture and put it straight in the game (not as part of a mod)?
I'm working (along with others on DeadlyStream) to make an "end-user version" of this tool, as part of a larger modding project. Stay tuned!
The lightsaber core looks weird!
You should probably leave the "Core" colour to its default value (pure white) to get lightsabers that look like the ones from the base game. But if you want to experiment, the option to change the core colour is there!
227 downloads
-

Language Converter for DLG/UTI/UTC/MOD Files
By TK102
From its original thread on Lucasforums:
DLG/UTI/UTC/MOD Language Converter 1.0
Icon by svösh!
PURPOSE
This utility allows mods made in other languages to have their strings displayed correctly in-game. Localized strings in mods contain one or more language identifier that is used by the game engine. If mod does have right language identifier for your game, you will not see any the text displayed from dialogs, item descriptions, etc.
You can use this utility to add language identifiers to mod files.
Supported file types: .utc, .uti, .dlg, .mod
HOW TO USE
DLGConv v1.0 is now GUI and its use will hopefully appear obvious. However for the sake of this readme, here are the steps.
1. Add files to the list that you want to modify using the Add Files button.
2. Choose the language(s) you wish to support by selecting the appropriate checkboxes.
3. Select an output path.
4. Click the Convert button.
929 downloads
(2 reviews)0 comments
Updated
-
File Reviews
-
-
Grimy. The Force approves.
-
Very good!
-
JuniorModder 15
I just started playing but so far it looks incredible! I was already using shaders for TSL but this one is probably the nicest, crispest, most detailed one out there.
-
 1
1
-
-
This Sith Lord approves of these retextures.
-
Great work, as usual.
-
This are wonderful to look at. I particularly like the dark grass. Maybe that's just me, but it fits the vibe of Dantooine.
-
Excellent work!
-
Just like the KotOR 2 version, these are awesome.
-
Excellent set of textures, fits in perfectly.
-
Swoop.
And by that, I mean that this is a very good retexture. -
Well-made. I especially like the work on the engines.
-
I did not originally notice this, but now that I can't unsee it, this mod is an essential upgrade.
-
Fits in seamlessly.
-
The facial hair on this creature unnerves even a Sith Lord. Well-made retexture.
-


-
File Comments
-

-
 I had a test of it on my end and it worked as expected, though I believe I might've discovered your problem. Soundsets are annoying in these games because to add the sounds they have to be added to something called a "dialog.tlk" file. The dialog.tlk file contains all the text you see in-game, and since my game is in English I believe the soundsets don't work for you because my mod is in English whereas your Kotor isn't and since your game doesn't use English text in its dial
 -
-
 Here are some additional files that add a Jawa portrait for the PC as well as replacing the vanilla soundset with Jawa noises. Please see ReadMe file for installation instructions. As always any feedback is welcome! Jawa portrait.zip Jawa Player sounds.zip
 -
I'm going to test it on my end now. What operating system do you use? Windows PC, Mac, Linux, Steam Deck? If you do not understand my question due to the English to Chinese translator please let me know.
-