Leaderboard


Popular Content
Showing content with the highest reputation on 09/29/2026 in all areas
-
Version 1.0.1
59 downloads
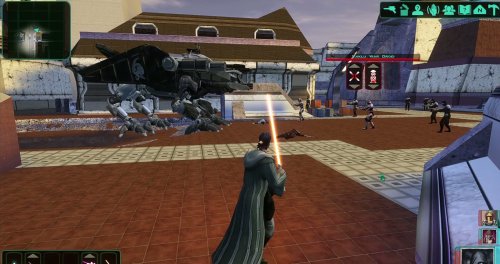
AI DISCLOSURE & FEEDBACK I use AI often in my workflows to assist with creating my mods, including handling monotonous and repetitive tasks. You should assume that anything I post has had AI assistance in some way. As I stated in my Dathomir WIP post, I expect discussion of my projects to remain professional and focused on the actual artwork, performance, and gameplay. Constructive criticism that helps improve the art or gameplay is welcome. Derogatory statements about AI will be ignored. I am here to improve the finished product, and I will not change my workflow to accommodate personal objections to AI. Bring a new Basilisk to the invasion of Onderon. Watch it wake in the Dxun hangar, storm Iziz in a replacement cinematic, and join the landing-zone battle as an allied war droid. FEATURES • Custom Basilisk model with an animated hangar reveal and boarding ramp. • Replacement invasion cinematic covering space approach, atmospheric entry, anti-aircraft fire and a heavy landing. • An allied Basilisk that fights alongside the player in Iziz. • Shoulder turbolasers, heavy claw attacks, a shockwave slam and an airborne rapid-fire nose-gun barrage. • Custom combat effects and sound. • One replacement Basilisk loading screen. REQUIREMENTS AND COMPATIBILITY Requires Windows x64 and a supported Steam Aspyr version of KOTOR II. Run the included compatibility check before installing. Other storefronts and executable versions are not currently supported. Tested on clean Steam game data and an installation of the KOTOR II Full Build: https://kotor.neocities.org/modding/mod_builds/k2/full Install after your chosen mod build. Compatibility does not cover every optional mod selection. The English Queen Talia invasion route is tested; the Vaklu route has not been qualified. The installer merges shared tables and story resources, preserves native party selection, and leaves saves and Steam Cloud settings unchanged. It replaces OndMov07.bik and the load_510OND/load_511OND loading screens. See COMPATIBILITY.md for supported executable hashes, conflicts and testing limitations. INSTALLATION 1. Close KOTOR II. 2. Extract the entire archive into a folder outside your game directory. Keep all included folders together. 3. Run Install Basilisk.exe and select the folder containing swkotor2.exe. 4. Click Check compatibility, review the result, then Install Basilisk. 5. Keep Steam running and launch the game using BasiliskLauncher.exe in your game folder. 6. Load a save from before Zuka’s invasion reveal and before first entering the Iziz invasion module. Required runtime components are bundled. No separate Python or .NET installation or manual patch download is needed. This package uses its own merge installer. Do not copy the payload into Override or install it through TSLPatcher. UNINSTALL Close the game, run Install Basilisk.exe, select the same game folder and choose Restore pre-install files. Keep the BasiliskInstaller backup folder. Restoration will stop if another mod has subsequently changed a file, protecting those later changes. Return to a save made before installation. CREDITS ShaolinGhost — project, direction, playtesting and release. Lane — KotOR Patch Manager. PyKotor contributors — resource tooling. Obsidian Entertainment, LucasArts and Aspyr — KOTOR II and original game resources. The Force Unleashed Wii Basilisk encounter — design and animation reference. Full third-party notices and installer/runtime sources are included. This is an unofficial, free fan modification. Screenshots may show unrelated character, environment and interface mods that are not included.7 points -

Version 1.3.1
267 downloads
Expands supported resolutions and scales all Menus/HUD. Install - Use with Kotor Patch Manager: https://github.com/LaneDibello/Kotor-Patch-Manager - Editable K1 Executable or GOG version required - Copy Scaled Kotor textures and font files to override directory - Apply Scaled Kotor patch with patch manager and then click launch. - Alt Tab Patch and Movie Patch are recommended. - Change resolution in game - please report any bugs Recommended - K1 Modern Driver Compatibility Patch Source: https://github.com/J0-o/ScaledKotorWidescreenPatch Credits: HD UI Menu Pack - The menu background outlines were combined with custom menu borders Vriff - Supplied the custom font scaling system1 point -
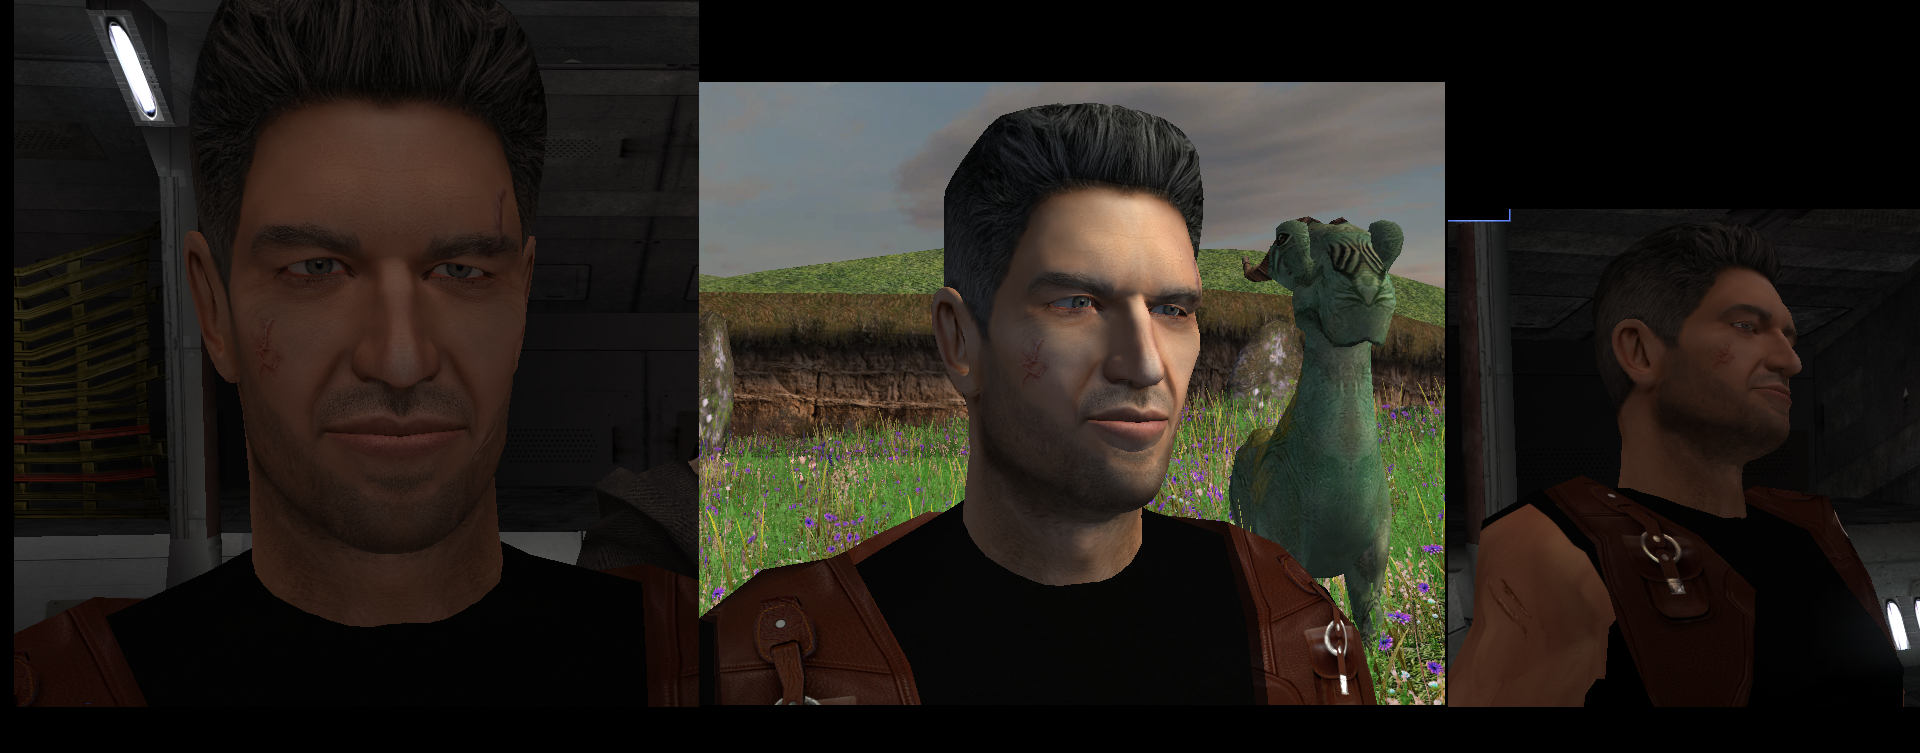
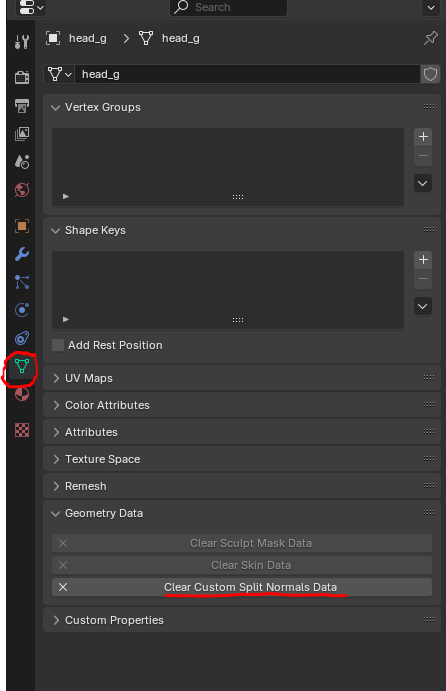
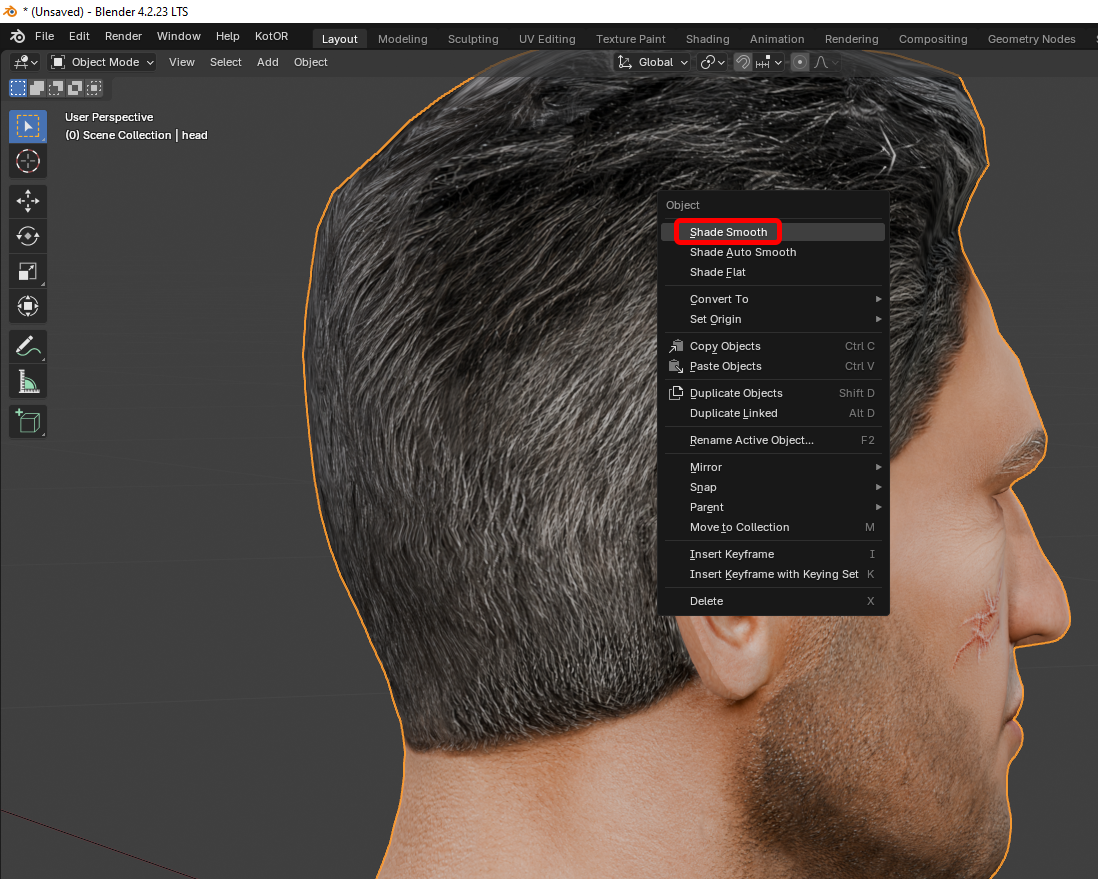
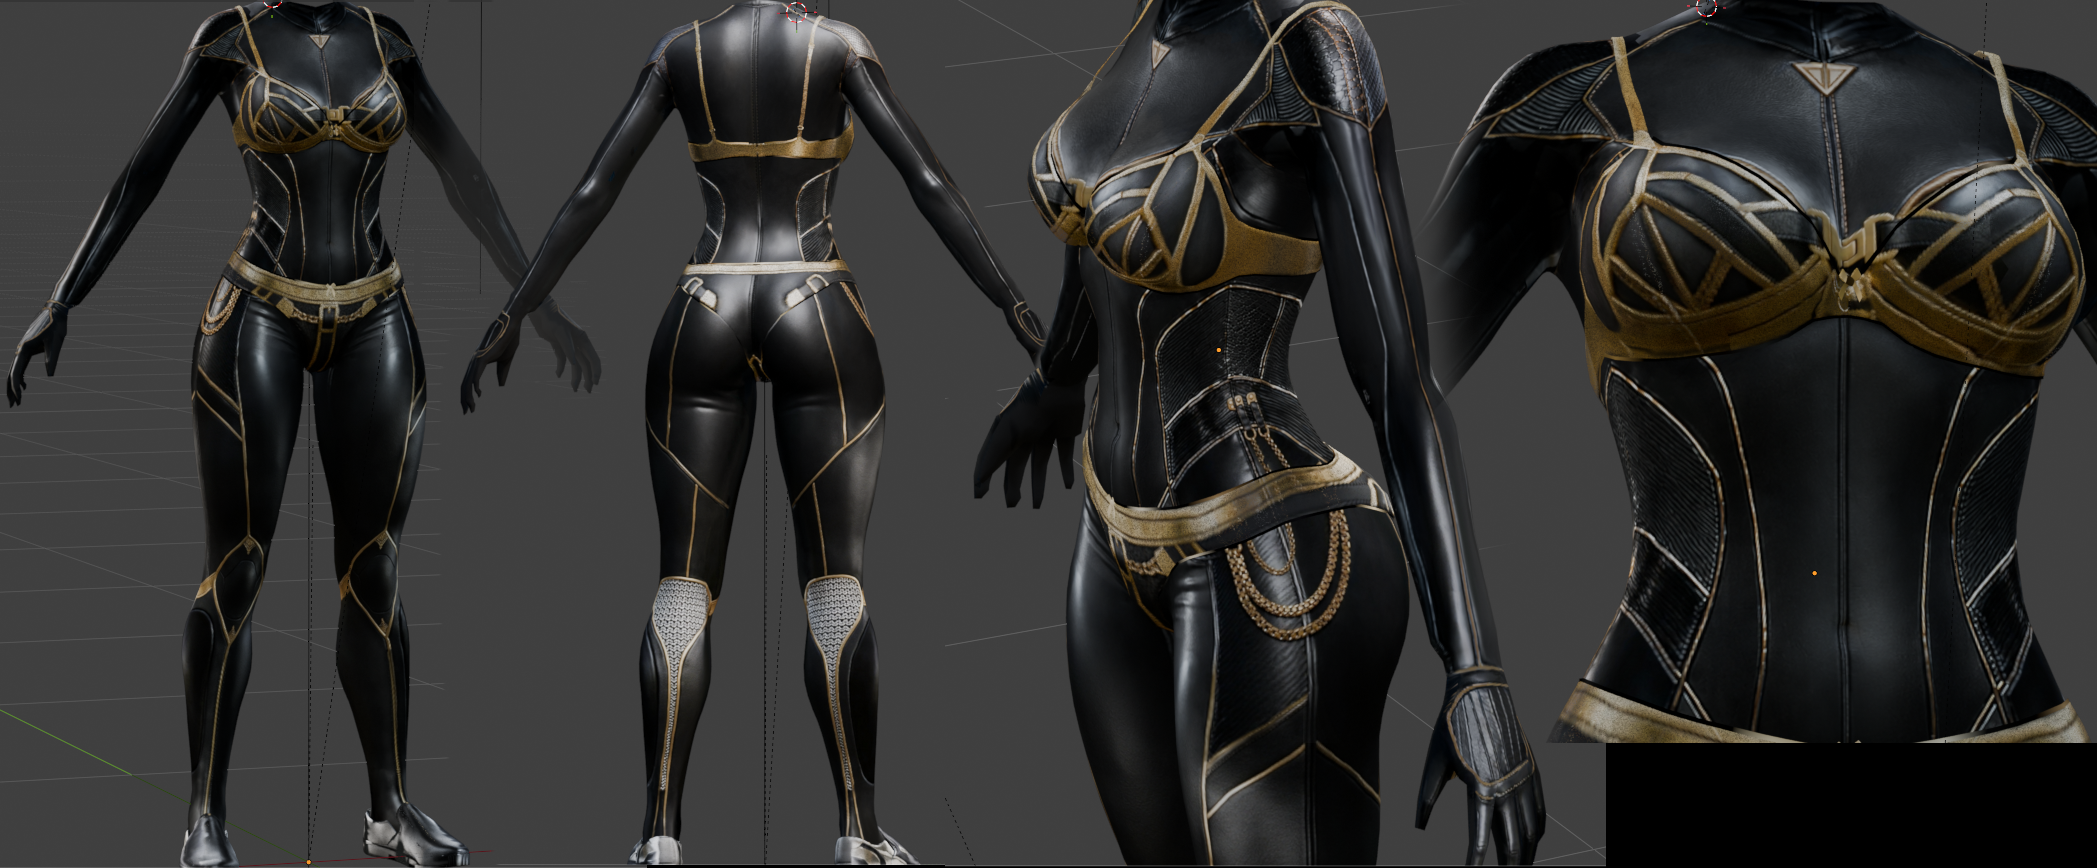
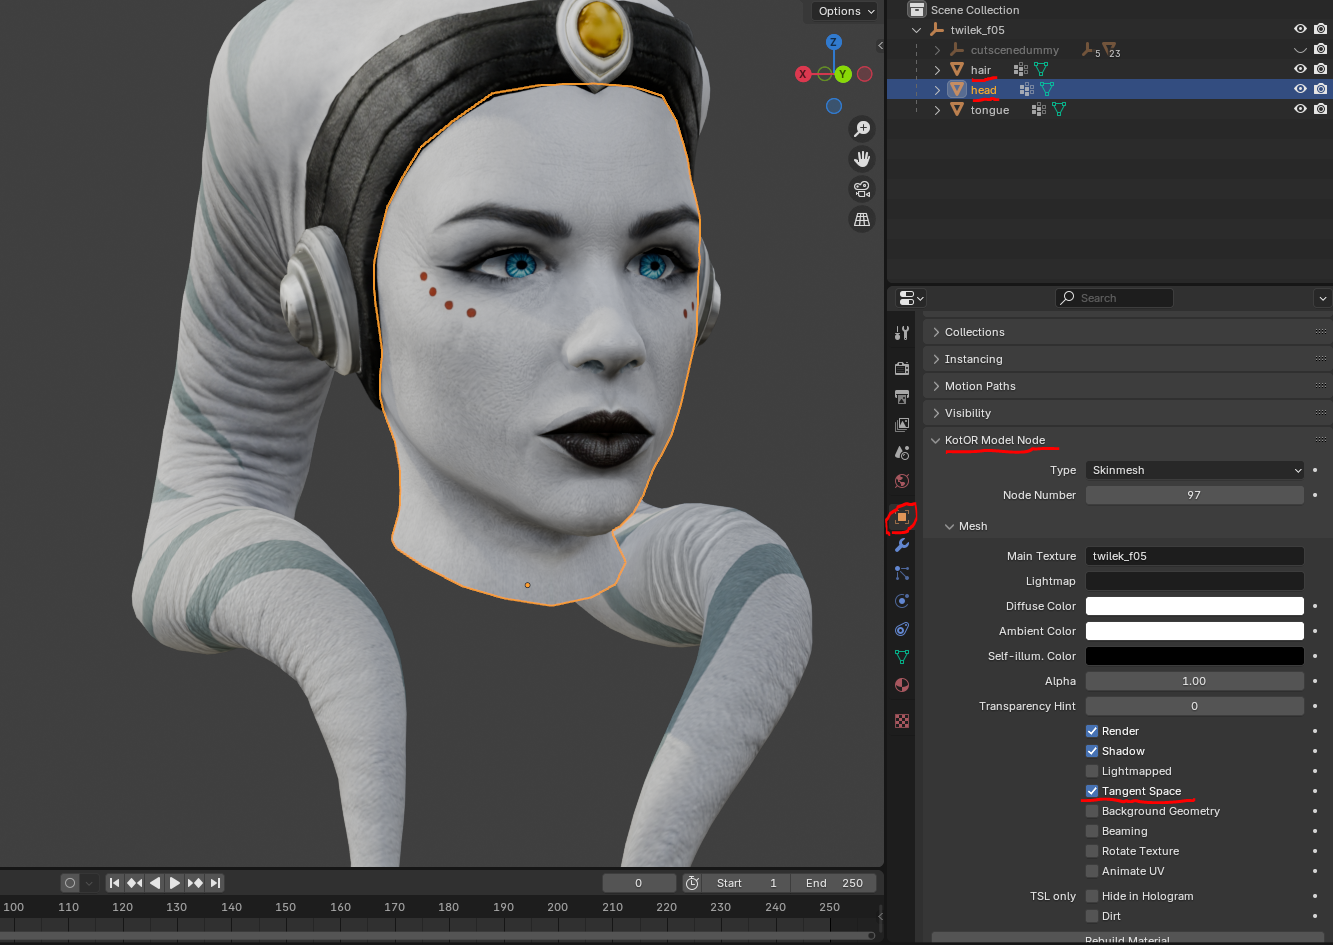
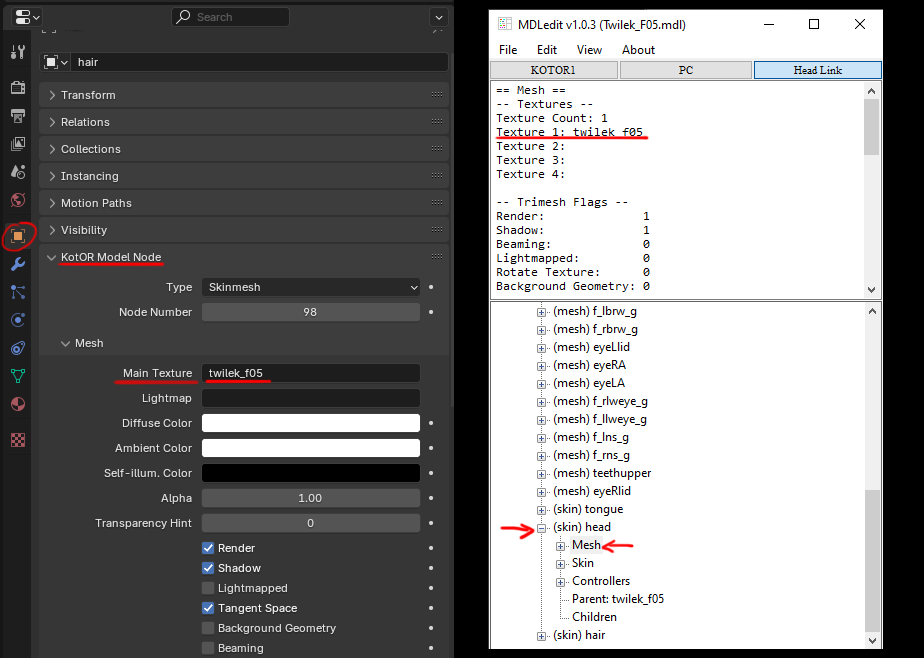
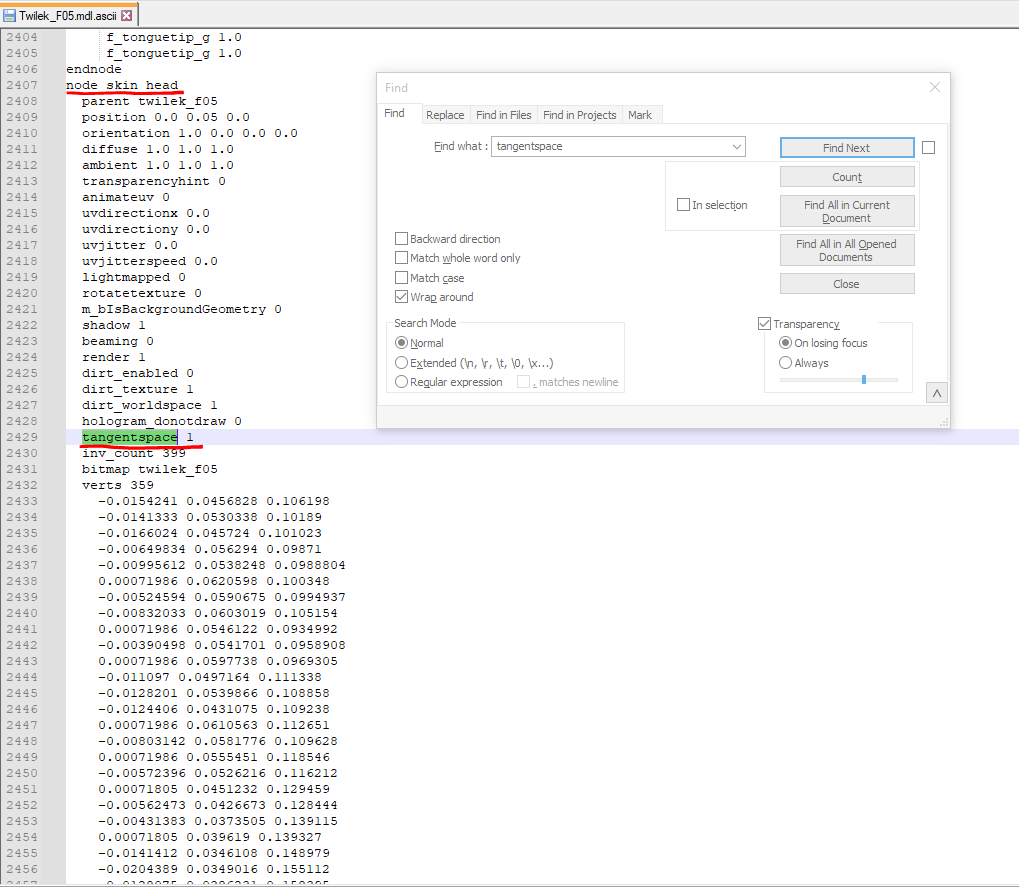
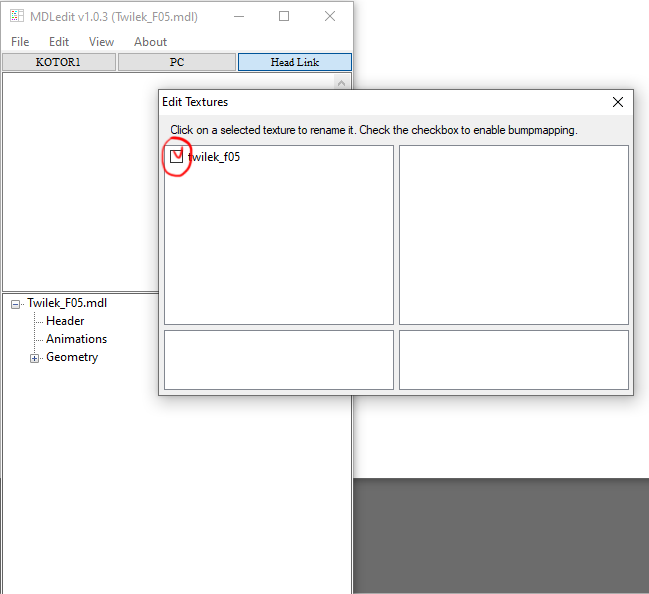
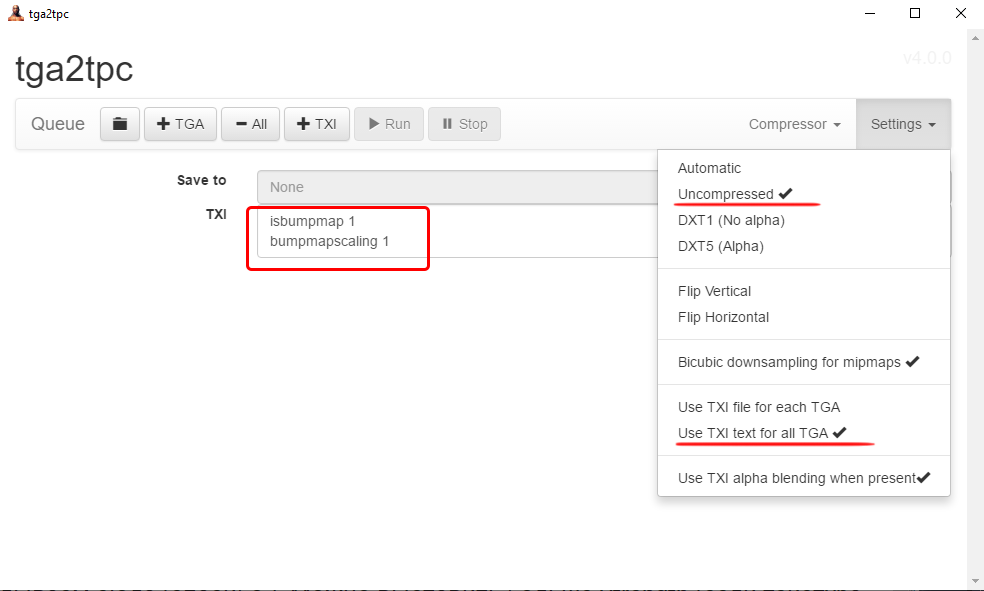
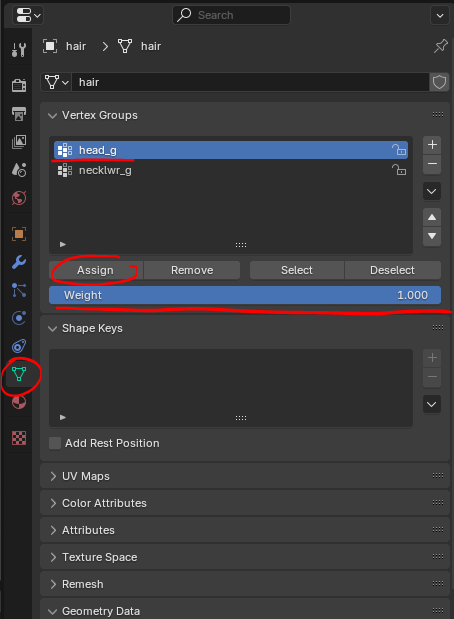
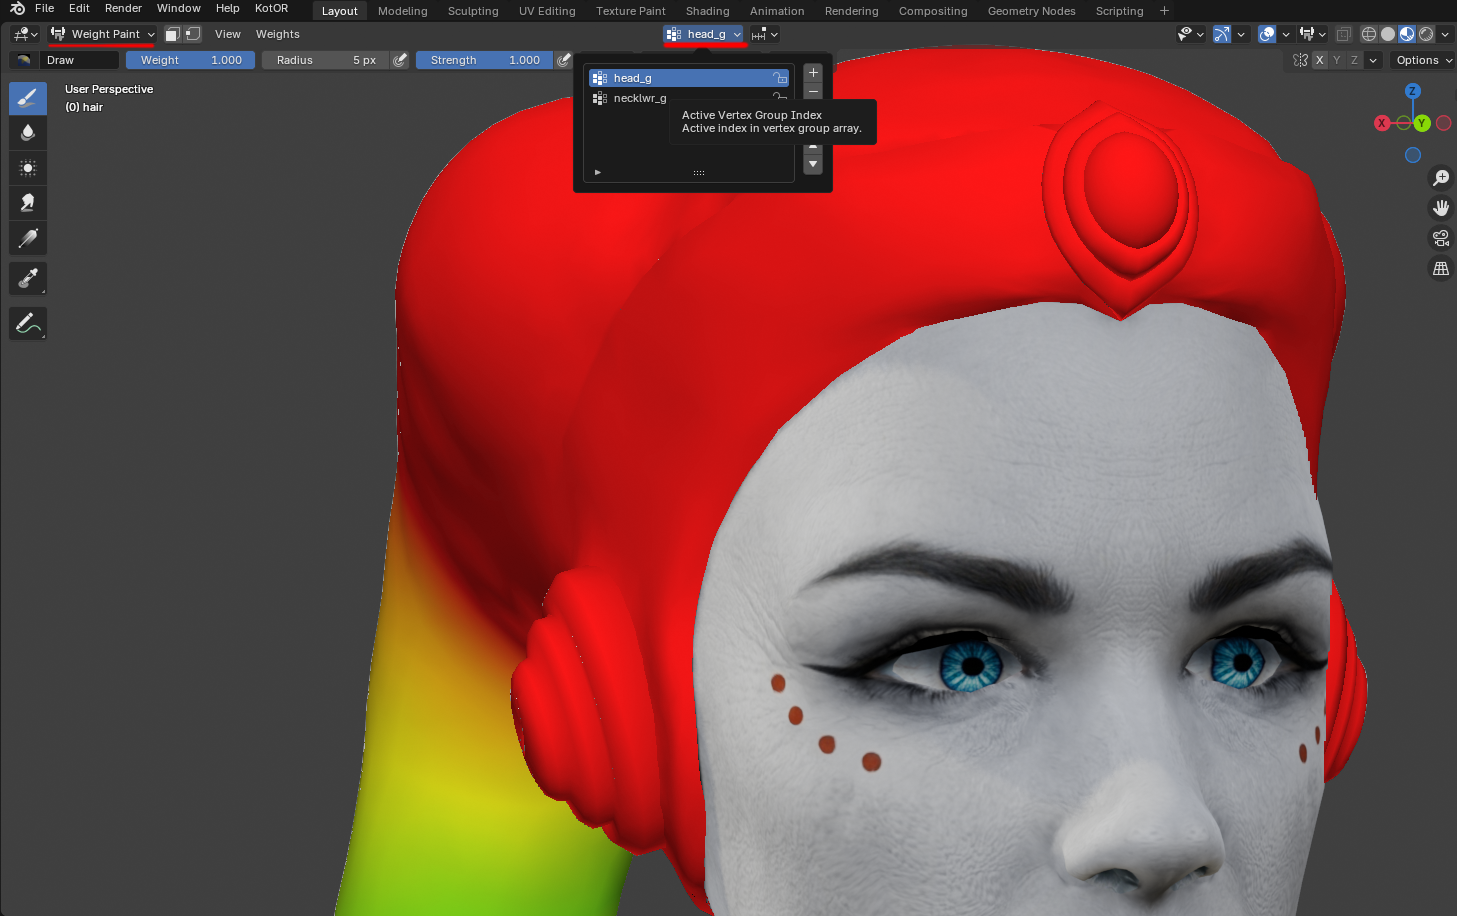
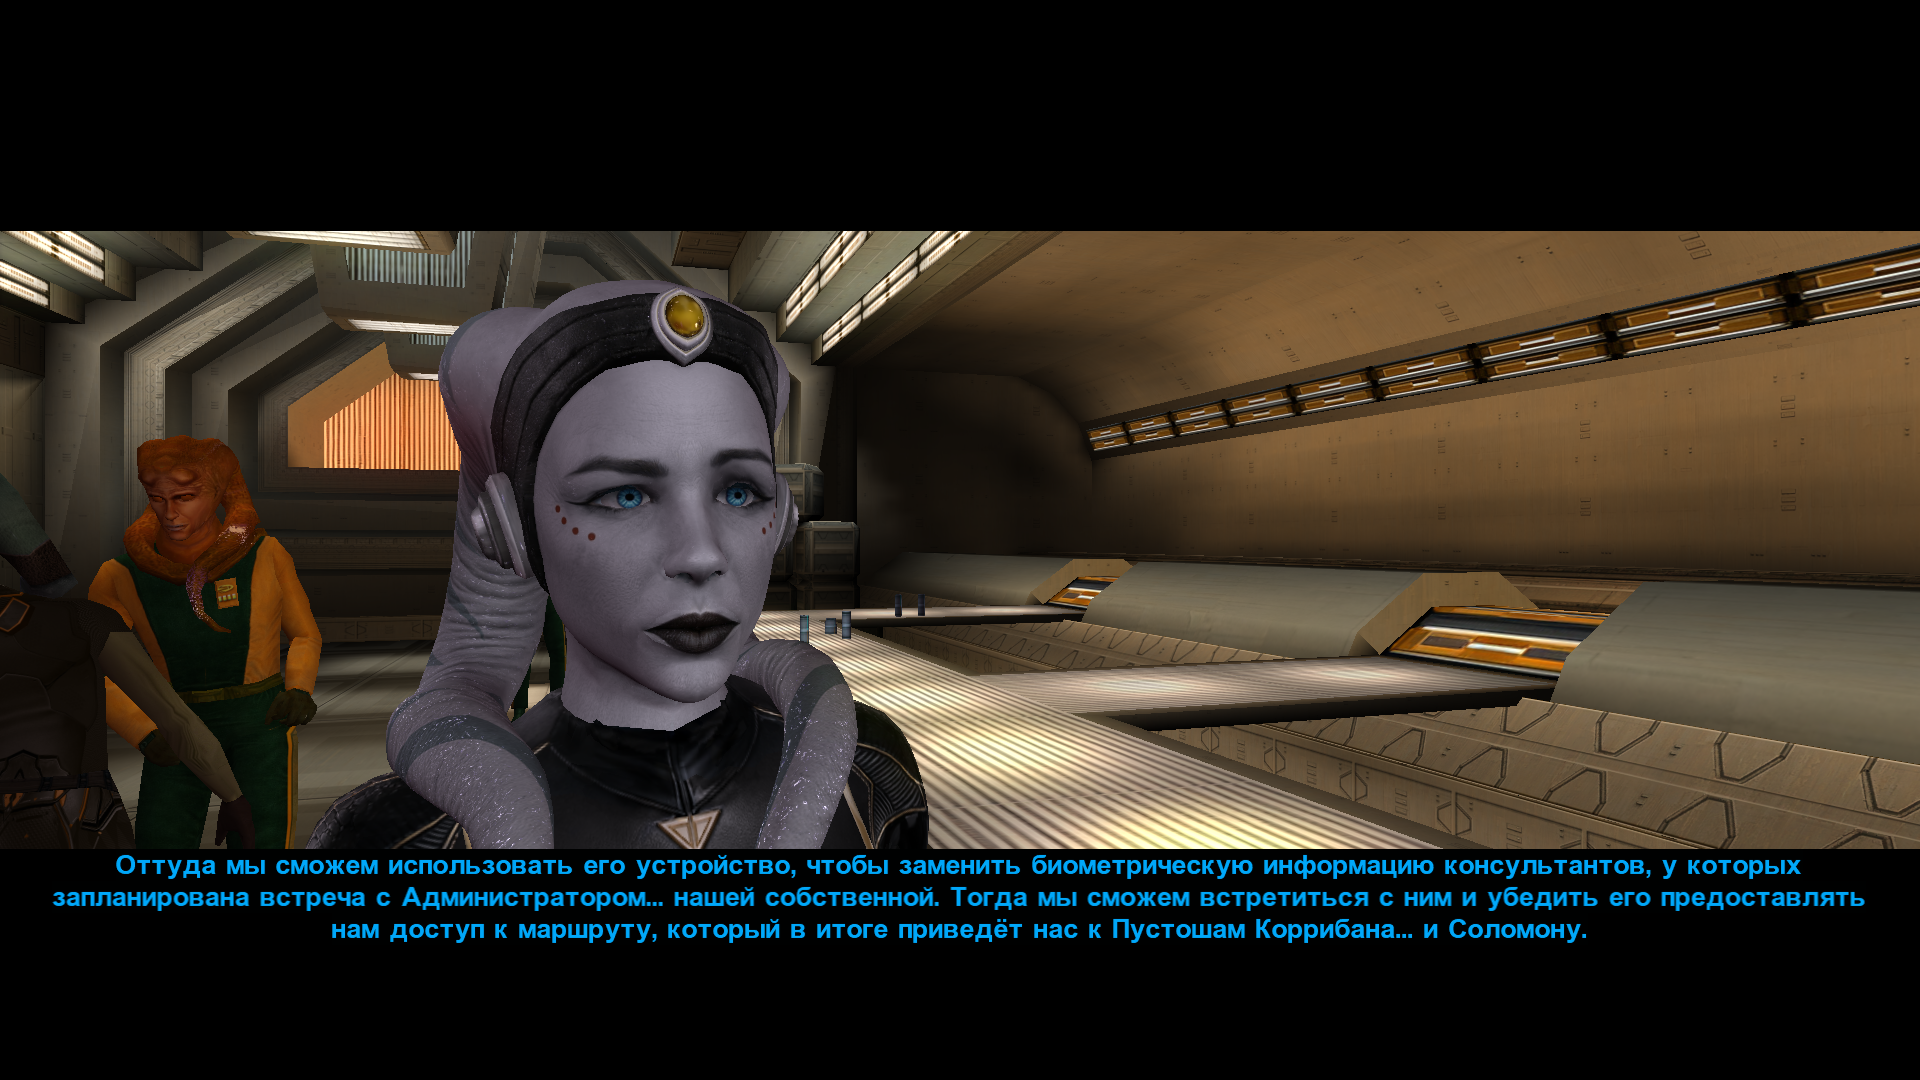
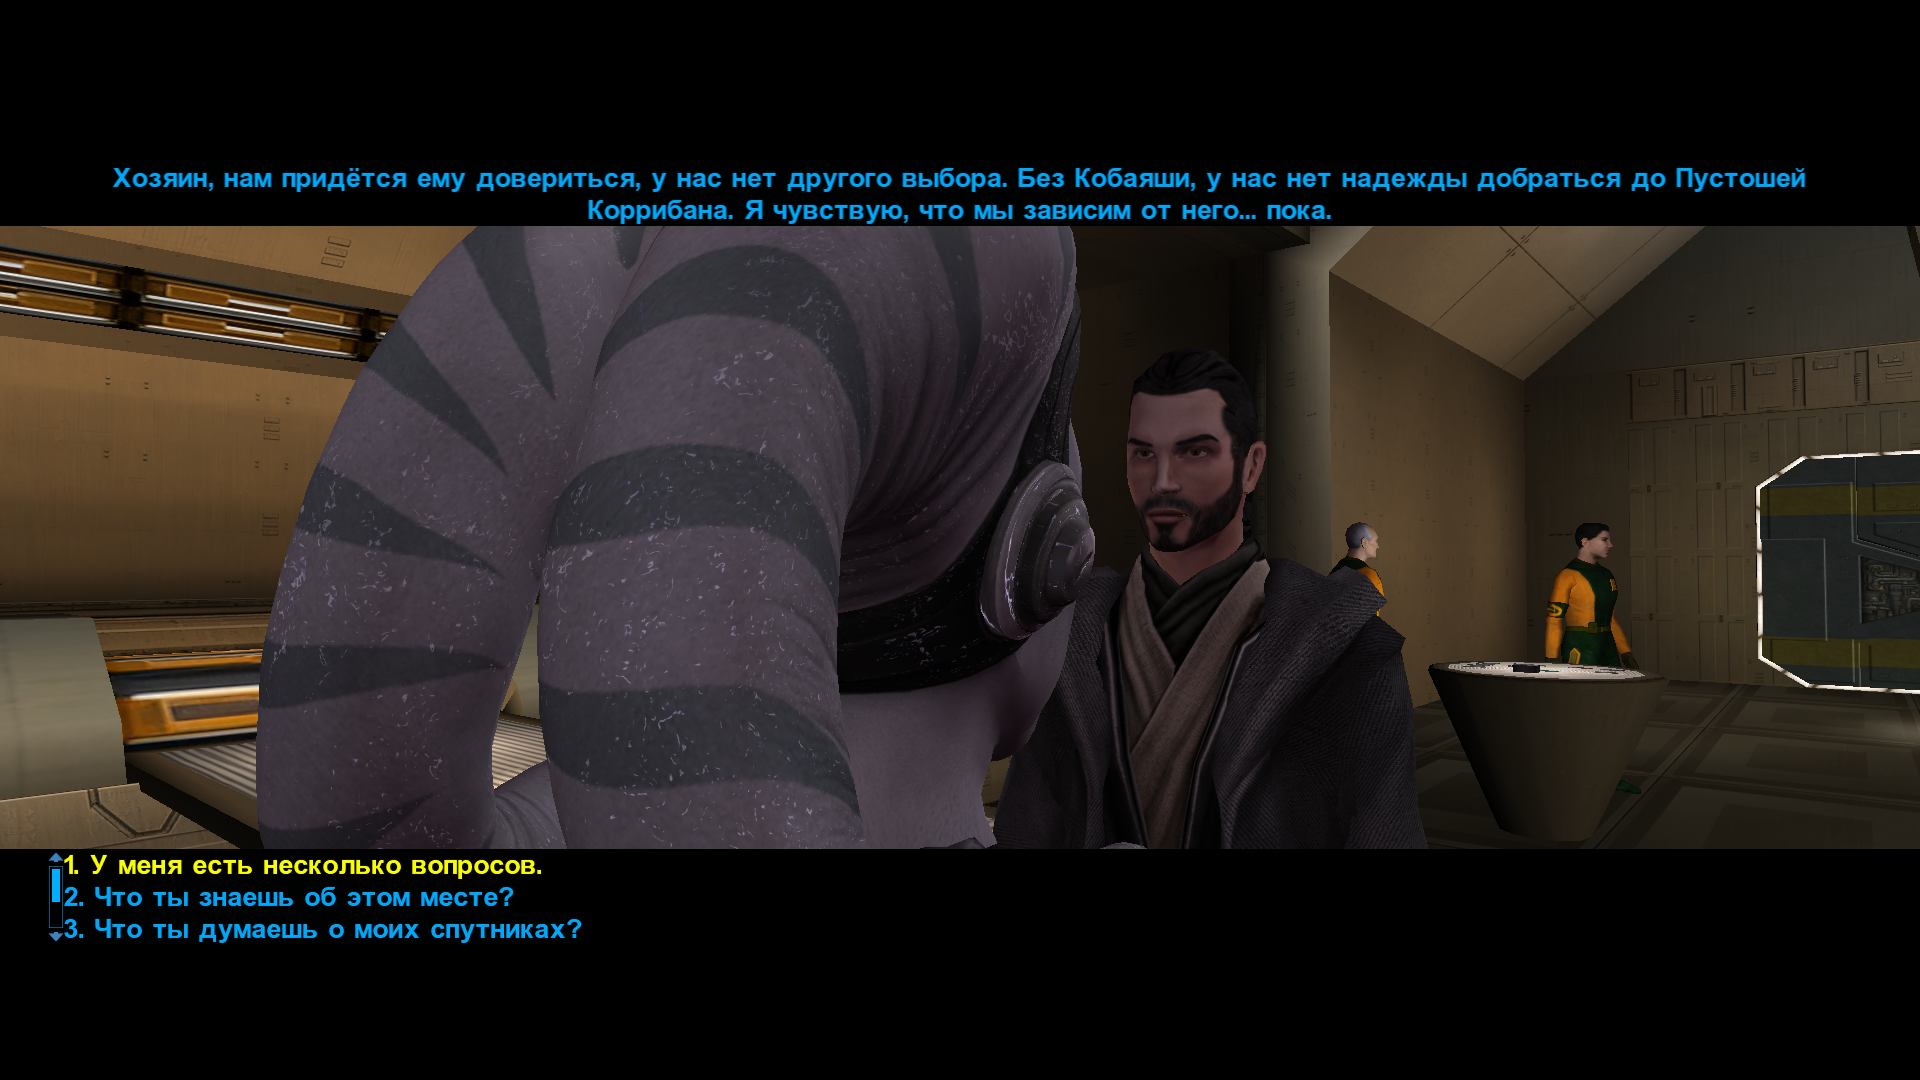
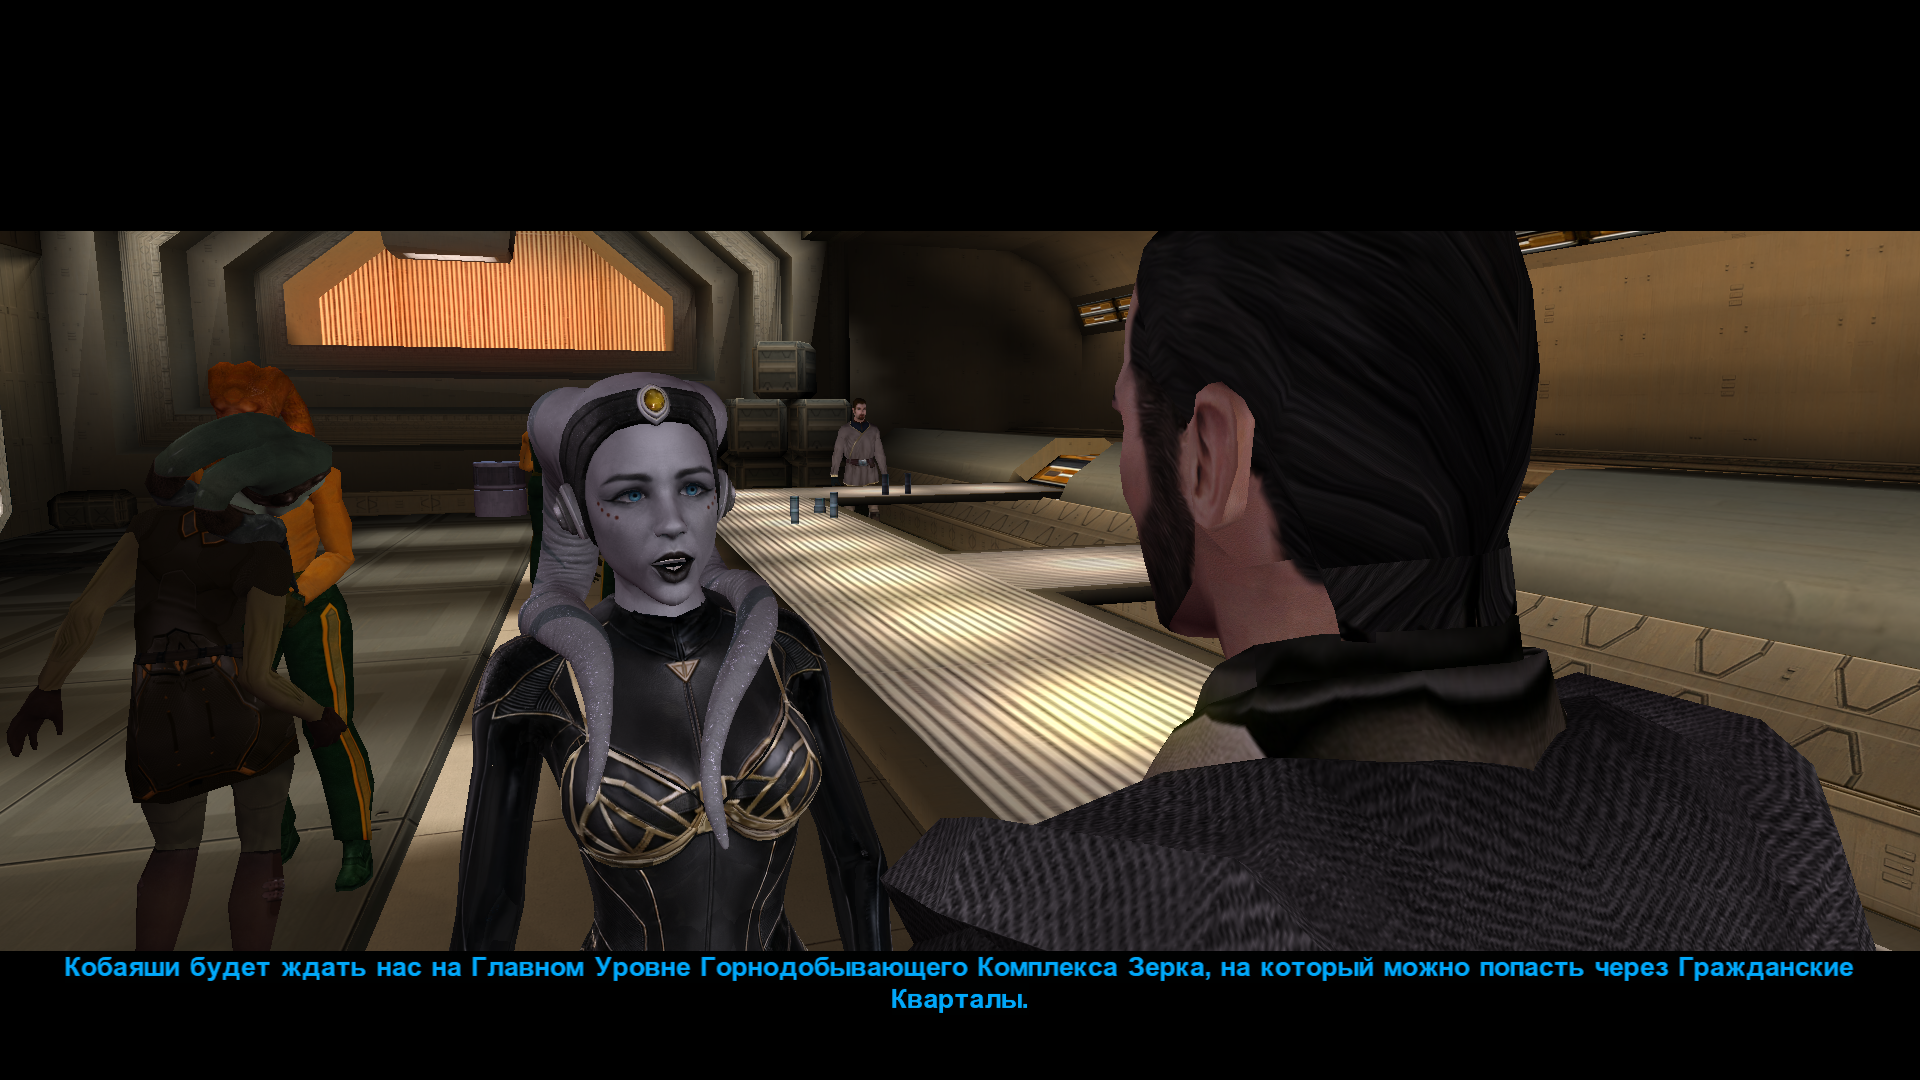
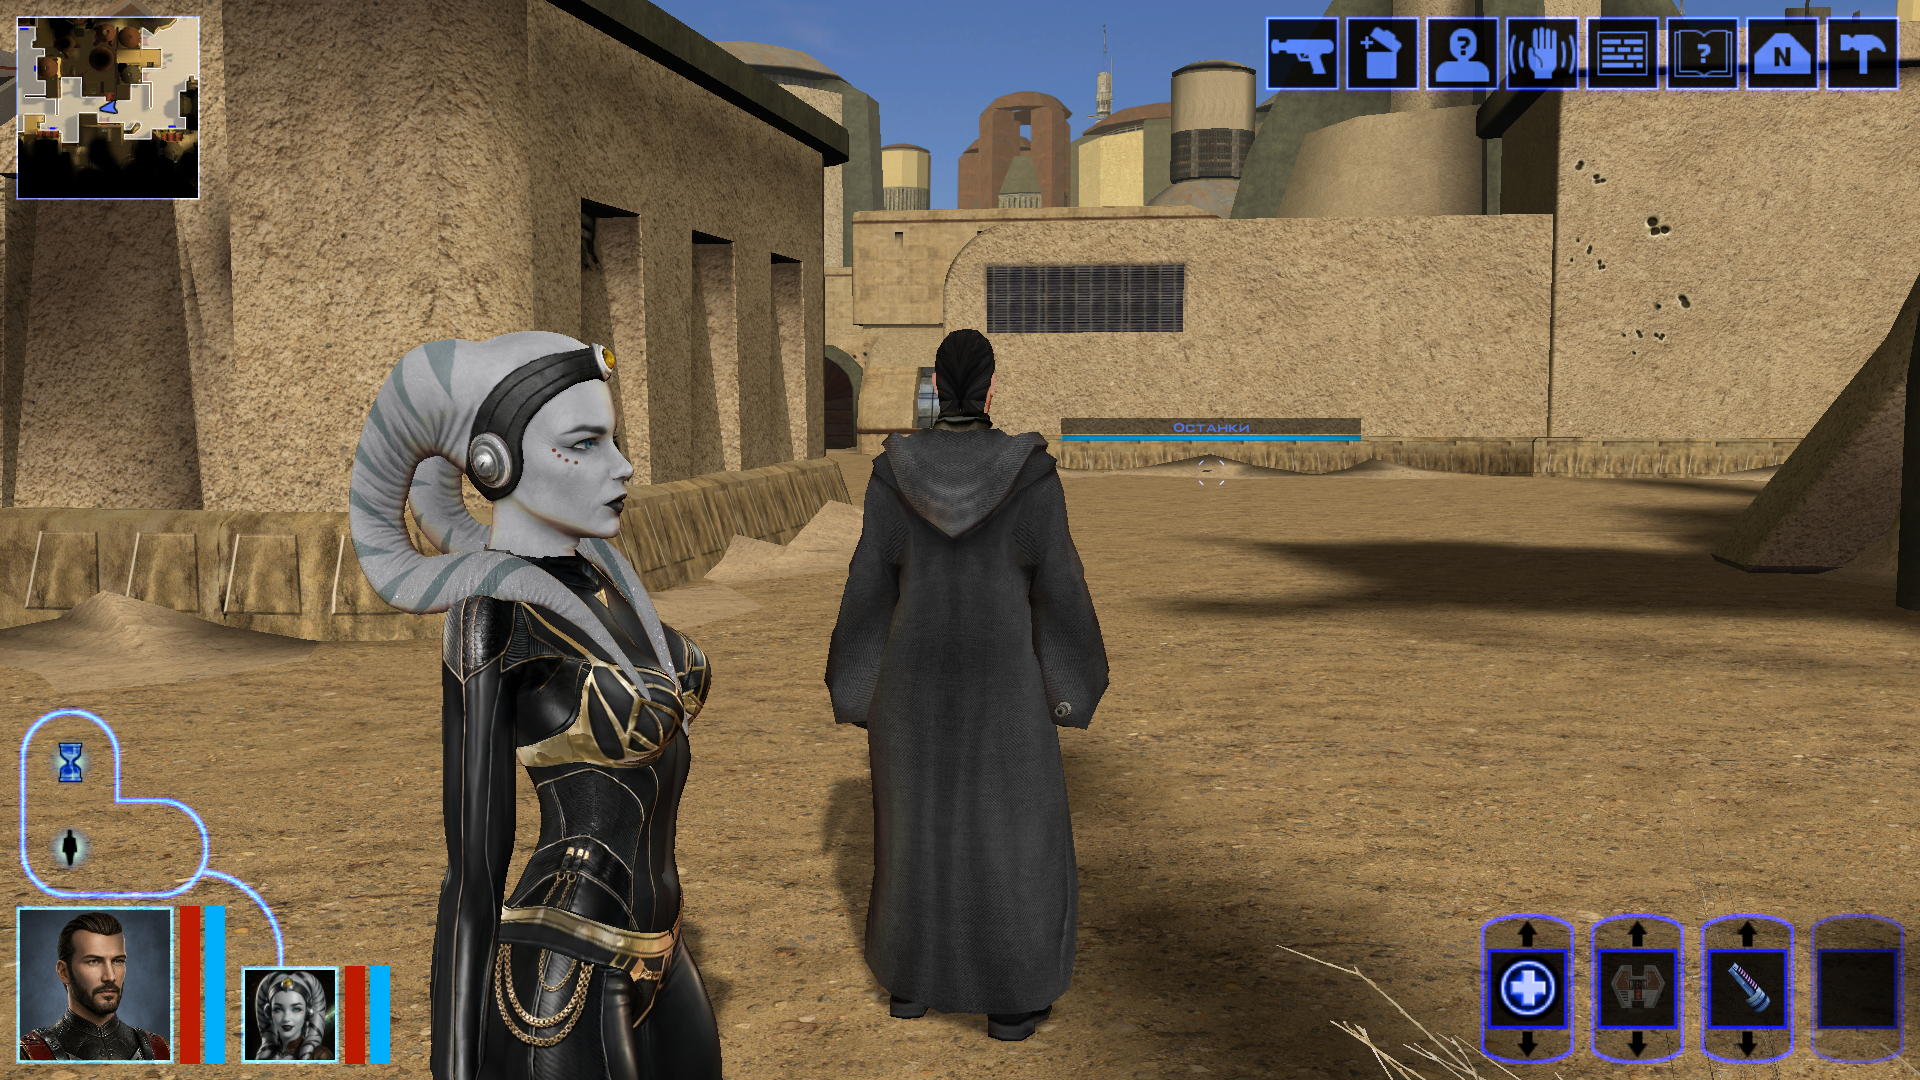
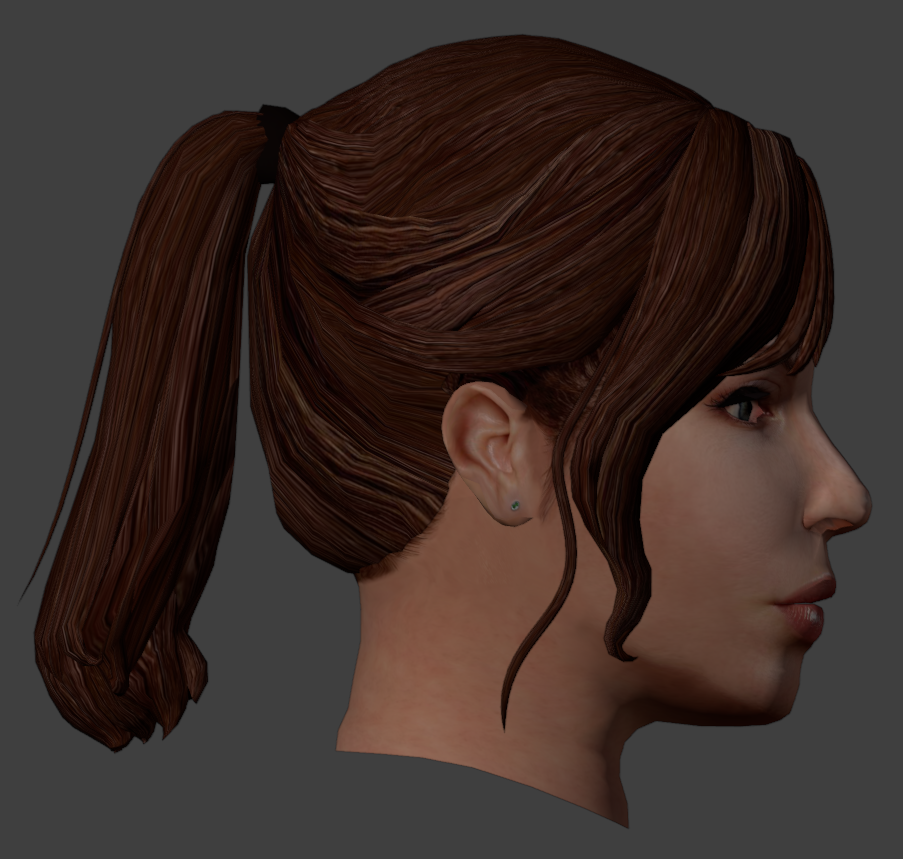
Hi everyone on this great forum! 😊 I decided to start my own little thread, even though I’m still relatively new here. I’ll be posting my work-in-progress, notes on how things are done - mainly for myself, so I can come back and refresh my memory later. If it ends up being useful to someone else as well, I’ll be happy of course. I’m sure everything I’m writing about has already been discussed countless times on this forum and is familiar to everyone. But I’m still a newcomer! My already released mods: New portraits for PartyMembers HD Animated Computer Interface Saul Karath Retexture Narve's New High Poly Canderous Head While working on the Canderous head I made a bit of progress learning Blender. I only knew it at a very basic level before, because I’m a 2D artist, not a 3D one. I still don’t really know what proper topology should look like, how to paint weights correctly, how to build textures with nodes, and so on. I’ll be learning all of that gradually. For this particular head I took a high poly mesh from this mod - big thanks to the author! Of course I heavily edited it: the geometry, the UV unwrap, and the texture. I also learned a few useful texture painting tricks. Geometry-wise the hardest parts are always the eyes and the lips, because the animation has to deform them properly, and what looks fine in Blender often ends up looking completely different in the game. Something I’d like to note here for myself - how to get rid of grey spots on the model after exporting from Blender to mdl/mdx: 1. The most important step - clear Custom Split Normals Data: Select the head mesh in Object Mode. Go to the Object Data Properties tab. Expand the Geometry Data panel. If the “Clear Custom Split Normals Data” button is active, click it. This removes the old broken data and forces Blender to recalculate the normals. Also helpful: 2. Apply smoothing — Right-click the model → Shade Smooth. 3. Apply transforms — Use with caution and only when needed! Things can shift in unexpected ways. In Object Mode select the head and press Ctrl + A → Apply All Transforms. ____________________________________________ P.S. English is not my native language, so I apologise in advance if anything is phrased awkwardly. ____________________________________________ Then I decided to retexture the high-poly Bastila body from the TCS mod. The thing is, we started playing through BOSSR on stream, and there Shadow uses Bastila’s body. And we have this Bastila mod installed. So I made her this outfit. I didn’t touch the model or the UV unwrap, only the texture. I painted the alpha channel in the places that should be more shiny. Since I don’t know how the original model author would feel about this little “side project” of mine, of course I won’t be releasing this texture anywhere — it’s purely for personal use. After that I moved on to her head. I wanted both the lekku and the face itself to have more polygons. So I simply applied a Subdivide, then worked on the mesh — editing vertices, sculpting, and so on. Then I started texturing, and at that point I really wanted to add a bump map so the lekku would look bumpy the way vanilla Twi’leks do (even if the vanilla ones are very low quality). I dove deep into the problem — I remember spending entire weekends glued to this forum reading everything people wrote about adding bump. Nothing was working for me. I tried every piece of advice, converted the poor bump map to TPC every which way, opened the model files in ASCII and searched for tangent vectors… I even started recalling university calculus about quaternions and how I used to redefine matrix multiplication in C++ practicals…🤣 It turned out the problem was completely different. The BOSSR mod authors used the "Twilek05" head model, but in heads.2da they assigned it the texture name "matilda_headd". Meanwhile the model itself is linked to the texture "Twilek05". And even though the engine can pull the main (diffuse) texture information from a texture that isn’t the one specified in the model, it cannot pull bump map information (and apparently txi info as well) from a texture with a different name! I don’t know why it works this way — maybe some internal script. Anyway, once I renamed the main texture to "Twilek05.tga", the bump map to "Twilek05b.tpc", wrote this in the "Twilek05.txi": bumpyshinytexture CM_SpecMap bumpmaptexture Twilek_F05b and also put "Twilek05" as the texture in heads.2da — miracle of miracles, the game finally saw the bump map! Yes, it didn’t turn out perfect — the bumps are too fine and therefore look a bit like shimmering. I probably won’t fix it, because we had to abandon that mod playthrough — it conflicted with other mods. But I’ll write down the key points needed to add bump (even though all of this is already on the forum — huge thanks to DarthParametric and everyone else who shared advice and tutorials): Before exporting, you must enable the “Tangent Space” checkbox in the KotOR Model Node plugin options for all the meshes that need it (in my case “hair” and “head”). To verify — open the model in MDLEdit, save it as ASCII, open it in Notepad++ and search for the word “tangentspace”. On the relevant nodes it should say tangentspace 1, not 0. If it somehow still shows 0 even though the checkbox was enabled on export from Blender, change it to 1, save, open that ASCII file again in MDLEdit (it might complain that it can’t recalculate the vectors — hopefully that’s not a problem), and then save it back to binary mdl/mdx. You can also just tick the corresponding checkbox in MDLEdit itself and re-save — but keep in mind that the bump will then be applied to every mesh in the model that uses that texture, not only the ones you might have wanted. Preparing the .txi. It must have the exact same name as the main texture, and the main texture must be the one that is actually linked to the model. Inside the .txi you need: bumpyshinytexture (your Cubemap) bumpmaptexture (your bump map name) In theory bump should work without the shiny part (only the line "bumpmaptexture " in txi), but for me it never did — because in that case the engine treated the alpha channel of the main texture as transparency. Meaning: if you darken the alpha to make the bump stronger → the object becomes transparent if you leave it white → no bump is visible. Maybe I’m doing something wrong? Preparing the main texture. It must be named exactly as specified in the model (you can check that here). It needs an alpha channel that controls both the shininess (via the Cubemap) and the strength of the bump. The darker the alpha, the stronger both effects. Yes, both at once — there’s no other way. Preparing the bump map. Save the main texture as an image and throw it into this website (again, thanks for the link — found it on the forum). You can increase Strength if the texture isn’t very contrasty, and add a bit of blur (slider to the negative side). Download the result and save the texture as TGA with a pure white alpha channel. Then use tga2tpc with these settings. You can also add extra lines or strengthen the bump with the bumpmapscaling value, as DarthParametric wrote here: https://deadlystream.com/topic/9353-bump-mapping-tutorial-request-for-novices/#findComment-87017 Final contents for the override folder: the model (mdl + mdx), the main texture (tga), the .txi with the parameters, and the bump map (tpc). Phew. The last thing I learned on this head was adding new geometry — I wanted to model headphones and a stone on her forehead. Important points here: convert everything to triangles and weight-paint it to the head. To check — switch to Weight Paint mode and make sure it’s painted red. If you need a piece not to move with the head, weight-paint it to the neck instead (a different vertex group). If you don’t weight anything at all, those pieces of the model simply won’t appear in the game. 🙃🙃 I’ll say it again: I’m by no means an expert on KOTOR modding, so I apologize if I write or do anything incorrectly! And, of course, I’d be grateful for any advice, comments, or corrections.
 1 point
 -
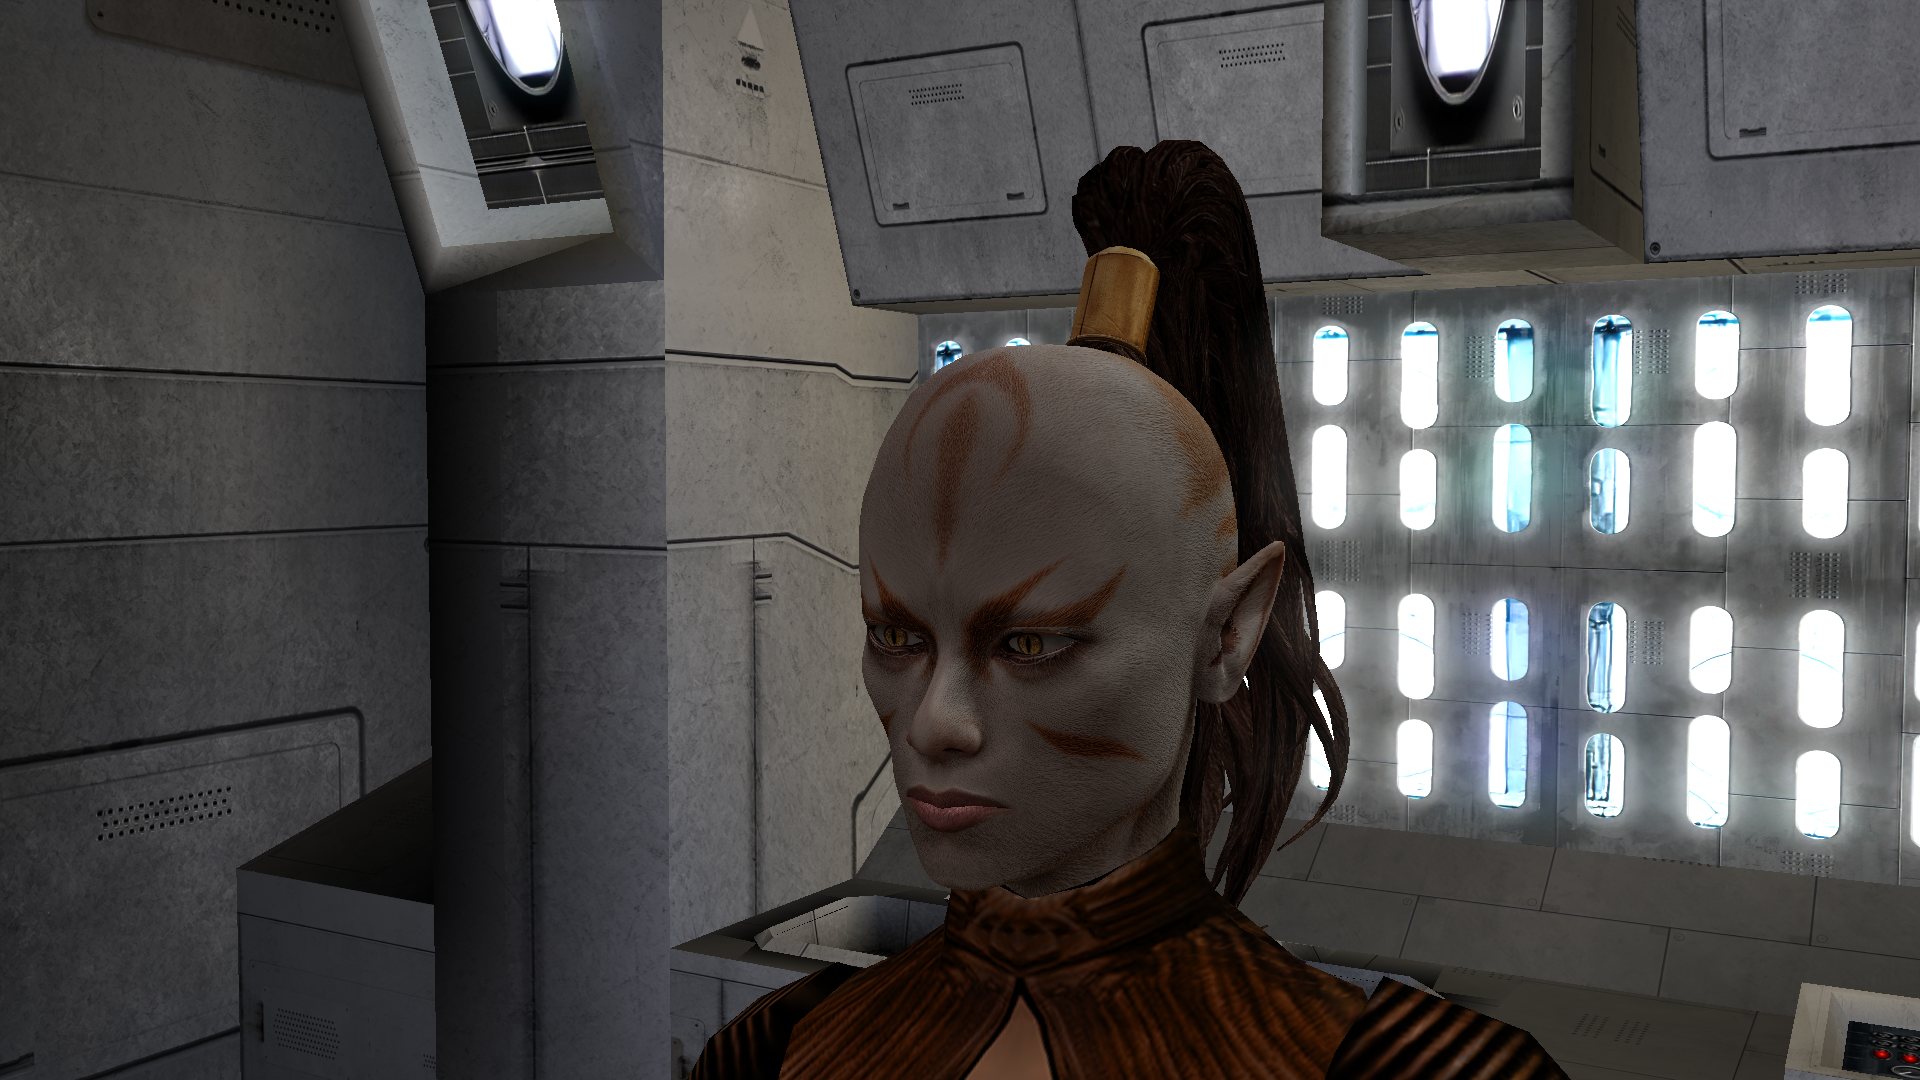
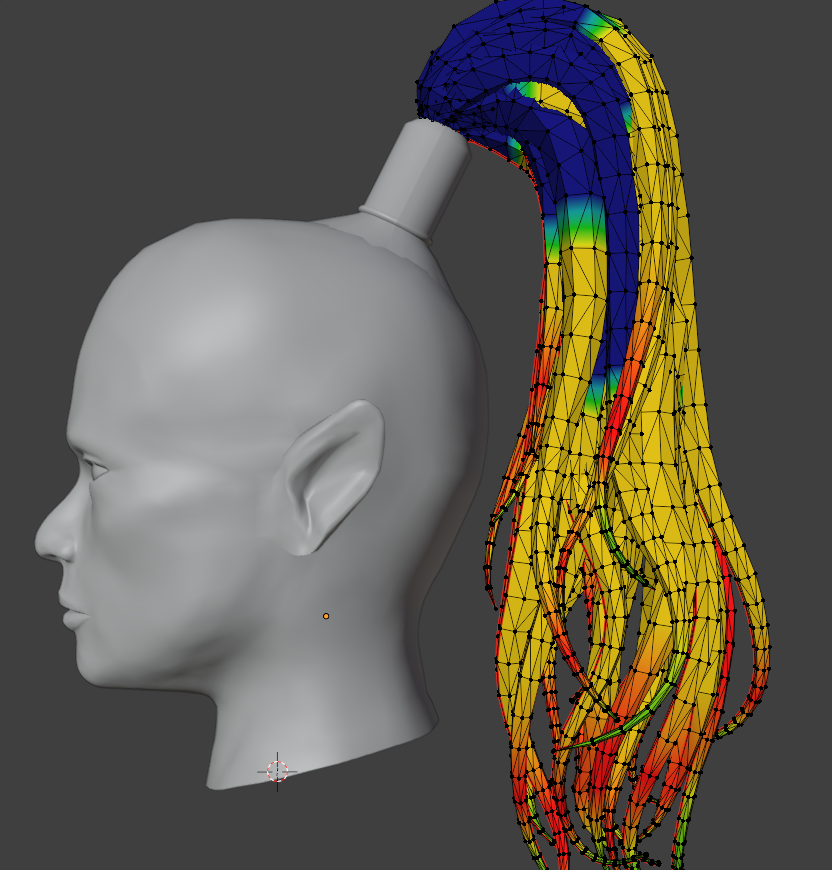
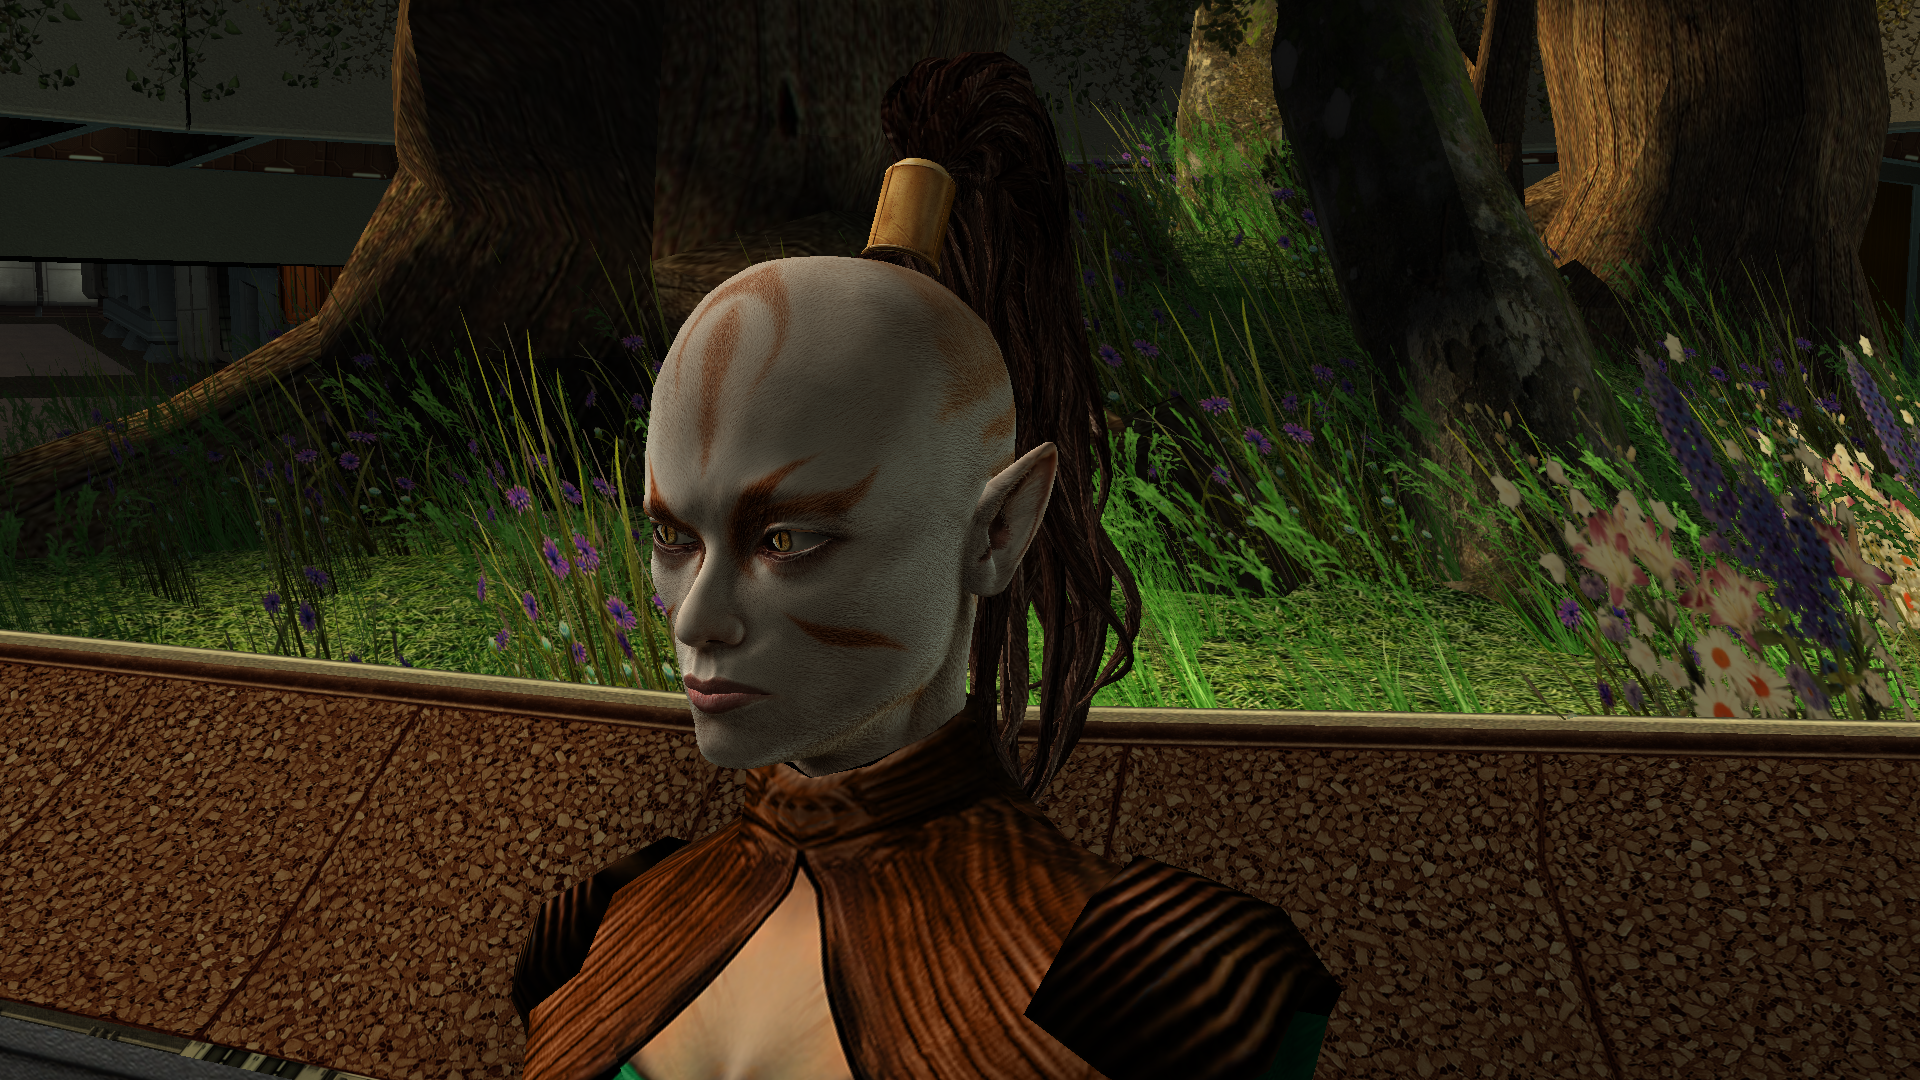
Another work of mine that’s currently in progress is the Juhani head model. It’s high-poly and has a 2K texture. The work is actually already finished, but I’ve realised I can’t release it like this - now I need to either rework the texture or even the body model, because the difference is too noticeable at the moment. During this process I learned a lot in Blender, but there’s no point writing about that here. The only thing really worth noting is how the game renders danglymesh with different weights. With weights greater than 0 up to roughly 0.6–0.7 the vertices get a kind of “semi-freedom”: the engine shifts them, but not as predictably as at 0 (fixed, locked to the head position) or near 1 (completely detached from the head and dangling with the set amplitude, stiffness and period). So when weight-painting the tail I used 0 near the attachment point and then jumped straight to 0.7 without a smooth transition. Toward the tips I softened it to 0.6–0.5 - the tips can dangle freely, they’re allowed to! I don’t know, maybe it can be done better, but at my current level of understanding the process I think this is the maximum. Yes, the lips also had to be re-weighted - I spent two days painting them this way and that, checking every frame, but in the end I got a result without any pinching or artifacts.
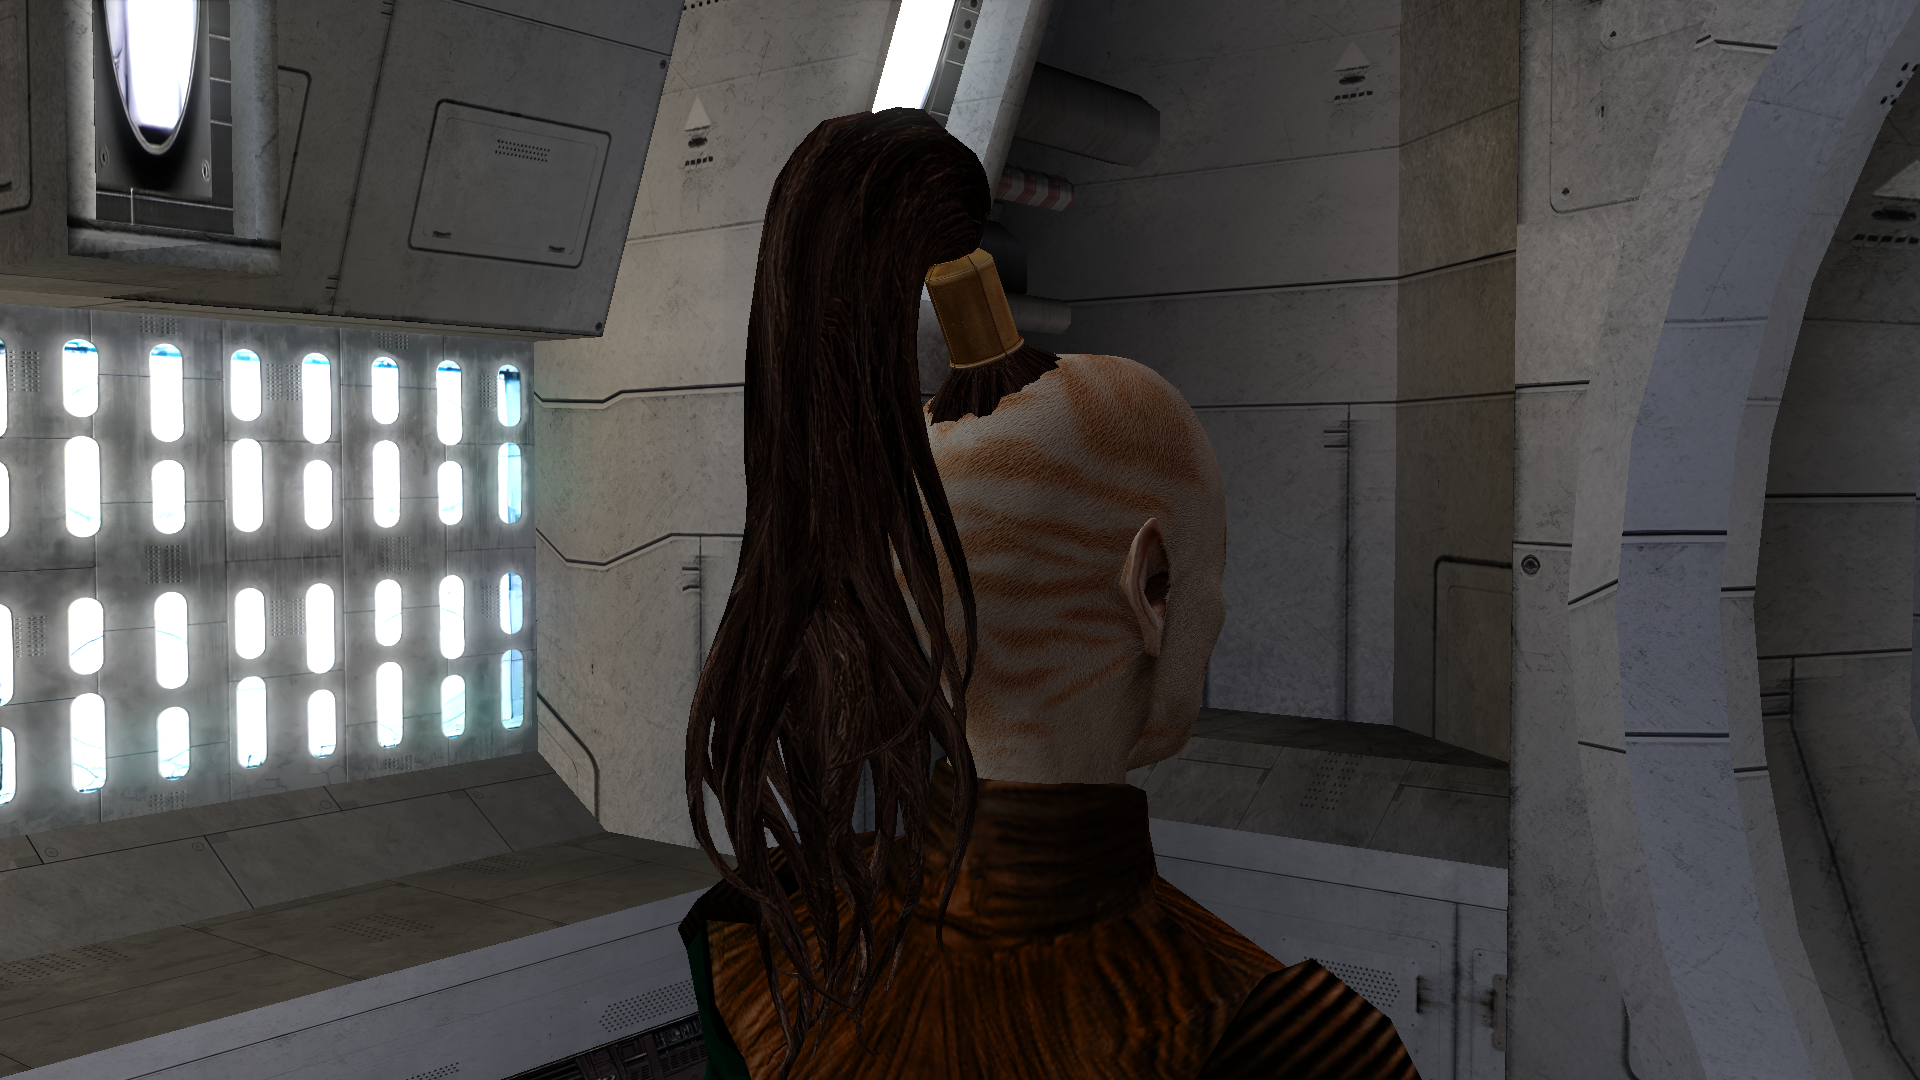
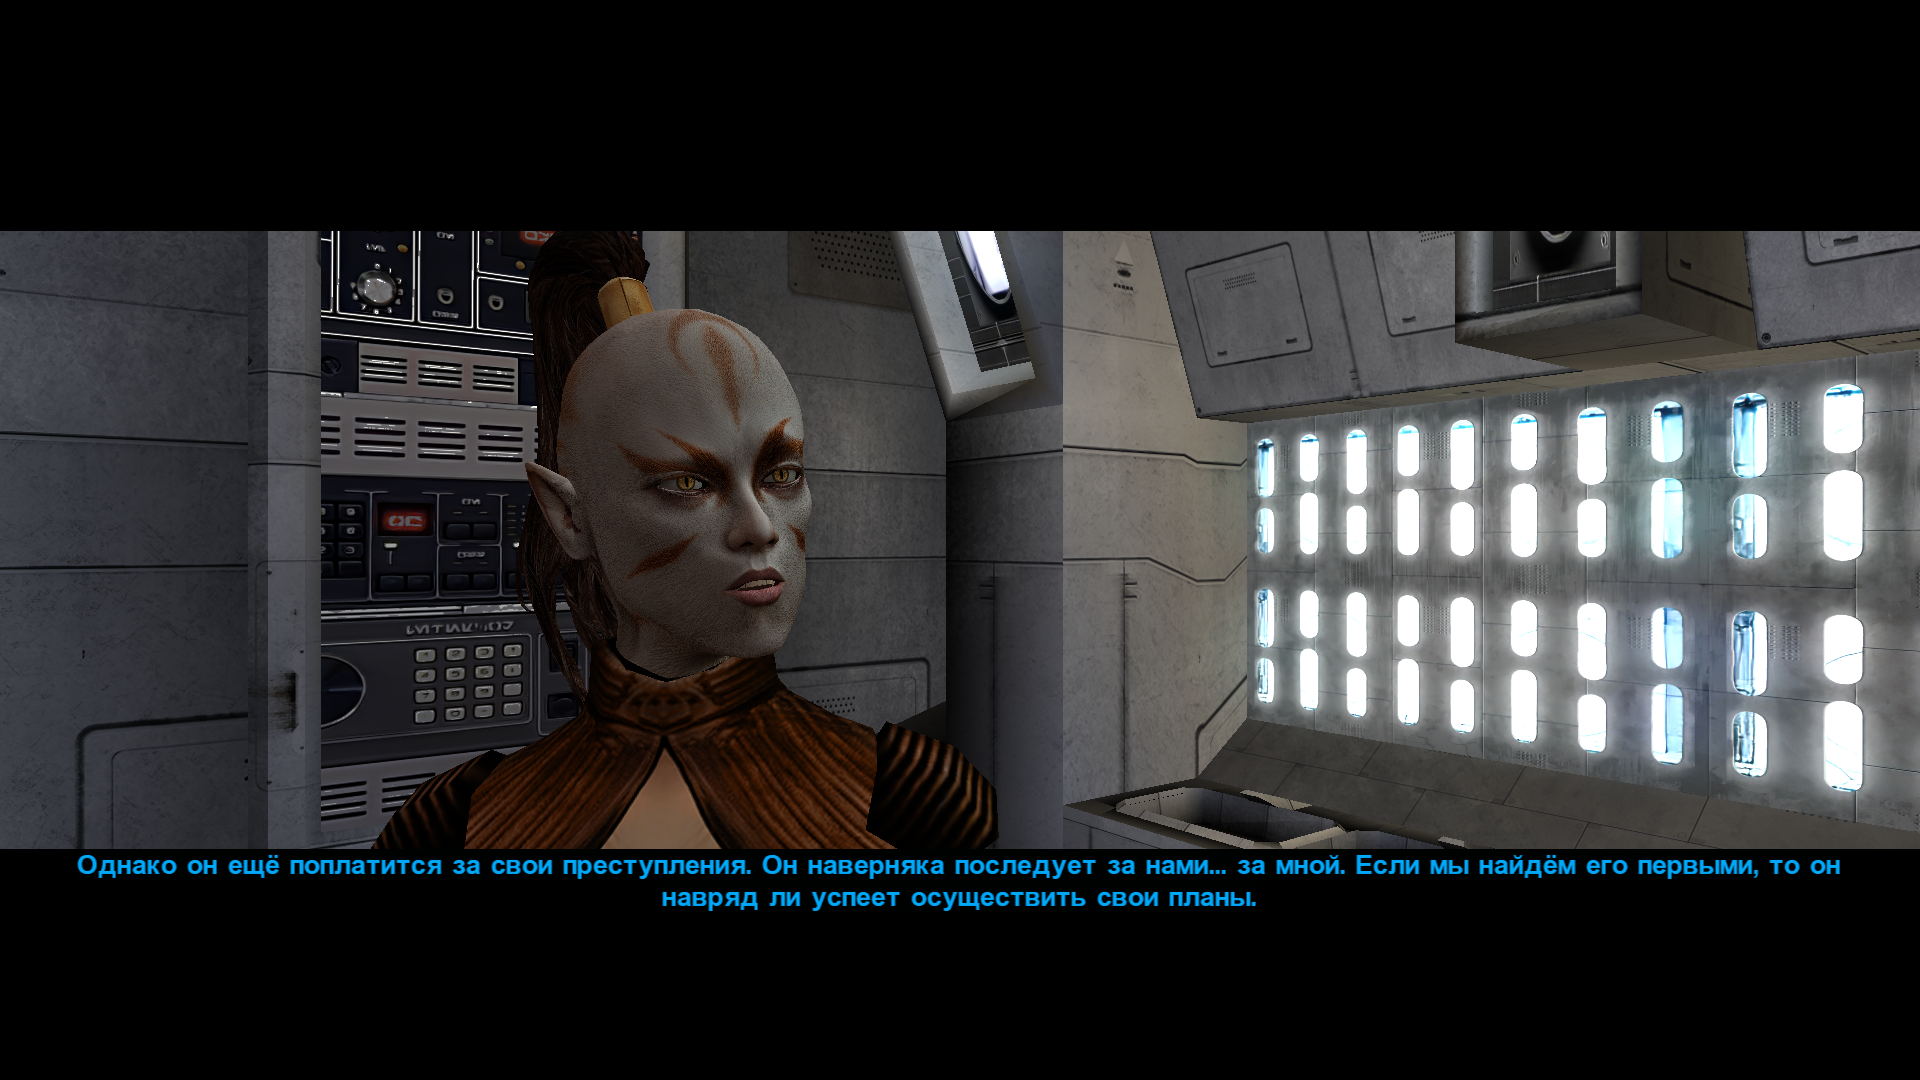
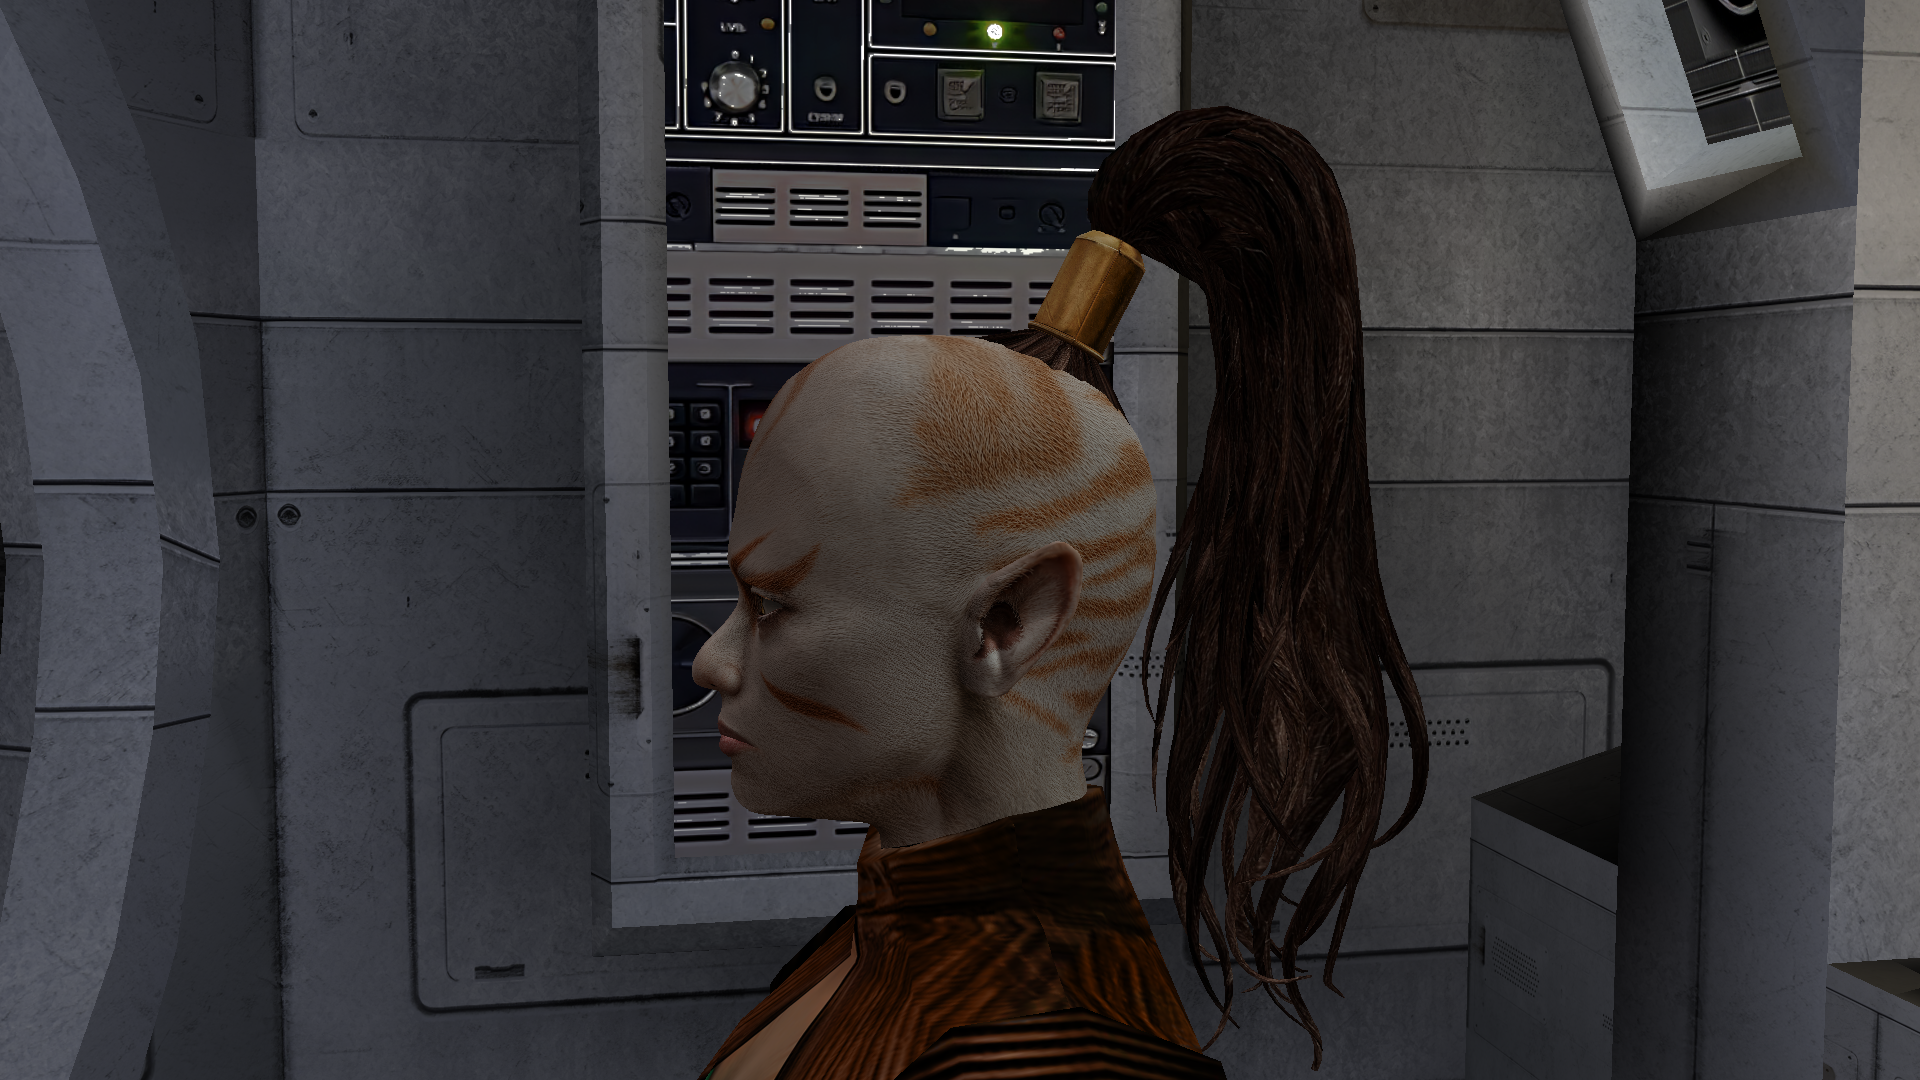
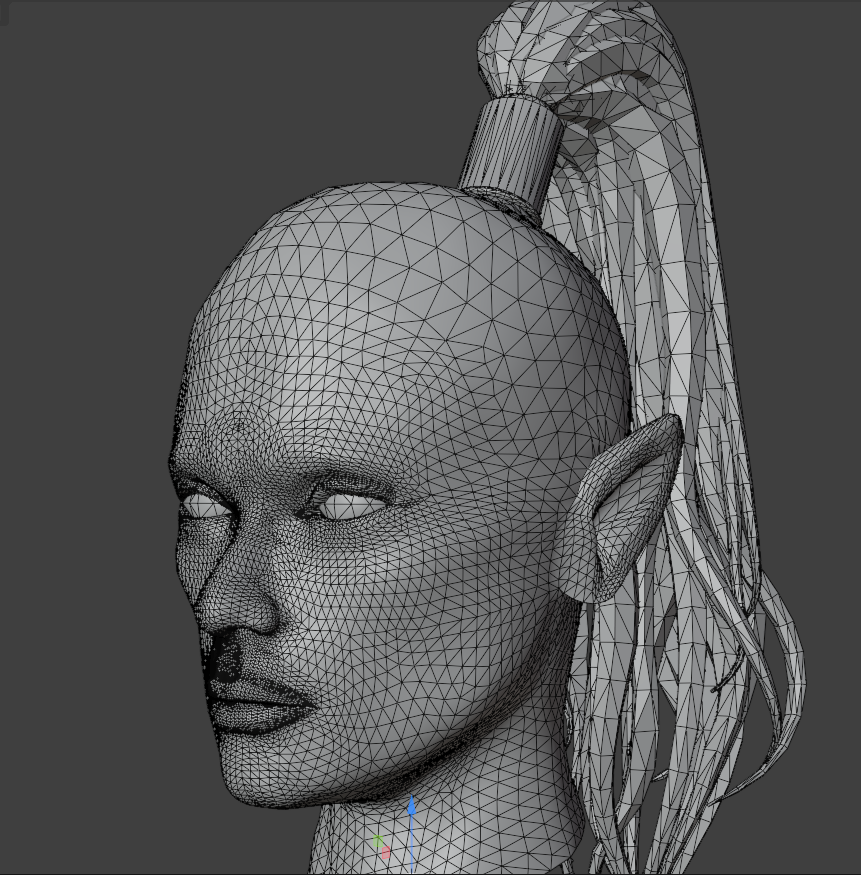
 1 point
 -
1 point
-
Do you have a link?1 point
-
Version 1.0.0
52 downloads
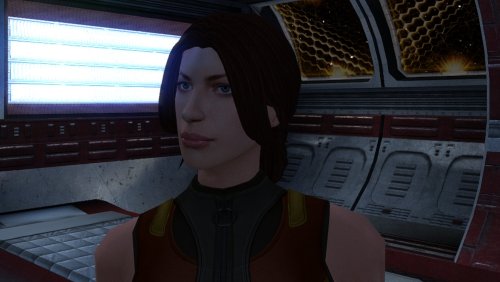
The mod replaces the PFHC01 model and textures. To Install 1. Download: PFHC01 2. Copy all files to the Knights of the Old republic's Override folder. (Example location - C:\Program Files (x86)\Steam\steamapps\common\swkotor\Override) 3. When/if prompted to overwrite files, press okay. 4. If you like the mod; leave a comment or endorse! (It would be much appreciated) Made with love.1 point -
Version 1.0.0
1,674 downloads
KMRP - KOTOR MODERN RESTORATION PATCH Modern resolutions, properly scaled UI, engine fixes and restored interface behaviour for KOTOR 1 48 resolutions | 800x600 to 15360x8640 | 4:3 | 16:10 | 16:9 | 21:9 | 32:9 WHAT IS KMRP? Vanilla KOTOR was built around fixed pixel sizes and interface layouts originally designed for resolutions such as 640x480. On modern displays this causes tiny text, overlapping list entries, undersized icons, broken map scaling and other interface problems. KMRP fixes these problems in the game engine itself. It supports 48 resolutions from 800x600 up to 15360x8640 across 4:3, 16:10, 16:9, 21:9 and 32:9. Several of these fixes require changes to swkotor.exe because the affected values are hardcoded inside the engine and cannot be reached through GUI or 2DA files alone. WHAT IT FIXES Readable text with properly scaled list rows Inventory, Abilities and Store icons and rows scale correctly Item stack counts remain visible with larger fonts Long item description crash fixed Description text no longer runs under the scrollbar Area map fills its frame Fog of war covers the complete map Map marker clicks line up correctly 250 misplaced map notes can be corrected using Derslok's fixes HUD minimap is zoomed correctly again Dialogue letterboxing, tutorial popups and interface artwork follow the selected resolution INSTALLATION Install other content mods first, such as K1CP or K1R, then install KMRP. Download the standard KOTOR Editable Executable Run KMRP - KOTOR Modern Restoration Patch.exe. Select your resolution. Open Advanced Settings if you want to change optional components. Click Start Patching. Launch KOTOR. To change resolution later, use Restore Original first, then patch again. KMRP backs up the executable, INI and every Override file it modifies before patching. EXE PATCHING KMRP modifies swkotor.exe because several interface values and bugs are hardcoded inside the game engine. Before writing anything, KMRP verifies the executable by SHA-256 and file size. Unknown executables are rejected. KMRP modifies 893 bytes of the 4,042,752-byte executable, around 0.022%, and adds ten 4KB code sections where additional space is required. Every executable patch is documented in the GitHub repository. KMRP is not a launcher and nothing stays running in the background. The only exception is the optional Modern Driver Compatibility component, which places two files beside the executable. If you do not want your executable modified, do not install KMRP. INCLUDED COMPONENTS K1 Modern Driver Compatibility 1.2.0 by Synchro Optional. Restores lighting, reflections, fog, soft shadows and correct grass rendering on modern hardware. K1 Area Map Fixes by Derslok Optional. Corrects 250 misplaced map-note positions. Party Portraits by MadDerp Bundled with permission. KOTOR 1 HD Icon Pack 1.0 by JackInTheBox Bundled with permission. COMPATIBILITY Tested with: KOTOR 1 Community Patch 1.10.0 KOTOR 1 Restoration 1.2 K1CP replaces two icons also included in the HD Icon Pack. KMRP keeps the K1CP versions where applicable. DOWNLOADS GitHub Releases https://github.com/RayesDiyab/KMRP-KOTOR-Modern-Restoration-Patch/releases Nexus Mods https://www.nexusmods.com/kotor/mods/1879 Deadly Stream Available on this page SOURCE AND DOCUMENTATION Full source code, executable patch documentation and reverse-engineering notes: https://github.com/RayesDiyab/KMRP-KOTOR-Modern-Restoration-Patch CREDITS ndix UR KOTOR High Resolution Menus 1.5 Synchro K1 Modern Driver Compatibility and published area-map research Derslok K1 Area Map Fixes MadDerp Party Portraits JackInTheBox KOTOR 1 HD Icon Pack RaymanGT HD menu and UI asset set LICENSE KMRP is licensed under GPL-3.0. Star Wars: Knights of the Old Republic © 2003 BioWare Corp. / LucasArts. KMRP is an unofficial community patch and is not affiliated with or endorsed by BioWare, LucasArts, Lucasfilm or Disney. You must own the game.1 point -
With recent releases of my Mod Options patch with the KotOR Patch Manager project, it is now possible to create custom options menus for mods and patches. I've created a brief tutorial to cover the process of creating these options: https://lanedibello.github.io/kotor-mod-options-tutorial/ For a video showing what this patch looks like see the spoiler below:1 point
-
Version 1.0.0
408 downloads
Peragus Miner Overhaul A Mod for Star Wars Knights of The Old Republic 2 Author: N-DReW25 1.0.0 Release Date: 02.09.2025 Installation: Simply click on the HoloPatcher.exe, select your option, click install and sit back and watch the HoloPatcher do its magic. This mod has four install options, you do NOT need to install four but you must install them in this order. Proper Peragus Corpses comes first. Peragus NPC Overhaul comes second. Tiered Peragus Miners comes third. The Peragus Mining Gear mod is required for this install. Vibrocutter changes can be installed at any point AFTER Proper Peragus Corpses. The "Description" section of the readme will tell you what each install does. Make sure to read them to ensure that you've made an informed decision on what exactly you want to install. Description: Peragus is a strange place. It's a mine wherein all of the miners are dead, except those dead miners all look like burnt monkeys wearing beige jumpsuits in-game. Despite the holograms of the Miners all wearing the same Miner's Uniform the aforementioned corpses are all wearing beige, whilst the Maintenance Officer Corpse and the bodies in the Kolto tanks wear a Czerka inspired uniform not seen anywhere else. This mod serves as a collection of mods, allowing you to fully customize Peragus to your exact liking. This mod offers the following features: 1) Proper Peragus Corpses: Proper Peragus Corpses removes the low-poly corpse placeables from the Peragus Modules and replaces them with NPC Corpses. These NPCs use the four generic Peragus NPC appearances, meaning there will be clones though this is on-par with Obsidian's NPC Czerka Corpses in the Telos Underground ruins. 2) Peragus NPC Overhaul: An addon for Proper Peragus Corpses, Peragus NPC Overhaul will give all 60+ Peragus NPC Corpses an overhauled appearance. Whilst this new appearance will be a generic appearance, if you see a generic old white man with orange hair that specific appearance will be unique to just that specific corpse meaning only Twi'leks and Devaronians would have duplicate appearances. 3) Tiered Peragus Miners: This option requires Kainzorus Prime's Peragus Mining Gear mod and the Proper Peragus Corpses, and Peragus NPC Overhaul from this mod installed. Tiered Peragus Miners is designed around Kainzorus Prime's Peragus Mining Gear mod, it adds a second Miner's Uniform item based on the vanilla Miner's Uniform. This means you can have BOTH Kainzorus Prime's Peragus Mining Gear for the Defense Bonuses and the vanilla Peragus Miner's Uniform for the ability to use Force Powers at the same time. The loot for these uniforms has been changed so the vanilla Peragus Miner's Uniform is found in the Plasteel Cylinder at the start of the Mining Tunnels whilst the Peragus Mining Gear is found inside a Plasteel Cylinder at the Central Platform which can only be opened via the nearby terminal. The Peragus Mining Gear, Peragus Miner's Uniform, and the Beta Peragus Miner outfit will be worn by various Peragus Miner Corpses and Holograms where appropriate. The end result should be a fully diversified Peragus Mining Facility. 4) Vibrocutter Changes: Since this mod is NOT compatible with Lewok2007's Vibrocutter changes mod, the Vibrocutter Changes install serves as an alternative to his mod. This option will move the Vibrocutter from the Corpse near the start of Peragus to a locked Locker in the nearby Security Office, this will force you to use the Plasma Torch and Mining Blaster to fight the Mining Droids for a little bit. This option will NOT work without "Proper Peragus Corpses" option mentioned above. Known Bugs: This mod shouldn't have bugs but if you find any report it to me on Deadlystream.com. Incompatibilities: * This mod is compatible with Kainzorus Prime's Peragus Mining Gear mod. * This mod is compatible with WildKarrde's Peragus Medical Bay Enhancement. * This mod is NOT compatible with VarsityPuppet's Peragus Tweak. * The Tiered Peragus Miners component is NOT compatible with DarthParametric's Fixed Hologram Models and Admiralty Redux for TSLRCM. Report any incompatibilities to me on Deadlystream.com. Permissions: Do NOT claim credit for this mod and do not use assets from this mod without my permission. Thanks: DarthParametric: For making the Female Czerka Officer's Uniform - A Modder's Resource, which the Medical Officer's Beta Uniform is based upon! ebmar: For providing help with the TSLPatcher! Kainzorus Prime: For making the Peragus Mining Gear mod! VarsityPuppet: For making the Peragus Tweak mod which inspired me to make this mod! Lewok2007: For making the original Vibrocutter Changes mod! WildKarrde: For making the Peragus Medical Bay Enhancement mod! Bioware: For such an amazing game! Obsidian: For such an amazing sequel! Fred Tetra: For Kotor Tool! Everyone who downloads the mod!! Legal: THIS MODIFICATION IS NOT SUPPORTED BY BIOWARE/OBSIDIAN ENTERTAINMENT, LUCASARTS, DISNEY OR ANY LICENSERS/SPONSORS OF THE MENTIONED COMPANIES. USE OF THIS FILE IS AT YOUR OWN RISK AND THE ABOVE-MENTIONED COMPANIES OR THE AUTHOR IS NOT RESPONSIBLE FOR ANY DAMAGE CAUSED TO YOUR COMPUTER FOR THE USAGE OF THIS FILE.1 point -
Version 1.0.0
54 downloads
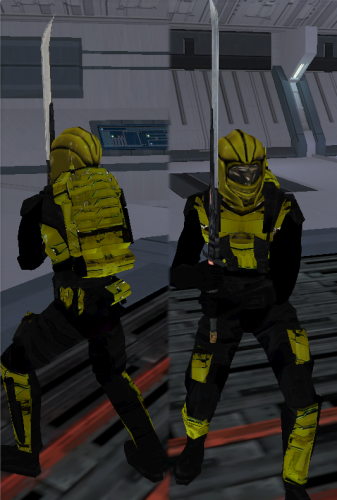
Modder's Resource - Iridorian by 90SK It is not fully assembled but it contains the parts required to set it up in appearance.2da. The head is the Ubese "Sith Assassin" model, and the body is PMBBL (the KotOR 1 Soldier clothing). The skins and the model for the body are there. The head model needs to be arranged but the texture provided for the head is on the Ubese Helmet model. KotOR Tool is required to finish the appearance into TSL, and it is not compatible with K1 at this time. --- Special thanks to Fred Tetra, author of KOTOR Tool, and Obsidian / Bioware for their original material. --- THIS MODIFICATION IS PROVIDED AS-IS AND IS NOT SUPPORTED BY BIOWARE/OBSIDIAN ENTERTAINMENT OR LUCASARTS OR ANY LICENSERS/SPONSORS OF THE MENTIONED COMPANIES. USE OF THIS FILE IS AT YOUR OWN RISK AND THE ABOVE MENTIONED COMPANIES OR THE AUTHOR IS NOT RESPONSIBLE FOR ANY DAMAGE CAUSED TO YOUR COMPUTER FOR THE USAGE OF THIS FILE.1 point -

Version 1.0
2,979 downloads
Summary In Star Wars: Knights of the Old Republic, the player, like all party members, would occasionally say things during combat and when performing other actions. In the second game, however, the player is mute. This mod restores the player soundset for Star Wars: Knights of the Old Republic II - The Sith Lords. The critical files needed for the original player soundset to function were actually always there, but they were in various states of disuse. This mod fixes them up and restores the player's voice. There are different soundsets for male and female players and they are the same ones as in the first game. Installation Run Player_Soundset_Restoration.exe. Uninstallation Remove the installed files. Compatibility This mod must be installed before any mods that patch soundset.2da. This mod does not use TSLPatcher to patch soundset.2da; it uses a hard 2DA install because the exact line numbers are necessary for the player soundset to work. It feels dirty, but I have to do it. Credits KOTOR Tool – Fred Tetra TSLPatcher – stoffe, with updates by Fair Strides SSF Editor– stoffe Permissions Mod JC's Player Soundset Restoration for K2 Mod Author JCarter426 Game Star Wars: Knights of the Old Republic II - The Sith Lords Attribution Preference "Player Soundset Restoration by JCarter426" or "uses JC's Player Soundset Restoration" or some other reasonable phrasing. This mod is released under the following licenses: Attribution Only License Attribution Only License (AOL) * You've got mods! * The creator of this mod has authorized the contents of this mod for public use. Other modders are free to use and edit materials from this mod and include them in other mods. This license applies to everyone equally and no further explicit permission from the original mod creator is required, provided the terms of this license are followed. The user must provide clear attribution for the source and creator(s) of these materials, following the specified attribution preference. The file that contains this attribution must be included along with all the other mod contents. (For example, crediting the original mod creator in your mod's description on a website, but not in any file someone would actually download, would be a violation.) The user must include any additional credits as indicated. This license applies only for the use of these materials in other mods (i.e. a form of software accessed within a video game). This license does not grant the user unlimited power to distribute these contents, edited or unedited, even if attribution is granted. These materials are being offered to encourage the creation of new mods that alter the game experience. (For example, distributing these materials as a mod resource on another website, or uploading the entirety of the mod as a "new" mod without really changing anything, would not be in the spirit of this license.) Where appropriate, it would be nice to provide a link to the original mod and/ or tag the original mod creator. However, this is not mandated. This is just a polite suggestion. Disclaimers WHOEVER STEPS ON THIS WILL GET A NASTY SHOCK. THAT HURT, I BET! I'M THE LAST THING YOU'LL EVER SEE. SILENT AND DEADLY. Donations If you enjoy my mods and would like to show your support in a monetary manner, you may do so via PayPal with this donation link. For various legal and ethical reasons, this is entirely optional and is not a requirement to downloading or using any of my mods. I also do not create specific mods for hire. I make mods as a hobby and will most likely do so regardless of any donations or lack thereof, but modding does take up a lot of my time and every bit helps.1 point -

Version 1.0
397 downloads
Testing a theory . . . Here's a new KotOR2 mod of mine. You’ll probably hate it! [TSL] T3-M4 Voice Reversion Module (version 1.0) MOD AUTHOR: Sith Holocron ORIGINAL RELEASE: 28 MAY 2023 FOR WHAT GAME: Star Wars Knights of the Old Republic 2: The Sith Lords Description: ---------------- T3—M4 will sound a little more like his KotOR1 incarnation with this mod. Not the command/combat barks - just the conversations. Installation: 1) Follow this path in your KotOR2 install and trace the route of the following…. SWKotOR2 > SteamVoice > AVO 2) In that AVO folder, find the following folders and move them to your desktop (which will enable you to reinstall the original sounds if you don’t like what’s in this mod): _T3M4AN, _T3M4CMN, _T3M4GRE, _T3M4HAP, _T3M4LAF, _T3M4MOC, _T3M4QUE, _T3M4SA, _T3M4SCA, _T3M4SCR, _T3M4WOU. 3) Place the folders in my mod package that have the same names in step 2, into the AVO folder To Uninstall: Take the folders that you put in step 2 of the install out again. Return the folders of the same name that you placed on your desktop back into the AVO folder Known Bugs: None known at this time. Special Thanks: To JCarter426: For pointing out exactly where I could find the original sound files that were replaced with my mod. To Leilukin: For walking me through SithCodec (let’s hope I got it right!) and for pre-release reviews. To Sithspecter: For pre-release reviews. To Snigaroo: For pre-release reviews. To Arson Hole: For pre-release reviews. Legal Disclaimer: All materials and copyrights belong to LucasArts, Bioware and Obsidian Entertainment Inc., I own none of the materials, and I'm not making any money out of this mod. It is to be distributed as-is without alteration, unless by permission of the mod author. (That's me!) This mod is not to be distributed for profit, either. If you're going to post it up somewhere, or make a derivative mod, or use it in another mod, please put a line in the read-me, mentioning me.0 points
.thumb.png.d8b108d1620cfd7d697f7271e60714db.png)