
Leaderboard

Popular Content
Showing content with the highest reputation on 08/07/2025 in all areas
-
1 point
Version 1.0.0
10 downloads
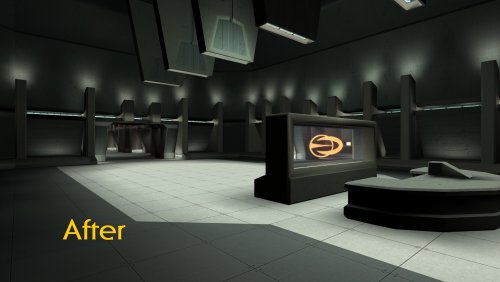
Created by: Sith Holocron (and others listed in the credits section) Game: Knights of the Old Republic 2 (using Trex’s “The Jedi Masters” mod) Version 1.0 Uploaded: 07 AUG 2025 Description: The Kotor III: The Jedi Masters Texture Reinterpretation mod was designed to upscale and/or enhance the many (oh so many) textures seen in the mod. For sake of my sanity, I’ll be abbreviating The Jedi Masters to TJM from here on. It is an extensive mod pack (as might be indicated by the size) but as seen listed below, it is not a complete overhaul. TJM uses textures from both KotOR1 and TSL. As there are already two fine upscale packages on Deadly Stream – and they both have liberal use policies – I was able to grab a bunch of upscales that already existed after renaming them to the TJM conventions. (See credits section for the other mods that were sourced.) Some of the TJM textures required new upscales as many of them are simply recolored vanilla textures and I didn’t want to manually recolor all of the original textures. Additionally, some of the textures in TJM are new or sourced from places outside the vanilla game. I’ve adjusted textures to my liking when I thought it would benefit the texture but I’ve mostly attempted to remain faithful to the – shall we say unique? - visual style of this mod. New upscales were (generally) set to upscale at 4 times the original size. The exceptions to this scaling are textures that would be larger than 2048 x 2048 if upscaled at 4x. As TJM is extensive and I didn’t have access to a beta team for this, please report any textures that I may missed an alpha layer for. I have heard rumbling that they are more than a few in the original TJM mod itself that presented issues in one way or another. Feel free to post pictures of areas over in the Release thread. In addition to the numerous before and pictures provided on this page, here is a little video showing the end results. What’s not included and why: I have not upscaled the following categories of textures included with TJM. Trex’s Custom Skyboxes: Many of these are already near the self-imposed 2048 x 2048 limit. In my humble opinion, they would not benefit from upscaling. I have replaced one of Trex’s skyboxes as seen in the outdoor levels of the planet called Etti with a version that uses my own textures rather than uses Trex’s textures (and it’s twice the size). Additionally, I have replaced one of Trex’s Coruscant skybox with one of my own. Inventory Items and their icons, including clothing and weapons: These fall outside of the scope of my original plans. Others that concentrate work on these type of mods would a better choice than me for this. Portraits and Character skins: Like the previous, working on character skins isn’t my forte. Many of the textures from Quanon were not upscaled (as they are close to my self-imposed size limit as they currently stand). When and where Quanon reused vanilla textures, those have been upscaled. If you are interested in what this mod doesn’t cover, you can always request other folks to work on it in the Mod Requests section on Deadly Stream. I wish you the best of luck with that. Installation: Drop all TGA and TXI files included in this mod into your Override folder. Credits: Some ship textures, the Czerka-branded protocol droid texture, and one animated computer panel in this collection were sourced from Dark Hope’s releases. Thanks to DH and her generosity in making permissions open for her mods. See here for a wide selection of their mods. Many of the TSL textures were sourced from “RESOURCE: Topaz GigaPixel AI Upscales – K2” by Thor110 (https://deadlystream.com/topic/9592-resourcetopaz-gigapixel-ai-upscales-k2/). I give my thanks for this convenient modding resource. Many of the KOTOR1 textures that TJM uses, I sourced upscales from what was originally called “KOTOR 1 Four Times ver 1.0” on Deadly Stream. It doesn’t appear to be on Deadly Stream now but I have found a version of that mod. It was uploaded to NexusMods as “KOTOR HD Galaxy Mod” - uploaded by SimplyCool988. Thanks to whoever the original unnamed author was for their open permissions, as listed in the read-me file. Thanks to Sithspecter for permission to use portions of his example pictures from his High Quality Blasters mod page. (https://deadlystream.com/files/file/861-high-quality-blasters/) Thanks to Lewok for beta testing these textures, adjusting some TXIs and an alpha layer of some textures on the D’Arth Syyth flagship, providing valuable input, and helping troubleshoot problematic textures. Thanks to Fair Strides for texture feedback and moral support. Legal Disclaimer: All materials and copyrights belong to LucasArts, Bioware and Obsidian Entertainment Inc. I own none of the materials, and I'm not making any money out of this mod. This mod is not to be distributed for profit, either. I hereby state that I specifically do NOT wish this mod to be uploaded to Steam Workshop. With the current state of NexusMods claiming mods as their property. it is unlikely for me that I’ll upload this mod over there. With that, Deadly Stream will be your one place to download this collection. Usage of my textures in other mods must be requested and approved by me before your use. -
1 pointHuh. Well of all possibilities, that wasn't on my bingo card.
-
1 pointEverything is on the surface)
-
1 pointDoesn't look like it. As far as I can recall, the only human heads I ported were for Kira (doubles as the TOR Jedi Exile with different hair) and Jaesa, and that's not either of them. Doesn't appear to be any of the vanilla K1 or TSL heads though. The hair definitely has that chunky TOR look to it, but having a quick browse through the TOR Community character creator tool I couldn't see it. However, if you look at what I assume is Canderous on the left, you can see he has rounded ears. That's a dead giveaway that it's not a vanilla head, since those all have blocky rectangular ears. My guess is that this is from some sort of "high poly" head mod. Doesn't appear to be a mod that's hosted either here or Nexus that I can see from a quick search though. @Dark Hope: Where does that female head model come from?
-
1 point
Version 1.0.0
13 downloads
Czerka cut module restoration v1.0 By Zobizob Description: In 2014, InSidious provided the Lost Modules Pack mod that was providing a playable version from cut content modules. The czerka depot module needed some work to be entirely playable. This is a modder's ressource. All you need to do is drop the m21aa.mod in the module folder, and the other files into override. Work done and disclaimer : All the geometry errors for the models have been fixed as best as i could (misplaced walls, missing parts, missing ceilings, a lot of geometry holes...) The lightmaps have been partially fixed for a good portion of the module, there are still some rough lightmap transition between each room tho and i'm not skilled enough yet to fix this entirely The walkmeshes have been entirely fixed There was no minimap. I pulled out a custom minimap using holocron toolset and edited the .are from the module so it is displayed accurately in the level. I placed 2 doors and some waypoints, they are leftovers from work on my own mod. You'll have to edit this if you want to use it for your own work. You will have to edit the .are to change the name from the module depending on how you wanna use it. It is currently named "Endar Spire - Command Module". There is still 1 file missing, the .pth file which allows npcs to walk inside the module in a scripted way. I will see to pull out a custom .pth file. Credit: InSidious for his original Lost Modules Pack mod. Thor110 for his very valuable insights. Kotor discord channel for insights on developping mods for this awesome game. Permissions: Feel free to use this work, just credit me if you're using my files. Legal: THIS MODIFICATION IS PROVIDED AS-IS AND IS NOT SUPPORTED BY BIOWARE/OBSIDIAN ENTERTAINMENT, LUCASARTS, DISNEY OR ANY LICENSERS/SPONSORS OF THE MENTIONED COMPANIES. USE OF THIS FILE IS AT YOUR OWN RISK AND THE ABOVE MENTIONED COMPANIES OR THE AUTHOR IS NOT RESPONSIBLE FOR ANY DAMAGE CAUSED TO YOUR COMPUTER FOR THE USAGE OF THIS FILE. -
1 pointNo this would be rather easy if anyone wants to do it It would require using mdledit and importing maybe some textures from K1. Sometimes I think I'm a bit of a perfectionist, tweaking details that 99% of people out there won't even notice. Maybe (surely?) it's too much at times and I should curb my enthusiasm a little sometime. Although I have a hard time stopping myself haha. Very interesting ideas, especially regarding the kind of Mayan vibe i really like that. George Lucas had a passion for anthropology after all. I kinda already planned to add crystal formations to secondary planets. I think i'll keep it to 1 or 2 crystals max, because i still want Dantooine and Korriban to stand out in that regard. But still, would be cool to find a unique crystal formation lost in the Kashyyk shadowlands, in the burried temple on Tatooine, or at the bottom of the ocean for Manaan. A little treat for today... As you may already know, @Quanon had pulled out custom modules for K1 in the past (I think only one thing got playable at some point, the Beta Korriban Temple Mod. ). These custom modules were really ambitious and I love the overall aesthetic, specifically the Korriban ones. Well I'm delighted to announce that Quanon has opened the doors to its superb resources for us recently! He is currently fixing his models so we can import them into blender (these models were made with older tools, and it tends to be broken with nowaday tools) and edit them freely. The first pieces from this collaboration are done, and you can see his custom module in video. All the models are Quanon's original work! Ive only edited the module walkmeshes, overall lighting/fog (because obviously, there is no lightmap), added small fallen rocks at the entrance, a little smoke effect in the sith chapel and animated light to the central piece, and finally fixed some texture uv maps. @Quanon is still working on this and there will be more rooms to this module! Congratulations to @Quanon and huge thanks to him, the assets are GORGEOUS 🥰
-
1 pointLip Syncing (the easy way) This tutorial will show you how to make custom Lip Synching with custom Voice Overs without the need for complicated Mod Prefixes etc. I advise you read through the installation of the CSLU Toolkit below before visiting the site. Tools you will need -Microphone / Voice Actor -Audacity - http://audacity.sourceforge.net/ -Lip Synch Editor - http://www.starwarsknights.com/tools.php#de -CSLU Toolkit - DropBox Link -DLGEditor - http://www.starwarsknights.com/tools.php#de -Notepad Installations Download the Audacity Installer and install Download the ZIP file containing the LipSynchEditor and unzip it. The CSLU Toolkit provides some extra work to install. Visit the above link and enter your email and you will be sent a download link. Download the installer and run it. Select Typical Install and accept the default options. Then go and get a cup of tea while you wait for it to download and extract. Download the ZIP file containing the DLGEditor and unzip it. Notepad comes with windows. Writing Dialogue For writing dialogue here is an excellent tutorial https://web.archive.org/web/20150925104635/http://www.lucasforums.com/showthread.php?t=180845 Although we will be focussing on two specific things which will be covered later. Make sure you have all of your dialogue written out and then take each individual line and put it in a text file. You can name it whatever you like but I normally use the NPC tag and then a 2 digit number e.g. Hello, How are you today? - commoner01.txt I'm fine thank you - commoner02.txt It just helps distinguish between files. Recording Now plug in your microphone and start up Audacity. Hold the microphone to your mouth and then press the record button and say the first line. You may find it is too quiet and that you need to use the Amplify Effect in the Effects Menu. Then use the drop down menu on the audio channel and select Mono. Then select File, Export and save it as the same name as the corresponding line in the text file for example commoner01.wav would be the sound file for Hello, How are you today? - commoner01.txt Record every line individually and put them in a folder with the .txt files. Make sure that there is no punctuation other than full stops, commas, question marks and exclamation marks as this is all it supports. Lip Synching To acheive custom lip synching you need to use the CSLU Toolkit to create a .phn file that can be read by the LipSynchEditor. To do this open Notepad and type the name of your wav file, followed by a space and the name of your text file. Continue this on the next line for each sound and text file. For example commoner01.wav commoner01.txt commoner02.wav commoner02.txt commoner03.wav commoner03.txt and this can be continued on. Save this as list.txt Next go into the LipSynchEditor folder you extracted earlier, then into Extras and then into Importing. There should be a file named makephn.tcl in there. This will need to be in the same folder as your voice overs, your text files with the words and your list file The next step is slightly different depending on your operating system. Windows XP: Click on Start -> Run and type "cmd" (minus the quotes) and hit enter. Vista/7: Click on the Windows Logo and run a search for "cmd"(minus the quotes) and click on the result that says either cmd or command. (I can't remember which it is as I have XP) You will now need to use some commands to navigate to the directory in which you saved all your files and the makephn.tcl script. The three commands are: dir - lists the contents of the current directory. cd *name of directory* - moves into the *name of directory* cd.. - Moves to the previous directory. For example I made the directory on my desktop and my default start location is C:\Documents and Settings\Tim So I would need to use the command dir cd Desktop cd Voice Overs The dir command is not necessary it just helps to find the names of some folders. You will then need to run the script makephn.tcl that you put in that folder and put list.txt after it. For example: makephn.tcl list.txt would be all you need to type. It will then think about for a bit and then if it is successful it will pop up with a little box that has nothing in. This means it is done and you can close it. If it comes up with an error double check that your sound file is MONO and that there is no excess punctuation in your text files. If you now check your folder there should be a lot of .phn files which are what we need hurrah. Now start up the Lip Synch Editor and click File, Import Phn. Hold down Control and select all of your phn files. This should come up Then click File, Save All and save your .lip files. Now open DLGEditor and click on one of your lines and find the VO_ResRef field. In here type the name of your .lip file without the .lip bit. Then tick the box that says sound exists. You will now need to put the .lip file in the .MOD for the module or in a seperate .MOD for voice overs it doesn't really matter. Then the .WAV needs to go into the StreamWaves Folder for K1 or StreamVoice for K2, NOT INSIDE ANY FOLDERS. HUZZAH you are done. It will work. Hope this works. Any questions, I will endeavour to answer them. If I missed anything or it doesn't make sense then please tell me and i will correct it. Thanks for reading. TB12
