J
-
Content Count
50 -
Joined
-
Last visited
-
Days Won
6
Everything posted by J
-
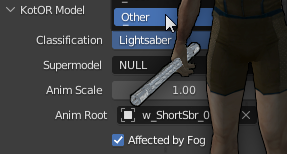
View File Enhanced Lightsaber Hilt Variety 30 Vanilla+ lightsaber hilts (10 regular,10 short,10 double) Working texture for both Aspyr and Legacy In the base game, every lightsaber you find has the same hilt model. My goal was to add some variability to the lightsaber hilts while also fitting within Kotor's engine limitations. Hilts are still tied to crystal color but should give the illusion that every saber hilt isn't exactly the same. The Blade I have rebuilt the original blade model, so that JC's Lightsaber Visual Effects for K2 is compatible (and recommended). The blades are now perfectly symmetrical after some UV editing. I also fixed a bug where some models didn't render all of the blade planes. A glowing light source has been added to each blade thanks to Crazy34's Light saber models. The Hilt I started with a base hilt design and then tweaked each one to have a slightly different shaped grip, emitter, and pummel. One hilt shouldn't stand out or overshadow the design of the others. Hopefully they feel like they belong. 10 hilts are completed for each crystal color. These are also compatible with the Aspyr version of the game, which had broken hilt textures. I added a custom hilt for Malak as well. Install Steps: - TSLRCM Required - 3C-FD Patcher required for Aspyr version - JC's Lightsaber Visual Effects for K2 is recommended. The glowing light colors were made to match these. - Extract and copy mod files to override directory Credits: - Crazy34's Light saber models for the glowing light effect - JC's Lightsaber Visual Effects for K2 amazing blade texture, I matched the glowing effect to work with these Submitter Jiiprah Submitted 08/01/2025 Category Mods TSLRCM Compatible Yes
-
Version 1.2.0
95 downloads
30 Vanilla+ lightsaber hilts (10 regular,10 short,10 double) Working texture for both Aspyr and Legacy In the base game, every lightsaber you find has the same hilt model. My goal was to add some variability to the lightsaber hilts while also fitting within Kotor's engine limitations. Hilts are still tied to crystal color but should give the illusion that every saber hilt isn't exactly the same. The Blade I have rebuilt the original blade model, so that JC's Lightsaber Visual Effects for K2 is compatible (and recommended). The blades are now perfectly symmetrical after some UV editing. I also fixed a bug where some models didn't render all of the blade planes. A glowing light source has been added to each blade thanks to Crazy34's Light saber models. The Hilt I started with a base hilt design and then tweaked each one to have a slightly different shaped grip, emitter, and pummel. One hilt shouldn't stand out or overshadow the design of the others. Hopefully they feel like they belong. 10 hilts are completed for each crystal color. These are also compatible with the Aspyr version of the game, which had broken hilt textures. I added a custom hilt for Malak as well. Install Steps: - TSLRCM Required - 3C-FD Patcher required for Aspyr version - JC's Lightsaber Visual Effects for K2 is recommended. The glowing light colors were made to match these. - Extract and copy mod files to override directory Credits: - Crazy34's Light saber models for the glowing light effect - JC's Lightsaber Visual Effects for K2 amazing blade texture, I matched the glowing effect to work with these-
- 2
-

-
- lightsaber
- hilt models
- (and 2 more)
-
 Im working a on new fix but its taking some time to build new models.
 -
 Try v3.0. I repackaged it with different tools. Hopefully it doesn't get flagged as a false positive again. It's a very simple script packaged with 7zip. Anyone can inspect the source by opening it in 7zip.
 -
Unfortunately the 4GB patch, that you already applied, modifies the exe. 3C-FD Patcher checks for an unmodified exe because it is changing very specific bytes.
-
should be fixed now. download and copy to override again
-
 After. It should not conflict
 -
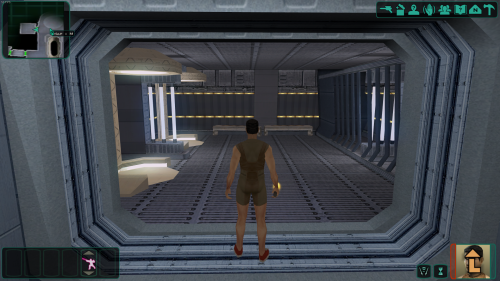
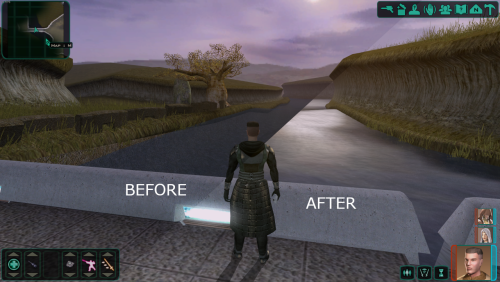
View File Water Restoration This is my attempt to restore the Dantooine water, plus some other areas, after the Aspyr Patch broke water effects. Requires C3-FD Patcher for the reflection effect. The original textures have been upscaled and the bumpmap has been replaced with a higher detailed water animation and baked into the textures alpha layer. Included: - Dantooine water - Enclave sublevel fountain - Telos ocean seam fix - Telos murky water restored - Jungle Tomb water - Citadel Station Residential fountain water Install Instructions: 1) Apply C3-FD patcher to fix the game's reflections 2) extract water restoration mod contents to override directory Submitter Jiiprah Submitted 06/21/2025 Category Mods TSLRCM Compatible Yes
-
Version 2.3
211 downloads
This is my attempt to restore the Dantooine water, plus some other areas, after the Aspyr Patch broke water effects. Requires C3-FD Patcher for the reflection effect. The original textures have been upscaled and the bumpmap has been replaced with a higher detailed water animation and baked into the textures alpha layer. Included: - Dantooine water - Enclave sublevel fountain - Telos ocean seam fix - Telos murky water restored - Jungle Tomb water - Citadel Station Residential fountain water Install Instructions: 1) Apply C3-FD patcher to fix the game's reflections 2) extract water restoration mod contents to override directory -
You will need the KOTOR Blender plugin. I used the 3.3 LTS version of blender but it looks like it has now been updated to newer versions. I still recommend using a LTS version. First you need to switch to the lightmap UV. If you don't, the lightmap will be baked on top of the diffuse texture. You can find this under UV Maps in each meshes Object Data Properties. Select each mesh and click UVMap_lm. Yes, it is tedious but it's required. To bake the lightmaps with the plugin, click the KotOR menu -> Lightmaps -> Bake(Auto). You should click an empty space, first, to make sure no meshes are selected. If meshes are selected it will only bake for what is selected. At this point you may notice the lighting looks bad. The UVs need to be unwrapped and some lightmaps will need to be resized to a higher resolution. This is optional but it helps me keep it organized. Look through the list of meshes and see which ones have lightmaps. I then rename the meshes to start with the lightmap name (lm0_Object19,lm1_Box01, lm9_mesh456,...). When unwrapping the UVs this makes it easy to select all meshes that share a lightmap, which you may be doing multiple times. There's 3 ways to unwrap the lightmap UVs. Each has different advantages and disadvantages. The best to use will depend on each group of meshes, sharing a lightmap. 1) Lightmap Pack (Most efficient) - This one will work for most but sometimes the triangles of a face get separated, creating an ugly seam. 2) Unwrap (Medium efficient) - Keeps the basic shape of faces the same bust doesn't pack as efficiently. This one requires you to select all(a key) UVs first or nothing happens. 3) Smart UV Project (Least efficient) - This one maintains the shape of faces perfectly but each UV takes up a lot of space. May require you to increase the lightmap resolution really high to look good (1024x1024 or more). While in the layout workspace, select all meshes that share a lightmap. Then switch to the UV Editing workspace. All meshes need to be selected in the 3D view, for the UVs to show in the UV editor. Then select one of the unwrap types in UV -> Unwrap. Remember, if doing regular unwrap, selecting all UVs is first required. Now, go back to the Layout workspace and bake the lightmaps. Some lightmaps may have weird artifacts or look low res. You can compensate for that by resizing the lightmap texture. Go to the UV Editing workspace and select the lightmap to edit. Then Image -> Resize. I try not to resize higher than 512x512 and I keep less detailed meshes between 16 and 128. The larger the texture size, the more memory it takes in game and the longer it takes to bake. Then go back to Layout workspace and bake again. To save the lightmap texture, go to UV Editing layout then Image -> Save As. You will need to do this for each lightmap once and make sure you choose TGA when saving. After, you can use Save All Images. I haven't even touched on lighting but here's a few tips: - Under World Properties, the surface color will affect your lighting a lot. I prefer to just remove the surface(or make it darker) and it gives me more control over the lighting. - Point lights fill the room with a lot of ambient light. If you want more control over the shadows use spot lights. - The game engine will add even more lighting on top of the scene. You can control this in the light's Object Properties -> KotOR Model Node -> Light
-
I'm not sure yet. I need to do a play through and make notes of problematic areas.
-
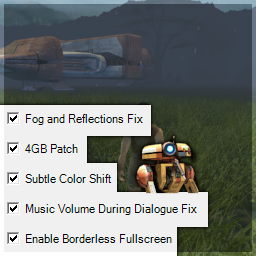
I have uploaded a fix. It was editing the swkotor2.ini with fullscreen=0, even if the borderless window mode patch wasn't selected. If your game opens in windowed mode either press alt + enter to switch to fullscreen or edit swkotor2.ini. [Display Options] FullScreen=1 [Graphics Options] AllowWindowedMode=0 FullScreen=1
- 26 comments
-
- 1
-
-
- hex-editing
- aspyr
- (and 1 more)
-
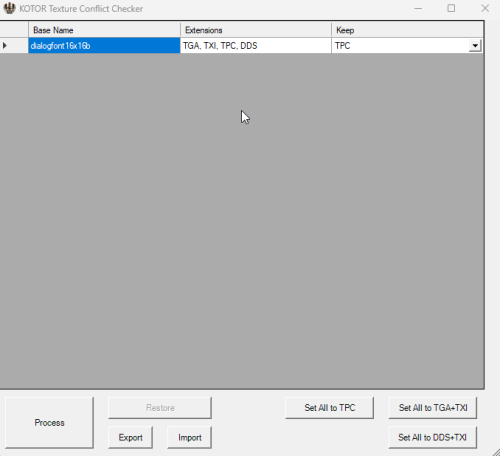
View File Texture Conflict Checker Texture conflict checker for K1 and K2. Place in your game directory and open it. It will list all conflicting textures, in the override folder, and allow you to choose which version to keep. Unwanted textures are moved to a texture_duplicates folder and can be restored through the tool. Source: https://github.com/J0-o/kotormods/tree/main/Texture Conflict Checker Submitter Jiiprah Submitted 06/05/2025 Category Modding Tools
-
View File Relighting TSL - Early Release I'm working on fixing/updating a few areas with lighting issues. This first one is the Peragus force cage room where encounter Atton. The room is way too bright so I reworked the light sources and rebaked the lightmaps, using blender. The goal of this project is not to redo the lighting of the entire game. That would force me to touch every model and be a modding compatibility nightmare. I want to just target areas that stand out or look really bad. Feel free to suggest areas. Current Areas: - Peragus force cage room - Ebon Hawk Medical Room Submitter Jiiprah Submitted 06/06/2025 Category Mods TSLRCM Compatible Yes
-
Version 2.1.2
135 downloads
I'm working on fixing/updating a few areas with lighting issues. This first one is the Peragus force cage room where encounter Atton. The room is way too bright so I reworked the light sources and rebaked the lightmaps, using blender. The goal of this project is not to redo the lighting of the entire game. That would force me to touch every model and be a modding compatibility nightmare. I want to just target areas that stand out or look really bad. Feel free to suggest areas. Current Areas: - Peragus force cage room - Ebon Hawk Medical Room -
Version 1.2.0
33 downloads
Texture conflict checker for K1 and K2. Place in your game directory and open it. It will list all conflicting textures, in the override folder, and allow you to choose which version to keep. Unwanted textures are moved to a texture_duplicates folder and can be restored through the tool. Source: https://github.com/J0-o/kotormods/tree/main/Texture Conflict Checker -
I don't know what this means but the borderless windowed patch is experimental. You can rerun the patcher and leave that one unchecked if it causes problems.
-
Does JCs lightsaber textures not address this? His have a thicker core. Hmmmm...I did notice the animation is different on w_lghtsbr_008 try this w_lghtsbr_008.mdl w_lghtsbr_008.mdx
-
It is borderless windowed mode. I made a typo. It allows the game to run in windowed mode but still fill the screen(like fullscreen would). On my system it fixes one of the stuttering issues. It also allows for better alt tabbing.
-
you can apply it at any time really I say first because it requires an unmodified swkotor2.exe.
-
Yes, just apply this patch first and remember it already comes with a 4GB patch.
-
oh gross. yeah the vanilla files do have this issue. ill look into it. crazy34 saberblades, with the fix, do not have this bug. EDIT: I made a mistake. I'll upload a new fix
-
If the exe has been altered, it won't work. Only works on the latest aspyr version from steam or GOG. Any other changes to the exe would need to be applied after C3-FD patcher. I noticed it looked odd as well. I booted up the old version and that's just how the ebon hawk use to look.
-
yes
- 26 comments
-
- 1
-

-
- hex-editing
- aspyr
- (and 1 more)
-
I'll look into it this weekend