Leaderboard
Popular Content
Showing content with the highest reputation on 07/07/2020 in Posts
-
.2da files are a very common and important file type in both KotOR games and are also very common to be edited in mods. That's why this tutorial aims to bring you a list with detailed explanations on what they do. Introduction You can find all .2da files in the 2da.bif file, where they can be accessed using KotOR Tool. KotOR Tool also provides a 2da-editor to modify them as you want. Basically, .2da files are 2d arrays or put simply: tables, just like you know them from programs like Excel. The one difference here would be that in a .2da file, each column has a specific and pre-defined (hardcoded) function. Each .2da file collects a set of "objects" that differ in details. Thus every column in the .2da file represents a certain characteristic of such an object while each row represents one specific instance of this type of object. As a simple example, you could have a file called trees.2da that contains information on different types of trees. The columns would then include details like height, age, etc and every row would stand for one tree species with details entered in each entry of this row. This tutorial will consist of two parts: First a (currently incomplete) list of all .2da files used in both games with detailed information on what they do and what each column stands for. The second part will be a list of .2da files that exist in KotOR but that aren't actually used since they're only remnants from Never Winter Nights (an older game by Bioware based on the same engine). This second part is only for reference, so that you know these files are useless. Now, this tutorial is currently far from being complete. There are many .2da files that are still missing and even for those that are already listed there may be missing information or maybe even incorrect information. If you notice a mistake or know things that are still missing, please post them to this thread so that I can add them to improve on this ressource. Thank you very much A big thanks already goes to Fair Strides, who provided most of the information currently listed. Thank you! Used .2da files In this section I will (eventually) list all .2da files used by both KotOR and its sequel TSL. Most of these appear in both games and are identical or have only very minor differences. Those are marked with (K1/TSL) after their names and possible differences will be explained in the proper place. Some .2da files however differ on a bigger scale between the two games or exist only in one of them. Those are then marked by either (K1) or (TSL) depending on which game they are from. Each listed file has a short introduction that describes what these files are used for, followed by a list of their columns with descriptions. If there is no description for a certain column, then that's just because I don't know what it does, while descriptions written in red are unconfirmed and might be wrong. And as a final note: When you open a .2da file in KotOR Tool, you will notice the first column labeled (Row Label). This column exists in every .2da file and labels the rows numerically from 0 upwards. This label can then be used by other .2da files to reference specific lines from this file. But since this column is the same in every .2da file, I won't list it everytime. And here we go: acbonus.2da (K1/TSL) aiscripts.2da (K1/TSL) aliensound.2da (K1/TSL) ambientmusic.2da (K1/TSL) ambientsound.2da (K1/TSL) ammunitiontypes.2da (K1/TSL) animations.2da (K1/TSL) appearance.2da (K1) appearance.2da (TSL) appearancesndset.2da (K1/TSL) baseitems.2da (K1/TSL) bindablekeys.2da (K1/TSL) bodybag.2da (K1/TSL) camerastyle.2da (K1/TSL) chemicalcreate.2da (TSL) classes.2da (K1/TSL) comptypes.2da (K1/TSL) footstepsounds.2da (K1/TSL) globalcat.2da (K1/TSL) heads.2da (K1/TSL) itemcreate.2da & itemcreatemira.2da (TSL) portraits.2da (K1/TSL) regeneration.2da (K1) subrace.2da (K1/TSL) upcrystals.2da (K1/TSL) videoeffects.2da (K1/TSL) Unused .2da files This section will simply list files that are not used by the KotOR games. Many of these only exist in the KotOR 1 files and were removed for TSL. actions.2da areaeffects.2da caarmorclass.2da capart.2da categories.2da catype.2da chargenclothes.2da Changelog1 point
-
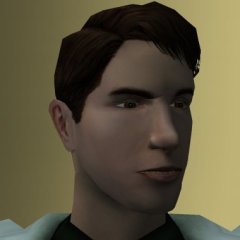
I would love to be able to use the character model of the galaxy's most fearsome warrior, Deadeye Duncan, for the player's character. Unfortunately I have zero modding experience. I decided to dig around in the game's files to see if I could find Deadeye Duncan's character model by name, but quickly realized I have no idea what I'm doing. I suspect that, for those who know what they're doing, a character model swap like this is super simple, so I'd love to know how to do it. Thanks!1 point
-
1 point
-
1 point
-
1 point
-
Install Kotor Tool (KT). Open KT > Kotor 1 > ERFs > Texture Packs > swpc_tex_tpa.erf > N > N_DeadeyeH01.tpc > extract. Simplest way is to reskin an existing head texture, but you won't have darkside textures/transformation without creating additional textures. KT > ERFS > Texture Packs > swpc_tex_tpa.erf > P > any PMHC but let's give an example one > PMHC05.tpc. Rename extracted N_DeadeyeH01.tpc to PMHC05.tpc. Copy and paste into Override folder located within the Kotor main folder, where ever it was installed to. May have to copy that file four times and rename each copy as the following PMHC05d PMHC05d1 PMHC05d2 PMHC05d3 These represent darkside transitions, I'm not sure if you gain darkside points if the face will default to vanilla files and change your face to another face texture so this additional step will prevent that possibility. Lastly, your portrait will not look like Dead-eye Duncan, because the game doesn't have a portrait of him. You can make a custom portrait with textures, or grab a sloppy screenshot, crop/edit it, then re-name it as PO_PMHC5.tpc You can find the vanilla head portrait from KT > ERFS > Texture Packs > swpc_tex_GUI.erf > P > PO_PMHC5.tpc but this would be for the normal head and not for Deadeye duncan. Notice that the player heads correspond with each other, so PMHC05 is listed as PO (for portrait) PO_PMHC5.tpc Now you have a working head and possibly a working portrait. An important note is that there are only so many file extension the game will recognize in the override, mainly tpc or tga. Good luck!1 point
-
Well as I was searching through the skinning tutorials and there seemed to be none on how to make a good looking texture with gimp, there was a lot on photoshop but not gimp so I decided to share my knowledge of it with the community. __________ Basics Basics part 1: Selecting an area To make good skins you would need to select a precise area to make it look nice. To do this you click on the drop down menu at the bottom. Usually this has 100% in it as a default. Set this to anything you wish. you should be able to distinctly see the area you wish to select now. Now to select the area you click on this icon and then click on each "bend point" on the area you want. A bend point is wherever the texture bends away from a straight line. Basics part 2: Re-coloring To change the color of a Jedi Robe some beginners use the paintbrush tool. In some cases this might work, but not if you want to make the robes look natural. For a natural look you first select the area you want to change by using the free select tool, if you want to modify the whole texture's color at once you go into "Edit" and then "Select all". Next you go into the "Colors" tab at the top of the page and click on desaturate. Note only do the desaturate step if you want to compleatly change the color, if you don't and you just want a hint of the color in the already existing texture you skip that step. To change the color you go into the "colors" tab again and click on "Color Balance". A menu like this should open. In that menu you drag the bars around till you get the shade you want. This part should be pretty self explanatory as the bars are clearly labeled. If green was your desire, your outcome should be something like this: If you want a more direct color you go into the "color" tab again and go to colorize. This can give you a quick and effective color but might not retain as much detail. Basics part 3- Repair When you select an area and re-color it sometimes you see a tiny bit you wanted that color. To fix this you use the blur function adjust the size to around .15 then zoom in to 800% and take the re-colored pixal section and hold down the blur and "push them" on top of the other area. Advanced This section is for people who know the basic functions of gimp and successfully make a descent re-skin Advanced Part 1- Overlay Overlay is basically changing the way the new layers interact with each other when you paste in another texture. In the "layers, channels, paths" toolbar: There is a dropdown menu here: in there there will be a bunch of options you select and they make the picture somewhat transparent and molds it to the texture. Click on them all till you get the look you want. Note you must have pasted a new layer into it and NOT merged it down. Advanced Part 2- Enhance filter Up in the "filters" toolbar menu there is a section called enhance go into it and select sharpen. Drag the bar in the menu till you get a good look, it really adds to the overall appearance. I will add some more tips when I find them but here they are for now. Enjoy~1 point


