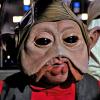
mangumpi Posted March 27, 2016 Posted March 27, 2016 So I'm brand new here, because I have been working on this mod all day and cannot get it to work. I slapped this model/texture together pretty quickly (I know the eyes are pretty wonky), but everything after that is a mystery to me. I am trying to make this model a replacement for PMHC04 (or any of them really), but I cannot get it to show up in-game. I know that it has something to do with vertex weighting/bone assignments but I have yet to find a tutorial that explains how to properly replace one head with a completely new model like this one. Quote
Sithspecter Posted March 28, 2016 Posted March 28, 2016 Welcome to Deadly Stream, mangumpi! That's a very nice Ithorian head you have there. Unfortunately, KotOR is a bit quirky about heads. I don't believe anyone has ever done a scratch modeled head. Most people have been forced to use a replacer tool, which limits you to only being able to move vertexes about and not add or remove anything. Here are a couple tutorials that might be relevant: http://www.lucasforums.com/showthread.php?t=224255 http://www.lucasforums.com/showthread.php?t=204225 I'm sorry I can't help you more, I'm no expert in the heads department. Maybe another modder with more experience can weigh in. Quote
DarthParametric Posted March 29, 2016 Posted March 29, 2016 I don't believe anyone has ever done a scratch modeled head. Not true, I've done it for instance. It's entirely possible, although success is largely down to whether MDLOps decides to co-operate. I am trying to make this model a replacement for PMHC04 (or any of them really), but I cannot get it to show up in-game. I know that it has something to do with vertex weighting/bone assignments but I have yet to find a tutorial that explains how to properly replace one head with a completely new model like this one. I would suggest if you are not familiar with rigging/skinning, heads are probably not the place to be starting. However, in this case you will be stuck with something very simplistic anyway, as the human rig is not going to accommodate something as weird as an Ithorian. Just weight all verts 100% to the head bone. Quote
Sithspecter Posted March 29, 2016 Posted March 29, 2016 Not true, I've done it for instance. It's entirely possible, although success is largely down to whether MDLOps decides to co-operate. Ah! I had forgotten! Quote
mangumpi Posted March 29, 2016 Author Posted March 29, 2016 Not true, I've done it for instance. It's entirely possible, although success is largely down to whether MDLOps decides to co-operate. I would suggest if you are not familiar with rigging/skinning, heads are probably not the place to be starting. However, in this case you will be stuck with something very simplistic anyway, as the human rig is not going to accommodate something as weird as an Ithorian. Just weight all verts 100% to the head bone. How should I go about doing this in 3DS Max? I am a true beginner to KOTOR model replacements, so I'd probably need a step-by-step explanation. Quote
DarthParametric Posted March 30, 2016 Posted March 30, 2016 Bearing in mind that, again, jumping into heads is not recommended if you have no experience with this sort of thing, I'll give you a brief overview of how to go about it. You'll need to do some research yourself to fill in the blanks. Seeing as I don't have your head, I'll just swipe one from an existing model to use as a roughly equivalent example. We'll take the TSL Ithorian: And lop off his head. Then trim off the excess bits and straighten the neck out a bit to approximate what you have, like so: Now before we get to skinning, your first problem is going to be that your head mesh isn't going to match any of the body meshes. They are all designed to mate perfectly with a human neck, so by just plonking on a giant alien head you are going to wind up with clipping and/or gaps. You could try making some sort of intermediate collar piece to slot between them to mask the join. I've done a quick hack job to show the sort of thing I mean. Start by loading in a human head to use as basis: Duplicate the head mesh itself, and isolate just the neck element, deleting the rest: Now I'm not going to cover modelling and UV mapping, so the short version is reshape this so you have something collar-ish like, making sure to not touch the bottom ring of verts, as these match the body meshes. And with the Ithorian head positioned appropriately: Note that if you move your mesh around, you'll need to do a Reset X-Forms on it and collapse the stack before proceeding further, otherwise you will run into issues later. Now we can get on with skinning. As I said in my previous post, the human rig is not going to be compatible with radically different alien morphology, so this will be limited to just a few bones, namely the head, head_g, and neck, neck_g and necklwr_g. Here is how my Ithorian head is positioned in relation to the human head: Based on that, we can use Edit Envelopes on the human head mesh's Skin modifier to see how these bones influence that mesh: Vertex weights are 0 to 1. Enabling Edit Envelopes will shade polygons based on the weight influence of surrounding vertices, with red representing weights approaching 1 and blue approaching 0. Weights on a given vertex can be split between multiple bones, but they will always add to 1 (so increasing the influence of one bone will decrease any others). Based on the position of the Ithorian head, the majority of the mesh can just be weighted 100% to head_g, with the lower neck getting a small influence from neck_g and necklwr_g. Simply adding a Skin modifier and adding head_g, neck_g and necklwr_g to the bone list should give you a pretty good starting point, as Max tries to allocate appropriate bone weights automatically: In this case though, the influences of neck bones seems to be a bit off, so I'll tweak that slightly. I'm not going to explicitly cover how to weight verts here, there are plenty of Max tutorials on Youtube and elsewhere that cover the process. Google is your friend. The process is the same for the collar, just with more weighting to the neck bones, noting especially to set the bottom ring of verts 100% to necklwr_g so they match the body model. Note that this will be something of an incremental process. You'll likely need to do a few passes making adjustments after testing it in-game. In certain cases with custom meshes you may also need to add additional loops to allow for smoother deformation, but that's generally more applicable to body meshes. With the initial skining pass done, we can move to finalising a few other things before export. You can delete the original head mesh. Things like the eyes and eyelashes are technically bones, so you may want to just turn off the Render option in their AuroraTrimesh modifier. You'll likely want to select everything in the scene aside from your meshes and remove any existing materials they have (Utilities pane -> More -> UVW Remove -> Materials). With a giant head like this you aren't going to be able to diplay the models for masks/goggles without horrible clipping, so delete the helper objects MaskHook and GoggleHook. Make sure your meshes are children of the AuroraBase. Select the AuroraBase and rename it to something appropriate and unique. I named mine DP_IthorianH. In the Modify pane turn off Do Sanity Checks and set the export directory somewhere appropriate. Hit the Export Geom Only button. You can save and close your Max scene. Find the exported MDL and edit the filename indicate that it is an ASCII file. For example I named mine DP_IthorianH_ASCII.mdl. Now you'll need to get hold of a binary model for MDLOps. Typically I use whatever the Supermodel specified in AuroraBase is, which in this example is S_Female02. You need to use the model for the version of the game you are compiling for. In this case I will be compiling for TSL, so I grab the TSL version of s_female02.mdl and s_female02.mdx and place those in the same folder as the ASCII model. Then those need to be renamed to the same name as the final version of your model. In this example, that is DP_IthorianH (hence why you append _ASCII to the ASCII file's filename). Now you can run MDLOps and load the ASCII file, then hit the Read and Write Model button. Once it is finished processing you should have a new binary MDL/MDX pair in your folder, in my case DP_IthorianH_ASCII-k2-bin.mdl/DP_IthorianH_ASCII-k2-bin.mdx. Now you need to take these and run them through VarsityPuppet's HeadFixer tool. This will patch the MDL, after which you can discard the old one. So now you have your head model, which you can rename as appropriate (I changed mine back to DP_IthorianH.mdl/mdx), it's time to get it into the game. The prefereable method is via TSLPatcher, which I am not going to exhaustively detail here. Suffice it to say, you'll need vanilla and modified copies of appearance.2da, heads.2da, and portraits.2da. The modified copies contain your additional rows, and you can then use TSLPatcher's ChangeEdit utility to difference them with the originals to generate the appropriate data in changes.ini. You'll also need to add in memory tokens, which I generally find quicker to do by editing the INI directly in a text editor. I'll post the version I threw together for you to look at. Once you have it installed, it's time to fire up the game. Cue drum roll: OK, so that looks hilariously bad/ridiculous. I guess that collar needs some work. But the model does otherwise work, so mission accomplished on that front at least. Here are some resources, if you want to poke through them: ASCII model - http://dpmods.wheb.org/files/kotor/misc/DP_IthorianH_ASCII.7z TSLPatcher setup - http://dpmods.wheb.org/files/kotor/tsl/%5BTSL%5D_Player_Head_Ithorian_Test.7z Quote
mangumpi Posted March 30, 2016 Author Posted March 30, 2016 (edited) Bearing in mind that, again, jumping into heads is not recommended if you have no experience with this sort of thing, I'll give you a brief overview of how to go about it. You'll need to do some research yourself to fill in the blanks. OK, so that looks hilariously bad/ridiculous. I guess that collar needs some work. But the model does otherwise work, so mission accomplished on that front at least. Here are some resources, if you want to poke through them: ASCII model - http://dpmods.wheb.org/files/kotor/misc/DP_IthorianH_ASCII.7z TSLPatcher setup - http://dpmods.wheb.org/files/kotor/tsl/[TSL]_Player_Head_Ithorian_Test.7z Thank you, that was a lot more than I expected but much appreciated! I'll keep you posted on how it works. Edited March 30, 2016 by Fair Strides Way too long of a post to be quoting... Quote
xander2077 Posted May 12, 2016 Posted May 12, 2016 I think if you wanted the neck verts from the human head to match the body it would be better to keep them the same size as on import, and then adjust the Ithorian neck to fit. It looks like the neck was sized up to create a collar, so it will look odd that way anyway. A collar could be created as well, but it would have to remain separated from the movement of the head and neck, and weighted differently and for that i would use one of the high neck robe collars so that it extends just inside the body, but follows the contours of the Ithorian neck. I would also suggest using the Ithorian head and neck instead of chopping the bottom of the neck crook off where it extends to the body, and try extending the neck to just inside the body model so that the open end of it doesn't clip. A good way to do that would be to adjust the lines of it so that they touch just the surface of the chest and shoulders and top of the backbone on the outside of the body model, then grab all the vertices on the bottom of the Ithorian neck, extrude edges only in the z axis a couple of times (just a little bit each time), and then merge all the verts on the bottom most extrusion to the center. This will create a point, and then you can place that point on a pivot somewhere inside the center of the chest up high, just below where the neck is, probably best to try different things out to find the sweet spot where it pivots just right. This will also ensure the head pivots on that spot and doesn't allow the bottom of the neck to clip outside of the body, and there wont be any gaps either. To cover the new geometry with the same texture just use the clone brush and a few others to blend it past the original edges of the neck. A collar can also help hide the overlap between the head and body models. of course it looks ridiculous the way it is, lol, but it was a good proof of concept. proof that this can work. Quote
Fair Strides Posted May 12, 2016 Posted May 12, 2016 Xander: To help the guy make sense of what you just said, could you go back through it, add punctuation, and chop it up into paragraphs, please? As a wall of text, I almost lost my place several times. Quote
Sith Holocron Posted May 12, 2016 Posted May 12, 2016 Capital letters are useful at the beginning of sentences also. Quote
1Leonard Posted May 12, 2016 Posted May 12, 2016 grammar nazi i am not.It's not about being a grammar nazi, it's about other people being able to read your contributions without getting confused or interpreting them the wrong way. Quote
xander2077 Posted May 12, 2016 Posted May 12, 2016 It's not about being a grammar nazi, it's about other people being able to read your contributions without getting confused or interpreting them the wrong way.I get that, it is just frustrating when I am used to the spell check working and I get short on time. But I think it is best if I try and solve that in another place besides this thread To help clarify I have a few pictures of what I am talking about to make a faux Ithorian. First take the head, it will have to be shrunk a bit, position it, and move the bottom vertices down around the chest and shoulders. I also moved the back half of the neck forward because it was hanging out over the back. Then I selected all the verts on the bottom of the neck Then I extrude only the edges together in the z axis direction twice, adjusting it back and forth and also reducing the size of the loop / shrinking it Then I merge the bottom vertices to a point. Then to help conceal the seam between objects, I make a collar that hugs both closely. It can be made out of part of the neck or another collar imported from another robe. For my collar I used the back faces of the neck and then extruded them as one radially (or along vertex normals) and of course it would have to be retextured to something besides the Ithorian skin. The body is only there for reference. In the final export it can be deleted from the model. As long as the other things are still there (helpers/empties, bones) from the original human head it should work fine. I guess a more complex one would be to have the eyes work. But I think those can be from the human model and just moved up to the Ithorian eye sockets. This method can be used on every alien besides the Hutt. I would not want to see a player character Hutt. It would probably end up looking like the Grinch. Quote


Recommended Posts
Join the conversation
You can post now and register later. If you have an account, sign in now to post with your account.