
Leaderboard


Popular Content
Showing content with the highest reputation on 09/21/2026 in all areas
-
![More information about "[TSL] Exchange Gamorrean Fix"](https://deadlystream.com/downloads/screens/monthly_2026_09/20260912154612_1.thumb.jpg.a7baab39ff2842f8499ca644a681ac76.jpg)
Version 1.0.0
37 downloads
===================================================== [TSL] Exchange Gamorrean Fix ===================================================== Mod for Knights of the Old Republic II - The Sith Lords Author: Lily File Name: Exchange_Gamorrean_Fix.zip Latest Version: 1.0 --- 1. DESCRIPTION: With TSLRCM, the Gamorrean Exchange thugs in the refugee sector on Nar Shaddaa have two bugs: 1. They no longer have dialogue if you try to talk to them. I believe the base game had a bug where they had more dialogue lines than they would actually say when you talk to them, and TSLRCM tried to fix this but it ended up even more broken and they just remain silent. With this mod, all of their dialogue lines are restored. 2. When you security one of the metal boxes near them, they tell you "Get out of there or I bash you!" which is an empty threat as they don't care if you take what's inside the box. With this mod, they will become hostile and attack you if you open the box to take what's inside (unless you are in stealth) as intended. --- 2. INSTALLATION: Run Install.exe and select your KotOR 2 game directory. A "backup" folder is created by the installer in the same directory. Don't delete it if you plan to uninstall later. --- 3. UNINSTALLATION: Run Install.exe, select your KotOR 2 directory, and use the "Tools > uninstall/restore backup" option to revert all changes made by this mod. --- 4. KNOWN ISSUES: None. If you find any bugs or problems, please report them. --- 5. MOD COMPATIBILITY: This should be compatible with all other mods. Requires TSLRCM. Do not use the Steam Workshop for KotOR. It will almost certainly end with compatibility issues. --- 6. SUPPORT: My mods are free to use. You do not need to pay for them, but if you would like to say thanks, you can buy me a coffee! --- 7. PERMISSIONS: Please let me know if you plan on using any of the files in my mod for your own mod. The answer is "yes you may", but I would like to know what you are doing with it! Do not directly reupload this mod anywhere else. --- 8. THANKS: - Fred Tetra - KotOR Tool - Cortisol - Holocron Toolset & HoloPatcher - Fair Strides - TSLPatcher THIS MODIFICATION IS NOT SUPPORTED BY BIOWARE/OBSIDIAN ENTERTAINMENT OR LUCASARTS OR ANY LICENSORS/SPONSORS OF THE MENTIONED COMPANIES. USE THIS FILE AT YOUR OWN RISK.1 point -
Version 0.52.0
6,534 downloads
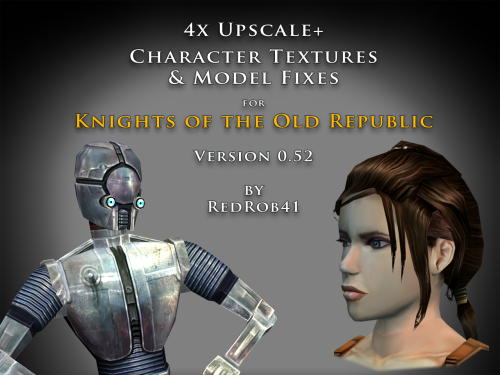
================================================================ IF YOU ARE EVER IN ANY DOUBT ABOUT INSTALLING ANY MODS, PLEASE REMEMBER TO ALWAYS BACKUP YOUR FILES BEFORE INSTALLATION, JUST IN CASE. ================================================================ Description: This mod is more than just a simple process of running all the character textures through an A.I. upscaling program. The purpose is to increase the size and fidelity of the character textures while maintaining the painterly style of the original game artists. This mod does not attempt to create photo realistic textures or add extra detail (like zippers, clothing stitches, fabric patterns, skin pores, etc) that are not already part of the existing style. This mod also fixes many of the UVW mapping errors, lighting errors, and some XYZ errors that the original model .mdl & .mdx files may have had. The process followed is generally: run texture files through A.I. upscaling program multiple times using different settings. Some settings result in "crunchy" textures (high contrast, sharp edges). Some result in "soft" textures (smooth gradients, lower contrast, blurry edges). Some result in better straight/parallel lines. Early tests used Vance AI; Deep Image; ImageUpscaler; or Let's Enhance. Eventually Topaz Labs' Gigapixel AI was chosen and used on the majority of textures. combine textures in multi layered Photoshop file, using layer masks to isolate the best parts of each upscaled image. This allows for some portions to be smooth (like skin, glass, metal or tubing), others to be sharp (like burlap, skin folds, hair, scratches, etc). touch up by manually painting away errors (such as jaggies due to original low resolution jpeg compression). manually recolor areas that the original artists missed (like commoner clothes where the pants seat do not match the pant leg; or player armors where pouches are inconsistent between male & female; etc). strategically add painted detail (such as highlights and shadows along the shoulders and neck of Player Character soldier's underwear; adding glove details to armors F, G, H, I, J; etc). painting personal choices (like changing P_BastilaBA02 to have different pants and remove wrist & neck restraints than P_BastilaBAS01 slave outfit). recreating entire textures (such as Player Character male scoundrel dark side underwear PMBASD01). fix the models' UVW maps to reduce some texture stretching (like collar of TSL robes I); adjust areas that are poorly mapped to the wrong locations or too large/small (such as PFBD collar); fix edge seams from one area to another; close gaps (like Mission's arms). manually fix texture seams by copying small areas of the image from one area to another; stretching and scaling them. This should result in model seams that are hidden or difficult to notice. sometimes the Alpha 1 channel is upscaled, but usually it is recreated directly from the final HD color texture. personal choice to add punchthrough transparency to the Alpha 1 channels of some female head models' eyelashes (like P_BastilaH04). recreate the Normal map (for bumpyshiny effects) from the final HD color texture. These work best when saved as .tpc format For most models, they only needed to be manipulated in 3DS Max, exported, and then run through Taina's replacer. This is usually sufficient to fix any XYZ and/or UVW coordinates. I prefer Taina's replacer method so that the model retains its smoothing groups data. For some models (like C_RancorS or C_Terantanak), Taina's won't work, so for those files, I had to resort to manually hex editing the binary .mdl & .mdx files. This is a much more labourious process, but in the end I got them to work. A few models required fixing the model weights of individual verticies. This was done to reduce portions of the model clipping through other parts in different animations. Again, this was done by manually hex editing. For many head models, the UVW coordinates for the tongue and inside of mouth may be moved significantly, especially for the KotOR heads. This is because the originals often map the tongue to a single pixel located in the lips area, which results in almost no detail. By moving the UVW to a free area of the texture, there may be room for painting a detailed tongue. For the party members that have specific underwear textures and basic clothing textures, there has been an effort to make any skin areas (like hands & arms) match between them. Usually the hand area from the underwear texture is copied to the hand area of the clothes texture. This creates more consistency of the party characters' appearance. For low resolution versions of models (like C_Gammorean_Low, C_Protocol_Low, N_Swoopgang_low) or placeables (such as PLC_EndPlA, PLC_RakatCrp, Stunt_WarDrd01) the original textures were not simply upscaled. Instead, the new versions were actually taken from similar high resolution versions and scaled down. Sometimes the textures were rebuilt from parts of other higher resolution images, with some touch up painting. Included is a spreadsheet labelled "KotOR upscale completed list v0_52.xlsx" which has more detailed information as to what files were changed, and in what ways. As of this update, 52.71% of the texture files that I intend to upscale have been completed. As such, this mod should be considered a beta test. The percentage is calculated for both games together, however the mod is released with files separated for K1 & TSL. The spreadsheet was created with Google Sheets and exported as .xlsx, so hopefully the formatting remains correct. I have also attached a copy of the spreadsheet to this mod thread. There will be three versions of this mod to choose to download: 4x .tga version. Highest resolution, the typical texture is now 2048x2048 pixels which = 16MB. This version is a total 5.2GB, hopefully it isn't too large or cause problems for some PCs. This version is also the best choice to use as a modder's resource. 4x .tpc version. Created by running full size .tgas through tga2tpc program which compresses a 2048x2048 pixel file to 5.5MB. This version is a total of 1.8GB, so it should be easier on PC systems, with no noticeable loss of visual fidelity. 2x .tpc version. Created by reducing full size .tgas by half in Photoshop, then running them through tga2tpc which further compresses them to 1.4MB. This version is a total of 530MB, which should be much easier on PC systems. All versions include the same .mdl & .mdx files. I have tested the .tga version exclusively, but have not tested the .tpc versions in-game. Please let me know if there are any issues. Most of the screenshots have been taken in TSL, because I find that it renders the characters better and has higher resolution screen grabs. My computer doesn't seem to render some of the CM shader effects properly (especially the bumpyshinytexture CM_SpecMap always seems too strong on my computer). I would appreciate any in-game screen shots that you take of characters like Hutts, Rakghouls, Rakata, or Selkath so that I can compare how other computers render their shader. ================================================================ Compatiblity: For best results, the model and texture files included with this mod should be used together. In most cases, the models can be mixed and matched with textures from other mods, but results will vary. For instance, the other textures won't be as perfect along the seams. Some other photo realistic HD texture mods may have been created using the original model's UVW layout, which will not perfectly line up with this mod's corrected UVW maps. Conflicts may also occur if there is another mod uses a .tpc file with the same name as one of this mod's .tga files (or vice versa if you install one of the .tpc versions). I would suggest installing other large mods (such as "KotOR 1 Restoration" or "KOTOR 1 Community Patch") first, then this one. ================================================================ Installation: Copy and paste the desired model and texture files into KotOR's Override folder. You may need to over write any existing files, so always have a backup. An effort was made that these textures and models require no 2da editing. The folder marked "Reference Normal Map" is not required to be copied to the Override forlder. These .tga files are simply a modders' resource. The normal maps seem to work best if they are saved in .tpc format. The "Copy contents to Override" folder should already have .tpc files in it for the normal maps. ================================================================ Uninstall: Delete unwanted files from the game's Override folder. ================================================================ Thanks for modding tools: KOTOR Tool – Fred Tetra mdlops (used version 7a2) - cchargin, JdNoa NWMax – Joco Replacer - Taina tga2tpc - ndix UR KotOR/KotOR2 Savegame Editor v3.3.2 - tk102, Fair Strides Hex-editor XVI32 2.55 - Christian Maas ================================================================ Permission: Consider this as a modder's resource. I give permission to any modder to use these files as a base for their own creations; as long as their creation remains free to use (not for profit); and credit is given to me as the source of any modded files. Please include a statement that specifies this mod's title and version. The original credit of course goes to the talented artists who worked on the original games for BioWare and Obsidian. Without their work, none of this would have been possible. I have tried my best to maintain the artistic style that they created long ago. This mod may NOT be uploaded or redistributed, in whole or in part, to any mod hosting site without my explicit permission. As always, this mod is free for your non-commercial/personal use. There should never be a requirement to pay for it. If you like the work I do, and would like to encourage me to create more, you can always donate to my tip jar at https://buymeacoffee.com/redrob416 where the funds collected will be used towards additional graphics tools and software. ================================================================ THIS MODIFICATION IS PROVIDED AS-IS AND IS NOT SUPPORTED BY BIOWARE CORP/OBSIDIAN ENTERTAINMENT OR LUCASARTS OR ANY LICENSERS/SPONSORS OF THE AFOREMENTIONED COMPANIES. USE OF THIS FILE IS AT YOUR OWN RISK AND THE AFOREMENTIONED COMPANIES OR THE AUTHORS ARE NOT RESPONSIBLE FOR ANY DAMAGE CAUSED TO YOUR COMPUTER FOR THE USAGE OF THIS FILE. KotOR upscale completed list v0_52.xlsx1 point -

Version 2.0.0
232 downloads
This mod allows you to buy KotOR2 items from Greeta Holda and Yuka Laka on Tatooine. The mod won't work if you already visited the Czerka Office or the Droid Shop, you need to load an earlier savegame.1 point -
Version 1.0.0
186 downloads
Changes the Mask of Tulak Hord to look like the Sith Mask, which in my opinion was the intended look for this item, since the 'Model Variation' number of the item only differs by 1 from that of the Sith Mask. (If you already visited the Tomb of Tulak Hord the mod won't work.)1 point -
Sith Holocron asked me to repost my old 2013 tutorial on this subject from LucasForums here, which you may have seen before, either in its original form or in the helpful video forms made by Xuul (if you have difficulty understanding any of the steps here, I recommend seeking those videos out). This method was originally discovered and posted for KotOR II, but works for KotOR I as well. Here is the guide, with some minor changes: --- The ability to run the KotOR games in custom resolutions has existed for many years now. Personally, I have patched KotOR I and II to run in a 1920x1080 widescreen resolution (and KotOR II now supports higher resolutions by default after the Aspyr patch), and many other people have done the same, with various resolutions. However, despite these patches, no matter what resolution the game is patched to run in, the games' .bik movies do not run in the patched resolution. They merely upscale to fit the width of the screen. For KotOR II, which was the original subject of this guide, the vanilla non-HQ movies play in an awful 640x272 and upscale from there, maintaining the 640x272 aspect ratio of ~2.353:1 until they are the width of the screen, with ugly black bars on the top and bottom of the movies. In late 2012, in this LucasForums thread, I pieced together the method to getting KotOR II to run the .bik movies in different resolutions -- in my case, 1920x1080. This thread will explain that method, applied to both games, and should allow anyone to force the games to run the movies in the same resolution that their game is patched to. WARNING: This modification requires the hex editing of KotOR I/II's executable. Mistakes could cause it to stop working, requiring you to redownload the file if you do not know how to fix the problem yourself. With Steam, this is an easy thing to do; on a physical copy of the game, it would require a full reinstallation. Remember to back up any and all files that you will be altering in case something goes wrong. Things you'll need: The KotOR I/II no-CD patch -- If you've already patched your game to run in a custom resolution, then you've already gotten the no-CD patch, because the normal executable isn't editable. I can't link to the no-CD patches since they are technically illegal, but they are easily found via Google. This should not be required for the GOG versions of the games. In the case of KotOR II, you should also grab the KotOR II HQ movies patch -- this is included by default with the Steam and GOG versions, so most people shouldn't need to worry about this. If you are playing with a physical copy, then you'll need to find a mirror of the patch online somewhere. There are 6 parts in total. RAD Video Tools -- this program is used to output the HQ movies to your desired resolution. **** The latest update of RAD Video Tools no longer works with kotor movies. Users will need to download version RADTools_1200e located here HxD Hex Editor -- You will need a hex editor to edit the games' executables. Any will work, but HxD is the one I used, and it's free. Download here. Now, the instructions. ----------------------------------------------------------------------------------------------------- Step 1: First, make sure you've backed up everything that you'll be editing. I suggest creating a folder entitled "Backup" inside your KotOR I/II directory, in which you can put the game's executable and any other important files (such as the original movie files), although the executable is really the only one that is at risk of being screwed up by a mistake. If you have the Steam version, you can just use the "verify integrity of game cache" function to redownload the original version(s) of any broken file(s). Step 2: Create a folder entitled something like "Outputted Movies" and put it somewhere like your desktop. It doesn't really matter where; the desktop is probably the best place. You'll be deleting it once you're finished, as it will no longer be needed. Step 3: KotOR II users should install the official KotOR II HQ movies patch. This will overwrite many of the files in your \Movies directory with higher quality ones. Remember that this is not necessary on the Steam version. Step 4: Get the no-CD patch for your game (I can't link here as stated above, so use Google) and, if necessary, patch your game to run in whatever resolution you want. Instructions on how to do that can be found online and will not be given here so as to reduce the size of this post. I'm sure most people reading this have already done this step eons ago, anyways. Step 5: If you haven't already, download and install the RAD Video Tools linked above. Step 6a: Now, the fun stuff begins. You'll need to use RAD Video Tools to convert all of KotOR I/II's .bik movies to your desired resolution. Depending on the power of your computer, this can take a significant amount of time. It might be best to just do this step overnight, as the processing takes a while and is very resource-intensive, slowing your PC while in progress. If you are on an old/weak PC, this process could take too long to be worthwhile for you. I can't estimate how long it will take, as it will vary wildly based on the power of your PC. To convert the files, open RAD Video Tools and navigate to your KotOR I/II installation directory, and then open the Movies subfolder. Select all of the .bik movies. Step 6b: Now that you've selected all of the files, click "Bink it!" in the lower left corner of the RAD Video Tools window. A new window should open wherein you can select the output settings. Under "Browse," select the desktop folder we created earlier called "Outputted Movies." All of the converted movies will now be outputted there. Under "Input video settings," enter your desired resolutions. I, for example, put 1920 in the width boxes and 1080 in the height boxes. KotOR I users should make sure that the "Compress audio" option is checked and that lossiness is set to 0, otherwise the files will be rendered without sound (thanks milestails for noting this); KotOR II users can uncheck compress audio. Click "Bink" on the right-hand side. Step 7: Now you play the waiting game. Wait for the movies to be converted. Step 8: Once the movies have been outputted to your desktop folder (or wherever else), copy and paste them to your KotOR I/II's Movies folder (e.g. C:\Program Files (x86)\Steam\steamapps\common\Knights of the Old Republic II\Movies). Select yes when asked to overwrite. You can also backup the originals beforehand, if you want. Once all the files are in place, you can delete the "Outputted Movies" folder from your desktop; it has served its purpose. Step 9: Install HxD (or any hex editor, really) and open the game's executable (swkotor.exe or swkotor2.exe), located in your KotOR I/II installation directory. Here comes the only complex part of these instructions. You will need to find the following hex values (in HxD, make sure to change the search datatype from Text-string to Hex-values) and edit them to match your desired resolution. Change the bolded resolution pairs to your desired widescreen resolution. Remember to flip the order of the hexadecimal values. For example, 1920 is 0x780 in hexadecimal. I would flip the order (ignoring the x) and enter 1920 as "8007." 1080 is 0x438, and thus, it would be entered as "3804." For KotOR II: TSL, the hex values you must edit are: For KotOR I, the hex values you must edit are (thanks to Kainzorus Prime for finding these hex values online): Note: If the game minimizes during cinematics, this may be fixed by setting the game's executable to run in compatibility mode for Windows XP with Service Pack 3. If you are having trouble finding the coordinates, it may be because the UniWS patcher already edited the hex coordinates for you. You can verify this by searching for what you plan on changing the coordinates to (instead of the original pre-patch values); if you find a match, that means the editing has already been done by the patcher. Step 10: Most people have probably already done this, but if you haven't, it's vital: open the file swkotor.ini/swkotor2.ini with Notepad (or any text editor) in your KotOR I/II directory and change the width and height under [Graphics Options] (and [Display Options] for KotOR II) to whatever your custom resolution is. ----------------------------------------------------------------------------------------------------- That's it! Assuming everything worked correctly, your KotOR I/II movies should now play full-screen, with no ugly black bars on the top and bottom. Enjoy the fixed movies, and PM me if you have any questions or anything that could be added to this guide. I will update this thread in the future to correct any mistakes or to add any additional information.1 point
-

Version 1.0.1
3,717 downloads
Those of you familiar with Party Model Fixes by redrob41 know it is a cool mod that fixes up some of the game's models for your K1 party members. Cool enough that I figured it was time for a sequel -- we are going to do even more fixing up of our compatriots: Carth: His unique outfit has a holster which hung by some leather that was missing a texture on one side, rendering it invisible from certain angles. This fixes up that issue, alongside some bonus texture mapping fixes to his opposite pouch and jacket, including the collar fix that redrob41 worked on in their original mod. Zaalbar: Our wookiee friend had some hairs that went missing depending on the angle, again due to missing textures on the opposite sides of some geometry. This fixes that right up, alongside some other messy texture mapping for some of his fur. Jolee: Sometimes Jolee likes to just hang out in a swim suit, socks, and... some kind of bizarre ankle brace. I could not tell you what it does, but it is unlikely to be doing its job given that it disappears when viewed from the other side. This fixes up another classic case of one-sided texture syndrome, and makes some small improvements to texture mapping. Mission: Originally Mission was set to just use adult models when wearing various armors, likely due to time constraints. Therefore, I have made some alternate armor models more suitable for a kid to use. These are just edited versions of the vanilla models, with similar texture mapping, so it is all very vanilla-looking and compatible with any texture mods. This will add the new models to your game and set her appearance.2da row to use them. Her unique models in vanilla are fixed up less noticeably to reflect the changes, and include similar texture mapping fixes to the arms that redrob41 did. This mod is intended to be installed after redrob41's Party Model Fixes, but does not require it to work. All changes will be applied immediately, and do not require that you start a new game. Installation: Download the included .7z file and extract it anywhere of your choosing on your computer. You can unzip a .7z file with tools such as Archive Utility on MacOs, or by with free programs like PeaZip on Windows and Linux. Simply run this installer, directing it to the location of your main game folder with the executable. For Steam installations, this would be "Steam\steamapps\common\swkotor". The installer is an .exe file, which Windows can run natively. Mac and Linux users might consider checking out Cortisol's HoloPatcher -- a new tool that is meant as a cross-platform alternative to traditional KotOR mod installers. Alternatively, executable files can be run on Mac or Linux with programs using tools such as Wine. If you are having trouble with either of those options, I have included some instructions for manual installation in the download's "ReadMe" file. If you happened to have previously installed another mod which placed an appearance.2da file in your override folder, the installer will give you a warning reporting as much upon completion. This is of no concern -- so long as you get no other warnings or errors, the mod is installed correctly and ready-to-go. The mod will overwrite any conflicting model files (.mdl/.mdx) in your override folder, but not any appearance.2da file it finds there, merely edit the existing one. Be sure to back up anything you want to keep ahead of time. The Included Files list below contains all the files that will be installed to the override folder. Uninstallation: Delete all of the files listed below from your override folder. If you had an appearance.2da file in your override folder prior to installing, you can find a backup version in the mod's "backup" folder, which was automatically created during installation, and place that in your override. If you are unsure whether or not a previous mod had put that file there or not, it is better to make use of the backup. Included Files: Compatibility: This mod is fully compatible with any mod which does not replace any of the model files (.mdl/.mdx) listed above. Files that edit appearance.2da are compatible so long as they do not change Mission's armor model cells. If you intend to install Party Model Fixes by redrob41, I recommend doing so before installing this mod, or what you install here will be overwritten. Expect compatibility with most any texture/reskin mods -- so long as they do not replace models (.mdl/.mdx files) as well as textures, there should be no conflict. Acknowledgments: Thanks to seedhartha, NdixUR, Symmetric, and Purifier for making importing to Blender simple using KotORBlender, and Cortisol for making file extraction easy with the Holocron Toolset. I would also like to thank Stoffe and Fair Strides for making inter-mod compatibility infinitely more feasible with TSLPatcher. Shout-out to ConansHair for pointing out that weird bright spot on Zaalbar's rump. This modification is not supported by Obsidian Entertainment, Lucasarts, Disney or any licensers/sponsors thereof. Use of this modification is at your own risk and neither the aforementioned companies nor the author may be held responsible for any damages caused to your computer via this modification's usage.0 points
