

Leaderboard


Popular Content
Showing content with the highest reputation on 05/29/2022 in Posts
-
View File Revan unmasked "Revan unmasked" mod for Star Wars: Knights of the Old Republic II: The Sith Lords ========================================================================== Version 1.0 Released 28.05.2022 Author LoneWanderer ------------- 1.Description ------------- Since TSL doesn't support save transfer, the player chooses Revan's gender and alignment during the first dialogue with Atton. Regardless of the choice, Revan's face is hidden behind a mask in the game. This mod removes Revan's mask and gives him/her the actual face from KOTOR I. There are 2 options available: with hood and cape (has many clipping issues, but mostly independent from Revan's robe reskin mods) and without them. You can change default heads from this mod to other KOTOR heads (located in the 'Alternate Heads' folder of the mod). -------------- 2.Installation -------------- Run "TSLPatcher.exe" installer, choose Option 1 (with hood and cape) or Option 2 (without hood and cape) and select your TSL folder. Edit: You'll need a save before entering the Secret Cave on Korriban for the mod to work properly. How to install a different head for Revan: Additional heads are located in the "Alternate Heads" folder of the mod. pmhc04 and pfhc03 head models are installed for male and female Revan by default. If you want Revan to have a different head from KOTOR, then: 1.Open the page "https://deadlystream.com/blogs/entry/220-blog-56-the-k1-and-tsl-heads/" in your browser. Choose the head in k1 heads section on the picture and remember its name. 2.In the "Alternate Heads" folder, find this head model and 5 textures. Copy them and rename male head, textures as "n_revanmh" and female - "n_revanfh". For example, pmhc01.mdl -> n_revanmh.mdl, pmhc01.mdx -> n_revanmh.mdx, pmhc01.tpc -> n_revanmh.tpc, pmhc01d.tpc -> n_revanmhd.tpc, ... , pmhc01d3.tpc -> n_revanmhd3.tpc 3.Put the renamed files in Override folder of the game, replacing existing files. How to use reskins from other KOTOR I mods: If mod only changes textures of an existing KOTOR I head (doesn't have .mdl and .mdx files), then to use it: 1.Rename textures from the reskin mod (files with .tga, .tpc extensions) as "n_revanmh", "n_revanmhd", "n_revanmhd1", "n_revanmhd2", "n_revanmhd3" - for male head, "n_revanfh", "n_revanfhd", "n_revanfhd1", "n_revanfhd2", "n_revanfhd3" - for female. 2.Place the renamed .tga/.tpc reskin files in Override folder of the game. If reskin had files with .tga extension, then don't forget to delete original .tpc files with the same names in the Override. ---------------- 3.Uninstallation ---------------- Delete installed files of the mod from Override folder. Copy the files from the generated "backup" folder and place them in the Override folder. If you have installed other mods after this one that modify appearance.2da, heads.2da, then you should uninstall those mods first. ----------------- 4.Known issues ----------------- The hood from Option 1 will clip with head and hairs in many animations, but this is a purely visual issue. -------------- 5.Compatibilty -------------- Option 1 (with hood and cape) is not affected by most mods that change Darth Revan's/Star Forge robes. Install it if you want to use mods like "Jedi Journeyman Robes" (which replace Darth Revan's robe with something else) for player's character. Option 2 (without hood and cape) is affected by mods that change Darth Revan's/Star Forge robes (model J). This means you can install various Darth Revan's robe reskins with it and they will appear on Revan. "Revan's Hoodless/Maskless Flowing Robes For TSL 1.1" by DarthParametric is compatible, but most (or all) female variants won't have a flowing cape. "Single bladed fake Revan 1.0.0" mod by Crimson Knight is incompatible. ------------- 6.Permissions ------------- This mod may not be modified or distributed without the explicit permission of the author. This mod can be reuploaded / posted on other sites only if it is unavailable both on DeadlyStream, and on Nexus, and there is no contact with the author for at least 3 months. --------- 7.Credits --------- Fred Tetra - KOTOR Tool TK102 - DLG Editor Stoffe and Fair Strides - TSLPatcher Blue - KotOR Scripting Tool --------- 8.Contact --------- PM me on DeadlyStream or Nexus. Disclaimer THIS MODIFICATION IS PROVIDED AS-IS AND IS NOT SUPPORTED BY BIOWARE/OBSIDIAN ENTERTAINMENT, LUCASARTS, DISNEY OR ANY LICENSERS/SPONSORS OF THE MENTIONED COMPANIES. USE OF THIS FILE IS AT YOUR OWN RISK AND THE ABOVE-MENTIONED COMPANIES OR THE AUTHOR IS NOT RESPONSIBLE FOR ANY DAMAGE CAUSED TO YOUR COMPUTER FOR THE USAGE OF THIS FILE. Submitter LoneWanderer Submitted 05/29/2022 Category Mods TSLRCM Compatible Yes1 point
-
Thanks, Marius for the in depth reply. Honestly I'm just doing it so everything has a size increase. If it is really noticeable within the game; would require a more in depth screenshot comparison. But sadly I fear on how the game uses said normalmaps/ bumpmaps it's not going to do that much in the end. I've just included all the .txi files to be certain the game uses it all as it should. Though no idea what takes precedence when the game loads textures. Txi or TPC. Also mind the normalmaps are basically the diffuse texture I run through FilterForge. The program offers a few different "filters" to obtain a normalmap from any sort of picture. Try to match the original as best I can. In all honesty I'm not that tech savy 😅 These 2 threads here on DeadlyStream have lots of info on said subject:1 point
-
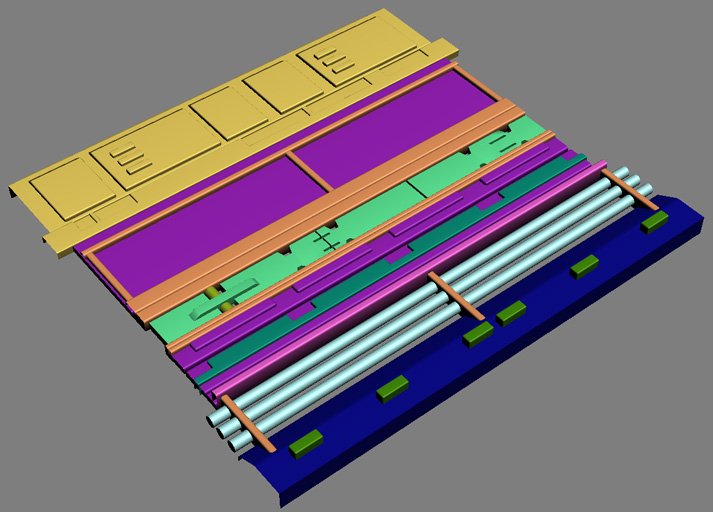
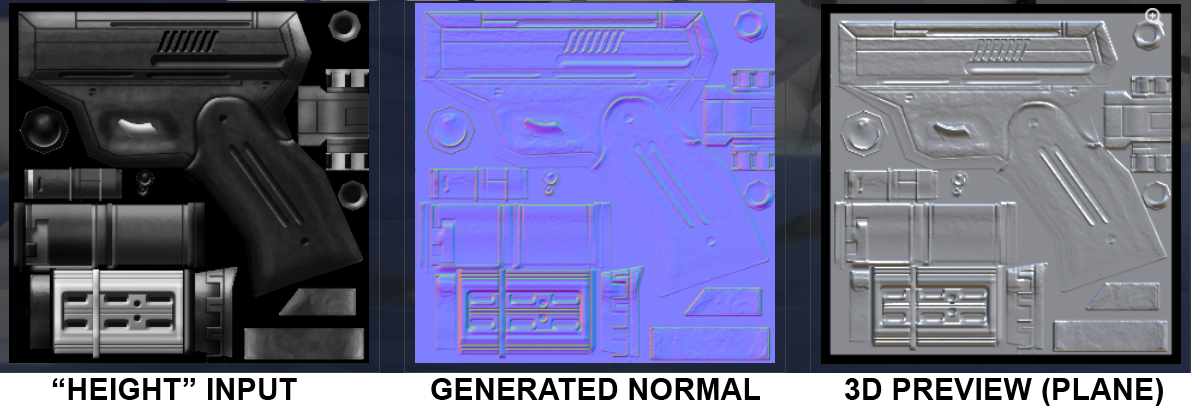
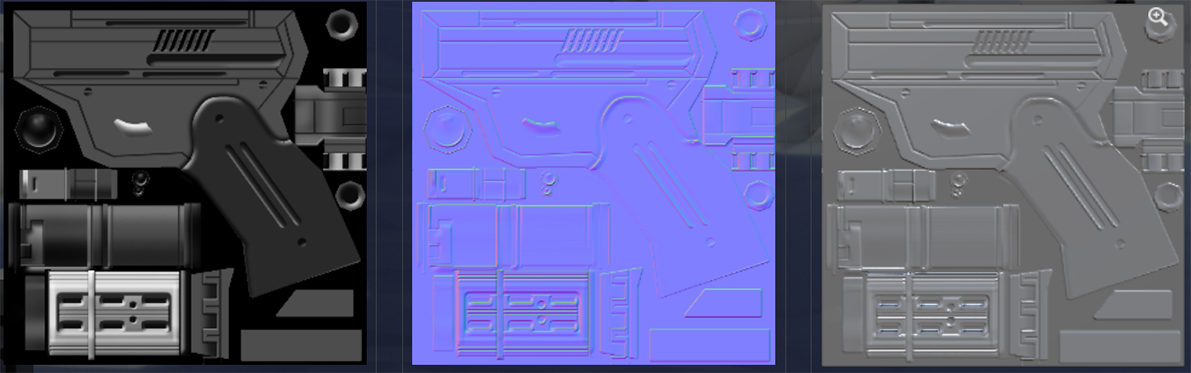
When talking about normal maps for 3D models like weapons, armour, placeables, etc., generally the "correct" way to do it would be to generate the map from a high poly version of the model. This is what is known as baking. In modern texture generation, this is often as much for creating the diffuse texture itself in the first place as it is for use with the final game model. Here's an example from some of my own experiments with recreating the Ebon Hawk textures from scratch. Take LEH_grwall01. This is the vanilla texture on the left, and my recreated texture on the right (lacking a grime pass): I started by creating a 3D model of the original texture, like so: This was the high poly model. The low poly model was a simple flat plane of two triangles. When baked out, this was the resultant normal map: Obviously this approach is not always practical. Sometimes you'll want to generate a normal map directly from a diffuse image, which I gather is what you are primarily interested in. The simplest route is to create a greyscale height map. At its most simplistic, this would entail desaturating the source image and then running through any number of programs or PS filters to generate the normal map. For example CrazyBump, AwesomeBump, xNormal, etc. There are also some online tools to do this, for example NormalMap Online. Results through this approach will vary wildly depending on the quality of your source image. As an example, let's take one of the texture sources from Sithspecter's "High Quality Blasters for Modders" modder's resource. We'll take w_blstrpstl_001 and simply desaturate it to create a pseudo-height map. Then we'll feed this into NormalMap Online: This is only about 30 seconds of effort, but the result isn't too bad considering. However if you have a look at the attached normal in closer detail, you'll see a lot of noise. This is typically very bad in a normal map, and in this case is somewhat exacerbated by NormalMap Online's lack of sufficient adjustment parameters to mitigate it. But really the root of the problem is that a diffuse is an extremely poor input source, especially in traditional textures that include baked/fake shadowing and highlights/specular. You can see in SS's source image that there are some highlights across the top of the main body, on the top of the sight back piece (bottom left corner), and along most curved edges. There is also a lot of noise in the flat areas from what I gather is the use of PS's Clouds filter, particularly noticeable in the trigger guard and surrounding area. Fortunately in this case we have some ability to quickly and easily tweak the height map, since SS's source is a layered PSD. Turning off a few of the noisy layers to create a new height map input, the revised generated normal looks like this: Looking at the attached revised normal, you'll see there is now far less noise, giving a mostly crisp map. There's still a little bit of wonkiness due to the highlights - notably at the top edges of the grip/handle, the lens of the sight (top left), and the screw heads and scallops - but that's part and parcel of using this sort of image as a source. Those particular issues could be reduced or resolved with some manual adjustment of the height map. Just imagine it as a gradient where white is the highest point and black is the lowest point. The thing to keep in mind with Odyssey is that its normal map implementation is pretty terrible. It's rarely worth the effort to create normal maps. I certainly wouldn't bother for anything small, like weapons or the like. Large floor and wall panels is probably where it will be the most notable, and these have the added benefit of typically being fairly simplistic in terms of the height details, meaning they are easy to create height maps for. Armour and bodies (like droids) can also make use of them, although this is best reserved for large details rather than lots of noisy fine detail. If you are thinking of trying it for stuff like monitor panels and the like I'd suggest you don't waste your time. Especially if it is going to be in a dark area (like the Hawk's cockpit). Stick with faked details in the diffuse for that sort of thing. Edit: Still far from perfect, but here's a further quick adjustment of the height map to address some of the highlighted (no pun intended) problems: You'd actually want to vary the height of the straight panel lines I think, make them a dark grey rather than black like the scallops. And the top edge of the handle needs to be a gradient to get a nice smooth curve. Same thing for the scope lenses (see the screw heads). w_blstrpstl_001_Generated_Normal.7z w_blstrpstl_001_Generated_Normal2.7z w_blstrpstl_001_Generated_Normal3.7z


 1 point