
58 files
-

Quanon's Modeling Tutorial (Part 3)
By Quanon
Part of the...
From Sith Holocron: Only Part 3 of this tutorial was found at JumpStationZ. Hopefully, there's enough in here to be helpful to somebody.107 downloads
(1 review)0 comments
Updated
-

SaberMaker for KotOR and TSL
By lachjames
This is a simple Python utility that lets you create new lightsaber textures for KotOR and TSL. Note that (especially in KotOR) creating a new lightsaber colour requires more steps than this - a future project will make this a one-click process for users, but for now I'm releasing this as a standalone tool for mod developers.
Installation
You should have Python 3 installed. There are no other dependencies. Just download and unzip the zip archive from this page, and you should be good to go!
I'll be releasing a Windows .exe version at some point. If you're not comfortable using the Python script, either wait for that or ask me (or one of the many helpful people on DeadlyStream) to make your lightsaber textures for you.
Usage
Run the script editor.py using Python, with a command like
"python editor.py".
This will open up the editor. You can choose the glow and core colours for the saber texture, and then save it using one of the bottom two buttons. The texture will then be saved in the current directory.
Bugs
There might be some bugs, but it's a pretty simple script and it seems to work fine.
FAQ
The lightsaber looks dark in-game!
For a bright lightsaber, you should select a colour with both Saturation and Brightness parameters set to 100% (in the second tab in the colour picker). Then you can use the Hue slider to choose a colour.
Can I use this for my mod?
Sure, feel free to use the textures for your own mods! I'd appreciate it if you credit this tool for helping create the lightsaber textures.
Can I redistribute this program in its entirety (with or without attribution)?
Please don't redistribute this program elsewhere on the internet. I will keep it here, so you can point people to it.
How do I take this texture and put it straight in the game (not as part of a mod)?
I'm working (along with others on DeadlyStream) to make an "end-user version" of this tool, as part of a larger modding project. Stay tuned!
The lightsaber core looks weird!
You should probably leave the "Core" colour to its default value (pure white) to get lightsabers that look like the ones from the base game. But if you want to experiment, the option to change the core colour is there!
177 downloads
-
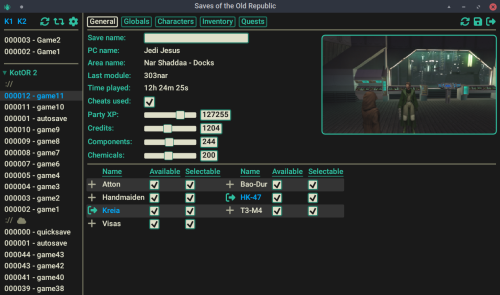
SotOR Save Editor
By StarfishXeno
SotOR: Saves of the Old Republic
A new save editor for KotOR 1 and 2
Warning
SotOR is a pathway to many abilities some consider to be unnatural, and generally lacks sanity checks, potentially allowing you to break the save. Also there are bugs, probably.
It creates a zip with the previous version of the save in it's directory, but you may still want to back it up manually.
May or may not work with saves from non-English versions of the game. Use at your own risk.
Differences from KSE
Aims to provide the same features and more. Currently WIP. Runs natively on Windows, Linux and in the browser (experimental, using wasm). Mac version should work, but pre-built releases won't be available here. Uses a built-in game database, allowing it to work wihout the game installed. Still capable of loading provided game files for your modding needs. Provided releases assume KotOR 1 Community patch and KotOR2 TSLRCM. Support for the updated steam version of TSL, including workshop. Does NOT support xbox and switch saves. See "Contributing" section. Contributing
If you encounter a bug or have a suggestion, please open an issue on github.
I would like to add support for the console versions, but I don't own any of them. If you're willing to provide save files and help with testing, please open an issue.
Thanks
Thanks to KSE , NWN Wiki, KotOR.js and xoreos projects for providing references on where and how to get the required game data.
354 downloads
- saves
- save editor
- (and 1 more)
(0 reviews)0 comments
Updated
-

gui Lightweight GUI Patcher
By th3w1zard1
A very simple CLI-based tool that'll take a folder of GUIs made for one resolution and patch them to work for another resolution. Please report any bugs.
Simply input the path to the GUI file (or folder of GUI files) and the output location, your desired resolution, and let it work.
GUI Resizer CLI Tool
Overview
This is a simple command-line interface (CLI) tool designed to adjust and scale GUI (Graphical User Interface) files based on different screen resolutions. The tool reads `.gui` files from the popular game Star Wars: Knights of the Old Republic and adjusts the layout to fit various resolutions and aspect ratios. It supports multiple resolutions and can handle batch processing of files.
Features
Multi-Resolution Support: The tool can adjust GUI files to fit several resolutions across different aspect ratios, such as 16:9, 16:10, 4:3, 5:4, 21:9, 3:2, and 1:1. Batch Processing: You can process multiple GUI files at once, making it easy to adjust a whole directory of files. Logging: Outputs logs to track the processing of files, including which resolutions were processed and where the output files are saved. Cross-Platform: Works on Windows, Linux, and macOS with Python 3.8+. Usage
Basic Command
To run the tool, use the following command:
python3 gui_resizer.py --input <input-path> --output <output-path> --resolution <resolution> Parameters
--input: The path to the `.gui` file(s) you want to process. You can specify a single file or a directory containing multiple `.gui` files.
--output: The directory where the processed files will be saved.
--resolution: The target resolution(s). Use the format `WIDTHxHEIGHT` (e.g., `1920x1080`). You can also specify `ALL` to process all common resolutions.
Example
To convert all `.gui` files in the directory `input_files/` to fit a 1920x1080 resolution and save them to the `output_files/` directory, run:
python3 gui_resizer.py --input input_files/ --output output_files/ --resolution 1920x1080 Logging
If logging is enabled, a log file named `output.log` will be created in the specified output directory. This file will contain details of the processing operations performed.
How It Works
1. Input Handling: The tool takes in `.gui` files or directories containing these files and reads them using the `pykotor` library.
2. Resolution Scaling: The tool scales the GUI elements based on the specified target resolution(s). It calculates scale factors based on the original dimensions of the GUI and applies these factors to resize elements accordingly.
3. Output Generation: The processed GUI files are then saved to the specified output directory, organized by resolution.
Credit:
Cortisol for PyKotor (90% of the code)
DarthParametric for testing and brainstorming the idea
48 downloads
(1 review)0 comments
Updated
-

script compiler knsscomp
By Cortisol
The knsscomp application is intended to be a cross-platform alternative to the various versions of nwnnsscomp that support compiling scripts for KotOR.
If you are using Windows, I would recommend sticking with nwnnsscomp as that is the far more tested and stable solution for compiling script files. That is unless you wish to aid in the development, then continually using knsscomp will help find out bugs and make it stabler program overall.
If you do encounter an issue with a compiled (such as the script not working the way intended in-game) and you have access to nwnnsscomp, then it is recommended to see if it works correctly if compiled with that program instead. If you believe the issue is with knsscomp itself, send the script file to Cortisol on Deadlystream or Discord and he will investigate.
This compiler has the include scripts and nwscript data embedded within the program and so it is not necessary to bundle them in the app folder. You can, however, include nwscript with the knsscomp as a way of the program automatically determining what game version.
The optimize flag currently does nothing and is there as a placeholder for future versions to use.
37 downloads
-

JdNoa's AniCam (Beta 3)
By JumpStationZ
Part of the...
AniCam
Author: JdNoa - [contact info in read-me]
Notes on dlg fields compiled from observations by Tupac Amaru, Dashus, and JdNoa.
Tupac Amaru did most of the testing for this. Thanks!
Thanks also to tk102 for updating DlgEditor for us & Darth333 for passing it along quickly. It made testing *much* less painful.
Thanks to several people for their notes/code about the mdl format: Torlack for notes on binary mdl and for NWNMdlComp, sorcerer for notes on ascii mdl, and cchargin for MDLOps.
---------------
Version
---------------
Beta 3 - Dec 1 2005
History: beta 3 should fix the bug where cubic interpolation treats angles as numbers and so interpolates the wrong way across the 360 degree mark.
---------------
Description.
---------------
AniCam is an internal tool used by TSLRP (The Sith Lords Restoration Project). It is being released to the public "as is". There is no warranty, implicit or explicit, of any kind.
AniCam is an animated camera editor for KotOR 2.
Animated cameras are just models in a specific format. AniCam lets you open & edit existing camera models or create your own. You can then use the animated camera model in a .dlg.
---------------
Installation
---------------
Requirements:
JRE 1.5 or newer. (Developed with 1.5.0.04).
AniCam will not run with JRE 1.4.
Simply extract this zip to your preferred install location and run the jar file, AniCam.jar.
---------------
Uninstallation
---------------
Delete the files that came in the .zip, plus the configuration file anicam.conf (if it was created).
---------------
1. How to use AniCam:
---------------
--- 1a. Basics:
Fill in your desired camera name and the length in seconds of the camera shot.
Add entries for your camera. An entry needs the time in seconds, position as x,y,z, and orientation as h,p,r. (heading, pitch, roll).
To add an entry, select "insert row" from the Edit menu or type ctrl-i.
Orientation is done in degrees. Straight ahead is (0,90,0). Left is (90,90,0). Right is (-90,90,0). And so on.
If you're getting position from WhereAmI, keep in mind that the Z location given is lower than what you see (I think it's the location of your feet). You probably want to add 3 or 4 to get a shot at eye level.
When you have all of your entries, select save from the file menu. The files cameraname.mdl and cameraname.mdx (which is an empty file) will be created. These can go in your override folder.
To use the new model, set the camera model field in a dialog, then in the dialog entry/entries that will have the camera shot, set the CameraID to -1, use CameraAngle 4, and set CameraAnimation to a useful number (probably 1200 or 1000: see part 2 for details).
An example:
Entry Time x y z h p r
1 0.0 -70 20 3.5 0 90 0
2 3.5 -70 30 3.5 70 90 0
3 4.5 -70 31.5 3.5 50 45 0
4 6.5 -72 31.5 3.0 30 0 0
with animation length 7.5.
This will (1) start looking straight ahead,
(1)->(2) move along the y axis and rotate left,
(2)->(3) rotate right and down while moving a little more along the y axis,
(3)->(4) rotate right and point straight down while moving a little along the x axis,
then (4) hold position for 1 second.
-- 1b. Interpolation:
If interpolation is selected, then when you save, extra intermediate entries will be generated to smooth out changes in position and orientation. So, if your entries have the camera going straight forward, and then moving left, instead of an abrupt transition from forward to left, the camera will move in a curve.
If interpolation is not selected, what you entered is what you get. Sudden changes in direction will be abrupt.
-- 1c. Importing:
You can import from a binary model, an ascii model, or xml.
For both binary and ascii models, I'm only looking for the data found in the standard animated camera models. This means that there is a single node, called camerahook, with animations called CUT###W (where ### is a number, usually 001), which has positions and orientations. The import routines can't handle anything else - no mesh nodes, no emitters, etc.
(Note that, if you're looking at the original camera models, importing 003EBOcam.mdl will fail because they misspelled "camerahook" - the camera won't work in-game, either.)
The XML import is *very* limited and has pretty much no error checking. It was set up to import data from Excel. If you enter your time, position, and orientation in Excel - like on the main screen for AniCam, but without the "entry" field - and then save as XML, you should be able to import into AniCam.
---------------
2. Indices, Multiple Animations, and your Dialog
---------------
-- 2a. Multiple Animations and their Indices
One camera model can have multiple animations. As a .dlg file can only have one associated camera model, this lets you do multiple animated camera shots in one dialog. (An example: kreiatch.dlg in 301NAR uses 2 of the 3 animations from 301narcam).
Each animation has a name of the form CUT###W, where ### is a 3-digit number. The number should be 001 or greater. If there is only one animation, usually the single animation is called CUT001W. This is not required (101percam uses CUT002W).
When you add an animation to your camera model, the ### is what you're putting in the "New Index" box - so if you enter 5 and click New Animation, you'll get a new animation called CUT005W.
-- 2b. Some general notes on using animated shots
1. Once you start an animated camera shot running, it *keeps* running, in real-time, even if you've switched to static shots. If you do 'start animation'->static shot->'continue animation', the second animated shot will probably be at a different position/orientation if the user clicked to skip one of the earlier nodes in your dialog, or if they had to choose a response.
2. Only one animation will run at a time. If you 'start animation' with CUT001W, then 'start animation' with CUT002W, then 'start animation' CUT001W again, the final call will start back at the beginning of CUT001W's camera shot... it won't pick up where it left off the first time. And if you do 'start animation' CUT001W -> 'start animation' cut002W -> 'continue animation' cut001W, the 'continue animation' will continue with cut002w, not cut001w. Once you start a given animation running, it's the only one you can use until you start another one.
-- 2c. Your .dlg file:
Useful fields are Camera Model in your dlg header, and CameraID, CameraAngle, CameraAnimation, Delay, and WaitFlags in your entries.
-- 2c.1 Camera Model
In the dialog header ("General Properties" in DLGEditor), set the Camera Model to your new camera's name.
-- 2c.2 CameraID and CameraAngle
Every node that is animated uses CameraID -1 and CameraAngle 4.
(Although all the Obsidian .dlg's use CameraAngle 4, other CameraAngle values will also work.)
-- 2c.3 CameraAnimation
You also need a CameraAnimation field in each entry using an animated camera shot.
CameraAnimation is where you specify which animation to use if you have multiple animations.
'start animation' is 1200, 1201, etc.
To start CUT001W running, use CameraAnimation 1200. To start CUT002W, CameraAnimation 1201. And so on.
'continue animation' is 1000. Or 1001, 1002, but...
...in the official .dlg's, at the very least, 1000, 1001, 1002, and 1401 are used - but testing doesn't show any difference in using them. If you start with 1200, then call 1001, it's not going to jump to the other animation. If anybody sees a difference between these, please let me know!
-- 2c.3a Start/Continue and the end of the animation
Your animated shot is 20 seconds long, but you gave the user a choice of responses in between animated shots, and they took 30 seconds to pick a line. What do animated .dlg entries do after the end of the animation?
If the entry is set to 'continue animation', it will hold the last position/orientation from the animation.
If the entry is set to 'start animation', it will re-start the animation. You could probably do some looping with this.
If you reach a 'start animation' entry and the current animation hasn't finished, the behaviour depends on which animation you specify. If it's the same one that's already running, it won't restart - it'll continue, acting like a 'continue animation' entry.
-- 2c.4 WaitFlags
If you set WaitFlags to 1 and use 'start animation', the entire camera shot (or the remaining portion) will be used in one entry. This won't work if you use 'continue animation'.
If you leave WaitFlags at 0, the camera shot will run for as long as the entry does, so you can either have VO or set the Delay field.
(WaitFlags = 3 is used in kreiatch.dlg, but I've seen no difference between WaitFlags=3 and WaitFlags=0 in my testing).
Setting WaitFlags doesn't block the user from skipping the entry.
-- 2c.5 Delay
If WaitFlags is not 1, the animated shot in your entry will last as long as the VO lasts, or for the length of your Delay field if it's set. If there's no VO, like the long animated shot of the ruined Dantooine enclave, then you'll want to set Delay to specify how long your camera shot lasts. Delay is set in seconds. Note that if you set Delay=0, it seems to override your VO length, so it may skip lines. If you're not using Delay it should be -1, not 0.
-- 2c.6 CamVidEffect doesn't work
CamVidEffect will *not* be applied to animated camera shots, but you can use a script to turn video effects on and off. Check out the first two nodes in intro.dlg in 001EBO: they call a_video_effect to turn T3M4's freelook on and off. (Notice that the developers tried to use CamVidEffect!) The a_video_effect script simply calls EnableVideoEffect(VIDEO_EFFECT_FREELOOK_T3M4) or DisableVideoEffect(). Don't forget to disable your video effect, or it will stay on forever.
---------------
3. Some examples from the original files:
---------------
These are a few places where camera models are used in different ways:
kreia_kr.dlg in 701KOR has a camera shot that spans several entries. Under "{Intro to 701KOR...", it starts at "{Animated camera begins}" and ends at "{Angry at end...".
kreiatch.dlg in 301NAR has an animated camera that plays intermittently. It has animated angles followed by static angles followed by animated angles. It also uses two different animations, CUT001W and CUT003W.
enc_ruin.dlg in 605DAN consists of one long animated shot.
44 downloads
(0 reviews)0 comments
Submitted
-
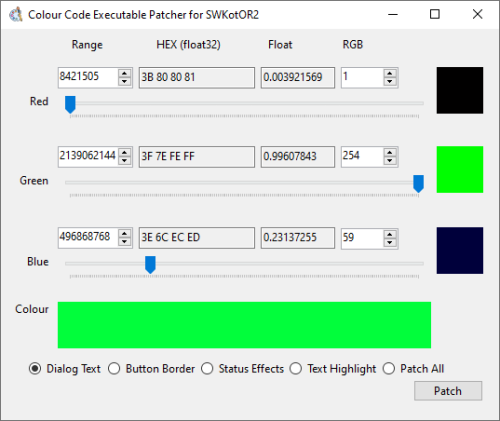
Colour Code Executable Patcher for SWKotOR2
By Thor110
Relish in the fact that you can now make the dialog text and highlight text colours whatever you want them to be!
With just the press of a button this tool will update the hard coded values within the executable for you!
Limitations imposed upon the Aspyr version of the game are that the Red value for the dialog text must lie between 8 & 31.
But there is no issue when updating the legacy versions of the game, provided you use the editable executable as I don't support editing the executable that comes with LegacyPC Steam or the Disc version of the game as they are slightly different, but the editable executable is essentially identical.
I made this tool to automate updating the hard coded colour codes contained in the executable for SWKotOR2.
Requires .NET 8.0!
Just put it in the game folder, next to the swkotor2.exe file and it will detect which version of the game you have when you click patch.
It detects what version of the game you have by checking for certain files, check the source code if you want to know more.
I advise against patching all the colours at once, but I provided an option just in-case anyone wanted to do this.
I also suggest looking at my written documentation, some values such as text highlight effect one another and the various different versions of the game are all slightly different, it's also possible that I have things slightly wrong here and there, feel free to let me know if you find out more.
More information on patching the values manually can be found in my tutorials here : https://deadlystream.com/topic/6886-tutorial-kotor-modding-tutorial-series/
In Tutorial : "24 - [ADVANCED] - Hard Coded GUI Elements"
For Steam LegacyPC users and users of the original Disc version of the game, please use the editable executable which can be found here : https://deadlystream.com/files/file/1321-kotor-2-editable-executable/
I released a new version on GitHub, functionally it is practically identical, I just removed the "Patch All" option and made a slight improvement to the way it detects the version of the game, there's no real need for me to update the version here as it is just an improvement to the code for the program.
Source code for the tool can be found here : https://github.com/Thor110/HexColourSlider
Thor110
14 downloads
(0 reviews)0 comments
Updated
-
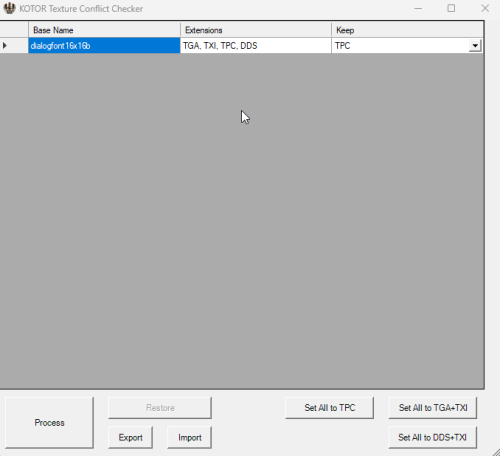
Texture Conflict Checker
By Jiiprah
Texture conflict checker for K1 and K2. Place in your game directory and open it. It will list all conflicting textures, in the override folder, and allow you to choose which version to keep. Unwanted textures are moved to a texture_duplicates folder and can be restored through the tool.
Source: https://github.com/J0-o/kotormods/tree/main/Texture Conflict Checker
21 downloads
(0 reviews)0 comments
Updated