Search the Community
Showing results for tags 'photoshop'.
-
Atton Sleeve Upscaling Advanced Techniques
-
I'm giving my TSL a much needed visual fresh-up. Peragus turned out fine, and I'm doing exactly the same with Telos (more exactly, grass and dirt), but Telos' files don't change in the game. * I'm using Kotor Tool to extract game textures from the ERFs. * I edit them in Photoshop CS2 (really just pasting over) and save them as .tga. * I'm making sure to merge all layers. * I'm saving in a custom folder in Override. Works fine for Peragus, but not for Telos. Not when I save them in different folders, the same folder, or put them directly in Override. Any ideas?
- 11 replies
-
- textures
- kotor tool
-
(and 3 more)
Tagged with:
-
Greetings, fellow modders! As I sit at my computer editing various textures in Photoshop, I often discover some interesting techniques for upscaling the KotOR games' low resolution/compressed images, and I hope to share some of my experience here. Some of these techniques might also be accomplished using GIMP or any other image-editing software. Optionally, you may wish to extract the relevant model into a 3D package to preview your various changes. We will begin on T3-M4 to demonstrate the two most useful techniques: edge-redrawing and edge-smearing. Extraction/Setup Edge-Drawing Edge-Smearing Part II has been posted.
-
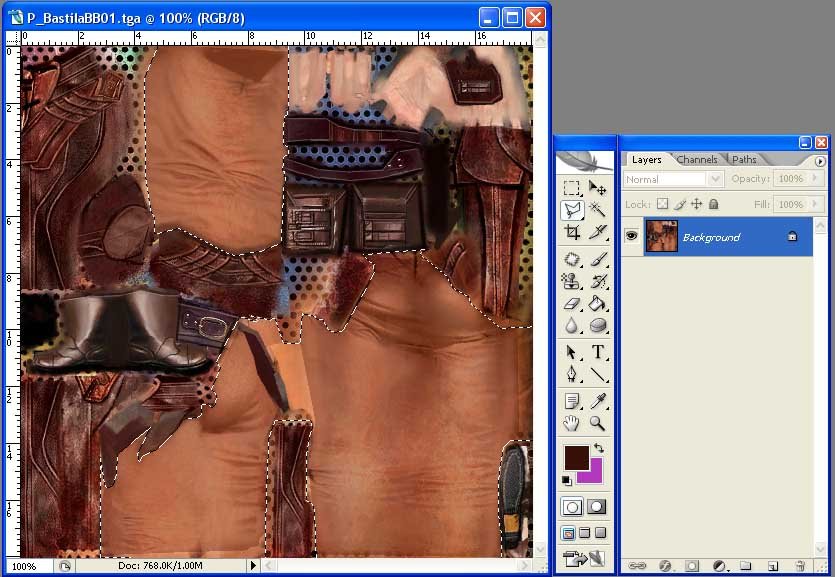
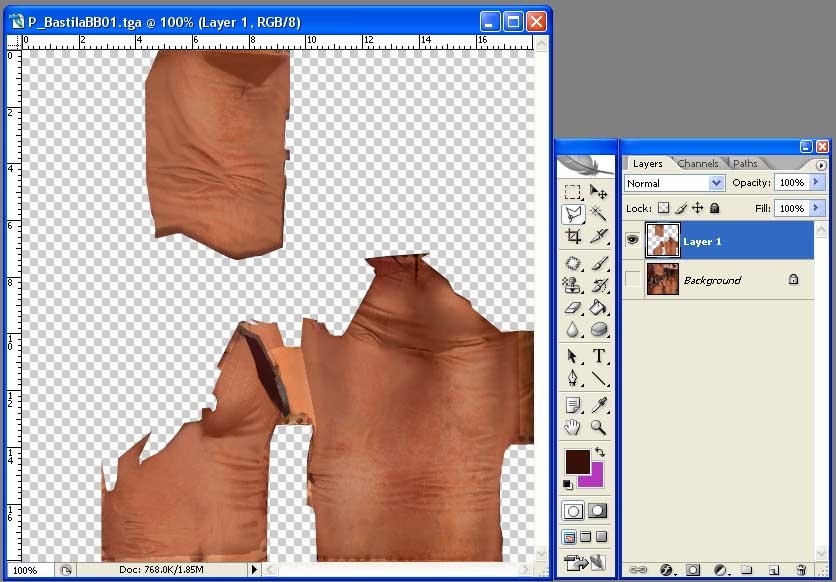
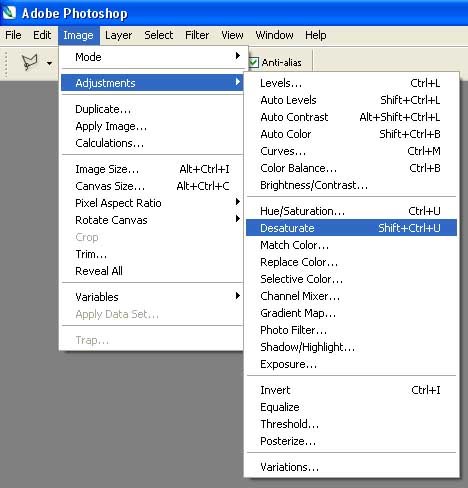
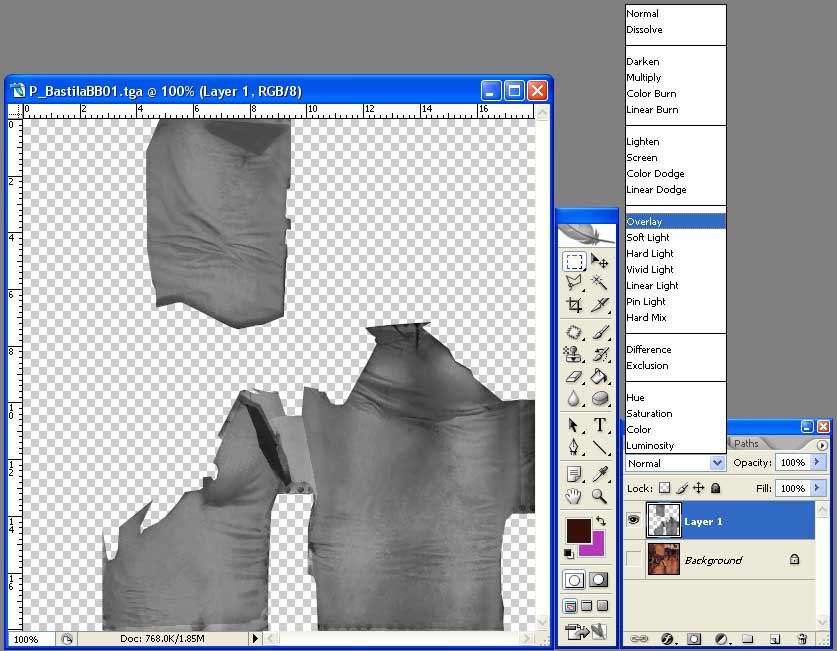
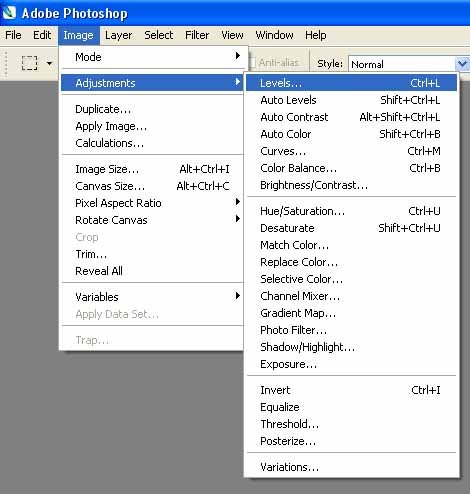
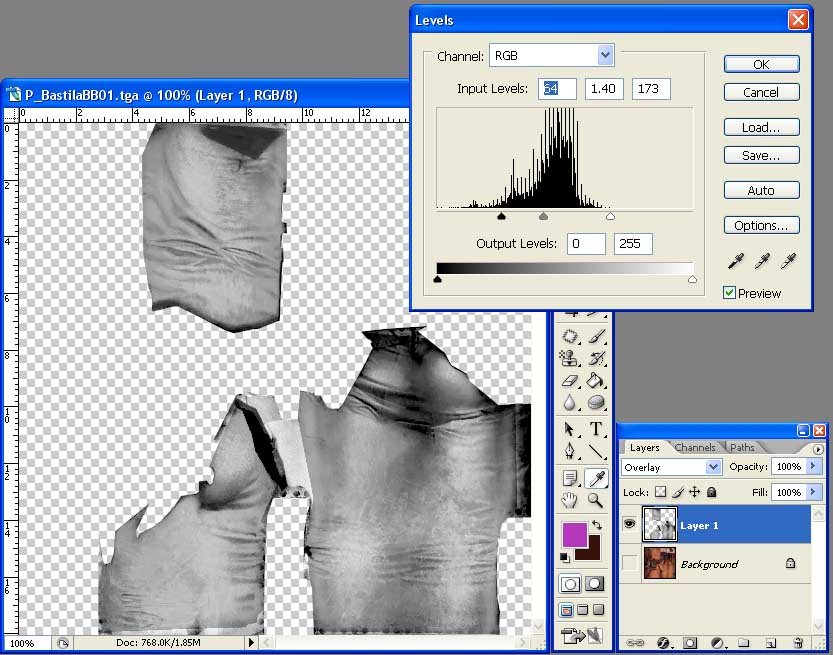
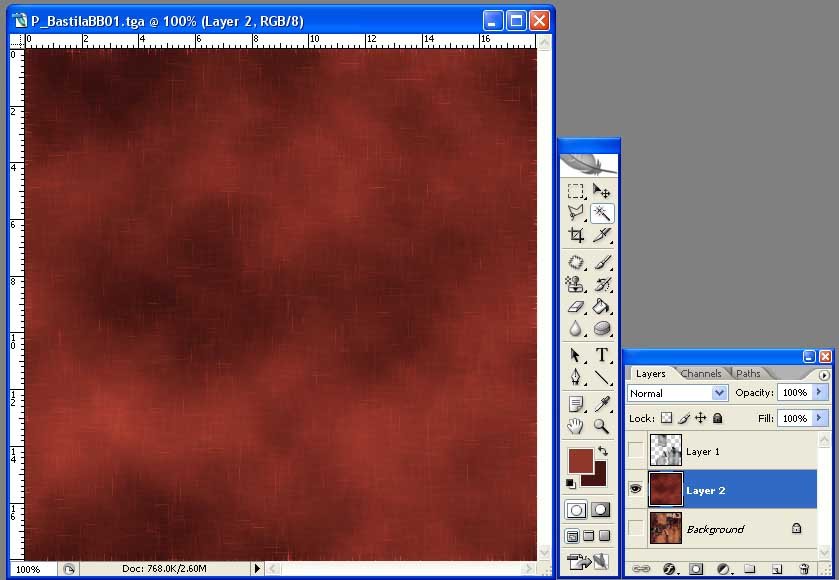
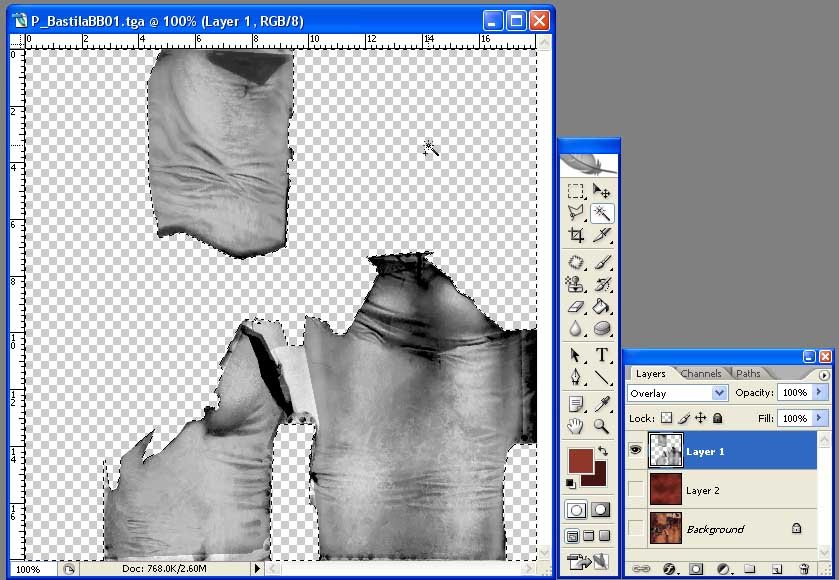
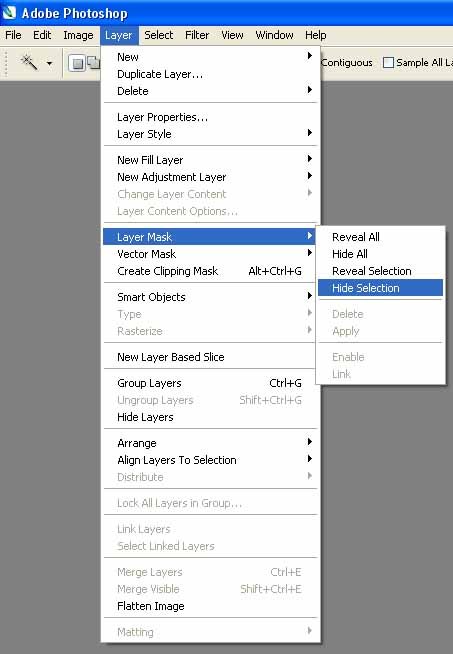
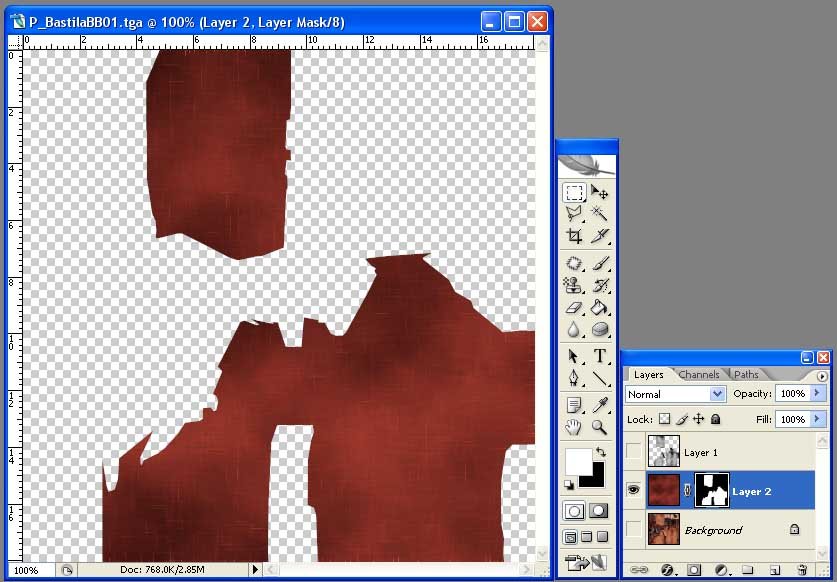
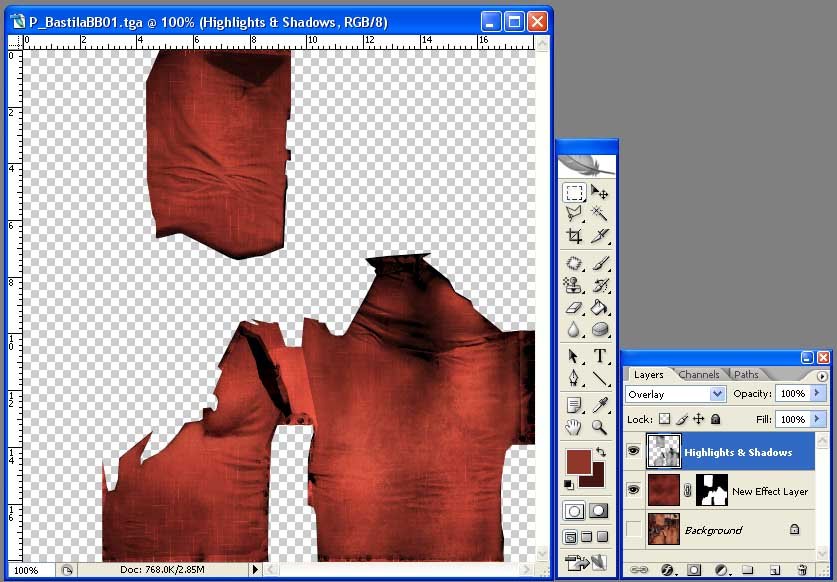
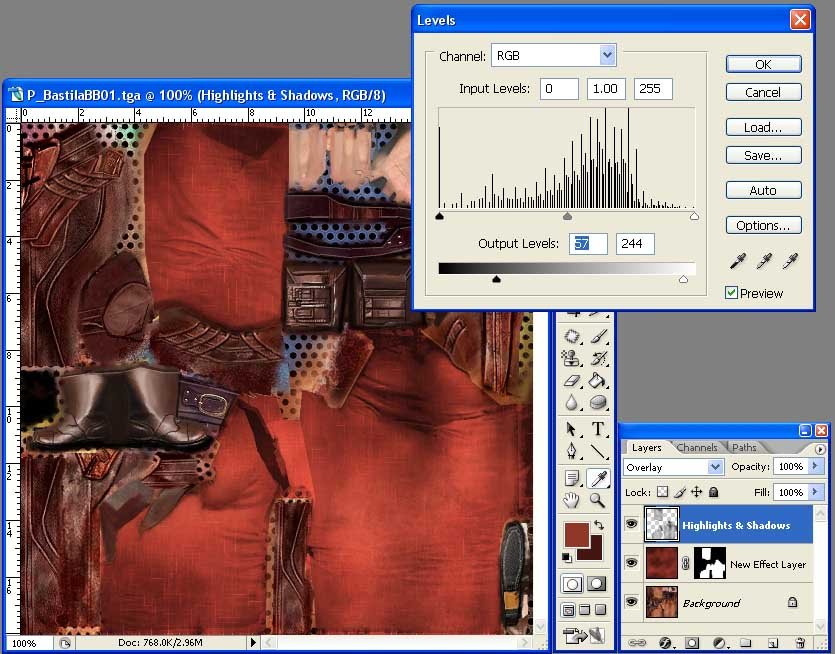
This is a Tutorial I made back in the day for Lucas Forums. I have copied it here for new modders. This is how I maintain shadows in newly textured areas: Step 1: Open the file you want to work on (in this case P_BastilaBB01.tga). I usually save it right away as a Photoshop file, and rename it. Step 2: use the selection tools to outline the area you want to work on (see the dashed outline in the image above). Then create a new layer (for now it is called Layer 1 by default). Step 3: desaturate the new layer. This will make the layer appear as greyscale. Step 4: set layer 1’s Blend Mode to “Overlay”. This will make Layer 1 affect the layer directly below it. Now, the shadow areas will cause the layer below to become darker (aka “multiply”), and the highlight areas will cause the layer below to become lighter (aka “screen”). The closer to middle grey on this layer, the less the layer below is affected. Step 5: in order to increase the contrast, I usually use the Levels adjustment, so that I have a little more control. On the histogram in the middle, there are three sliders that control the Input Levels. By sliding the black one to the right, all the dark areas become darker. Sliding the white one to the left makes all the light areas whiter. When you slide the grey one to the left, more contrast. Slide it to the right, less contrast. Step 6: create any new texture you want on a new layer (in this case, a simple render clouds filter followed by the water paper filter). On its own, it looks fairly flat and lifeless. (I’ve also turned Layer 1 off for now.) Step 7: select the blank area of Layer 1. With this area selected, make Layer 2 active again. Then create a "Layer Mask". A layer mask controls layer transparency. Here you can see the layer mask as a little black & white picture next to the layer thumbnail. Basically, the white areas are 100% opaque (100% visible). The black areas are 0% opaque (0% visible). Any greys will be partially transparent. (Advanced: you can edit the mask by clicking on its thumbnail, and painting with white, or erasing with black.) Step 8: now that layer 1 is turned back on (renamed to Highlights & Shadows Layer) it will cause layer 2 (renamed to New Effect Layer) to have a little more three dimensionality instead of being relatively flat. Step 9: if the highlights and shadows seem too harsh or contrast, they can be readjusted using Levels again. Here, the bottom two sliders are used, and they change the Output Levels. As the black slider moves to the right, all the dark areas of the layer become more grey (lighter). Similarly, as the white slider moves to the left, all the white areas of the layer also become more grey (darker).
-
Does anybody know where I can get a cubemap for a Drexl? I'm working on some textures and I feel that this is the biggest thing missing. I was about to download the Modders' Resource Cubemap Pack but I wanted to make sure first. Plus, I don't have a clue on how to build one myself... Thanks!
-
I've been doing some random retexturing, mostly for myself as I get practice. First thing I've been doing is increase all textures to 1200 X 1200. Most re-works I've downloaded ended up being 512 X 512. So...what is the max resolution recommended? My 1200 X 1200 PC looks pretty awesome... Just wondering if it causes issues moving forward...


