JCarter426 1,263 Posted June 18, 2016 This is a repost of an old tutorial I did on LucasForums. The original discussion thread is HERE. This tutorial will go over the process of ripping heads from a full body model, as I did in my modding resource JC's Heads for K2. Through this method, we'll be able to take a Duros character and let him use any body model in the game, just as most human characters as well as Twi'leks and Devaronians can. No longer will he be cursed to wear a white jumpsuit.I'll note that at the time I'm writing this, I have only made heads for Knights of the Old Republic II: The Sith Lords. But I believe the process is the same for the first game.Tools you will need: KOTOR Tool MDLOps 0.7a2 (or later) a 3D modeling program that supports NWMax (such as 3ds Max or Gmax) NWMax a hex editor To start, extract the model you want to turn into a head. In this case, n_duros. Extract both the MDL and MDX files.Next, extract a head to use as a template. It should be similar to your final result, so that means roughly the same size, and at least the same gender. Make sure to get one with the mask and goggle hooks already on it. I like to use Atton's head, as that makes it easy to test as well. Again, extract both the MDL and MDX.Now extract the texture for your head. In this case, N_Duros01. Save as TGA.Place all these files in a folder somewhere, then convert each model to ASCII using using MDLOps.In your modeling program, import your head template model (mine is P_AttonH). Import geometry only.Immediately save this project.After it saves, delete all the highlighted items below. The names will differ slightly depending on which head you're using, but the stuff you keep should all be the same (except the Aurora base, which has the name of the model). 1 Quote Share this post Link to post Share on other sites
JCarter426 1,263 Posted June 19, 2016 Now save this as a new project. In a new project, import your full body model (mine is N_Duros).Now delete everything except the highlighted items below. Again, it will differ from model to model. What you're trying to keep is the object necklwr_g and all its children, as well as the head geometry - called here simply "head", but it may be "Head_Geo" or even part of "torso".This head is already its own object so that's it. Other models have the head as part of the torso - but that's fine, as you can simply delete all the vertices below the neck for those. In any case, save this project once you're finished.With this project still open, go to File -> Merge and import everything from your head template project (mine was Head Template Male).Select necklwr_g and link it to torsoUpr_g with the Select and Link tool.Now it should look like this. Next, select the head geometry and the Aurora base (here, P_AttonH). Link them using the Fast Linker tool in NWMax.Now save this as a new project. There's a point to all these separate files, I assure you. Quote Share this post Link to post Share on other sites
JCarter426 1,263 Posted June 19, 2016 Open your original head project (Atton Template for me). Select and rename everything with Tools -> Rename Objects. Add a prefix, something that makes it obvious which head these objects belong to.Now merge it with everything from your head project (I called mine Duros Head 1).With that imported, you should see one head at the origin and one above it. Select everything on the top half and move it down. Make it overlap the other head as much as it can.Now that everything is in position, you can link the MaskHook and GoggleHook helpers to head_g with the Select and Link tool.For this next part, hide everything except the two head geometries to make it easier to see them. Then you need to turn on the Snap Toggle so you can snap to vertices.Select your new head geometry and go edit the editable mesh. Move each vertex along the bottom circumference of the neck into the corresponding positions on the template head.These two heads have the same number of vertices so it's pretty easy. If you're not so lucky, you might need a bit more modeling skill to get them in place. You may also have to adjust the vertex weighting, which is not very fun. I didn't have to for the Duros, or the majority of the heads I've done so far, so I'm not going to cover that here.I also decide to scale down the second layer of vertices to match Atton's neck more closely, so there isn't a bulge.Once you're satisfied with your vertices, unhide everything and then delete all the objects in the template head. You won't need them anymore.The Duros model was lacking a texture, so I applied one here using the material editor. I notice his head includes a turtleneck, so later I might remap the model to remove it. Or maybe Duros just get cold easily.Now, this part is important. I only learned this through experimentation, because frankly it's not a very intuitive part of the design.Animations are applied to the head and body separately, meaning you can end up with each part playing entirely different animations if you don't give them the same setting. We don't want the Duros to use Atton's animations, so I change the supermodel to S_Female02, the default male supermodel. We do this by selecting the Aurora base and changing the text in the box next to Super in the MDL Base Parameters.We could change it to something else if we like; I might decide I want the Duros to retain his hunched over posture... if so, I would make some new body models that use those animations and then set the head's supermodel correspondingly.Now's a good time to save again. I save in different slots; that way if I screw something up, I won't have to start over from the beginning.I also notice the goggle and mask hooks are most certainly in the wrong places, so I reposition them. There's only so much I can do, however, as the shape of the head is just too different from a human's; only the breath mask looks any good.When you're finished editing, select the Aurora base and export as geometry only. Export it anywhere except in your folder, so you don't accidentally overwrite something.Now rename your file to something new - again, so you don't overwrite. The naming scheme I use is the original model name, plus "-ascii", plus "_new". Move this file to your folder now. Quote Share this post Link to post Share on other sites
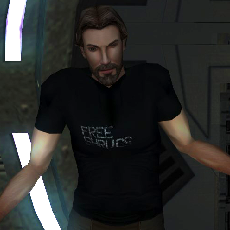
JCarter426 1,263 Posted June 19, 2016 Here's my folder and its contents so far.Now it's time to convert this file with MDLOps.Load your edited ASCII file, then read and write. MDLOps will generate a new MDL and MDX. Run the Head Fixer on the MDL.The Head Fixer creates a new, fixed MDL file to put the animations back. Rename the fixed MDL and the MDX file from the previous step to whatever you want. However, the file name must have the same number of characters as the original (in this case 8). You could get around this by renaming before you export, but it requires more setup work, so I resign to keeping it the same.Once you've chosen your name, open the MDL in a hex editor. Find and replace the original name (mine was P_AttonH) with your new name (mine is JC_DuH01). Be careful to only replace characters, not delete them; that would break the model and cause your game to crash, most likely.There are 5 Duros textures in the game, so at this stage I use the same process to create duplicate models for each texture variation.After some 2DA editing to get the head in the game, or in my case simply keeping it as P_AttonH for a quick test, we can see our final result:Behold, a new head that can go on any body.You can use roughly the same process to create new full body models if you like, mixing heads and bodies from different models. That's what I did for the Handmaiden Sisters and I've made a tutorial here.So, go make new heads, and good luck! 4 Quote Share this post Link to post Share on other sites